DIGITAL VIDEO SURVEILLANCE RECORDER
English Version
THE ECONOMICAL SOLUTION TO PROTECT YOUR HOME OR BUSINESS
Instruction Manual
RISK OF ELECTRIC SHOCK DO NOT OPEN
to receive product updates and technical support
Online
By Phone
Mexico
Por Teléfono
NECESITA AYUDA
VOUS AVEZ BESOIN D’AIDE?
En Línea
LOREX IS COMMITTED TO FULFILLING YOUR SECURITY NEEDS
THIS PRODUCT MAY REQUIRE PROFESSIONAL INSTALLATION
to receive product updates and technical support
BEFORE YOU START
ANTES DE
CE PRODUIT POURRAIT EXIGER UNE INSTAL- LATION PROFESSIONNELLE
ESTE PRODUCTO PUEDE EXIGIR UNA IN- STALACIÓN PROFESIONAL
AVANT DE
Installation
Important Safeguards
Service
FCC CLASS B NOTICE
General Precautions
Features
Digital Video Recorder Features
Connectivity Features
Mouse Control Remote Control 16 Channel Starting the System
Table of Contents
Getting Started Front Panel Rear Panel Basic Setup
Connecting Cameras
Display
Alarm
Managing Passwords
Using the Main Menu
Advanced
Remote Connectivity
Remote Viewing
Mobile Apps
Appendix A System Specifications Appendix B Networking Checklist
Appendix D What is Port Forwarding?
Lorex Player 11
Appendix K Full Connectivity Diagram
Appendix E Internet Setup Wizard PC only
Appendix H Connecting a PTZ Camera
Appendix I Connecting Additional External Monitors
Page
DVR DIGITAL VIDEO RECORDER
Getting Started
REMOTE CONTROL
The system comes with the following components
5 PTZ
Front Panel
Rear Panel
Step 3 Connect the Ethernet cable
Basic Setup
Step 1 Connect the BNC cameras
Step 2 Connect the mouse
Step 5 Connect the power adapter
Step 4 Connect the display
Step 6 Verify camera image
Local DVR user name and password
Default system password & port numbers
Quick access to system information
Step 7 Set the time
Table Mount
Connecting Cameras
Camera Stand Installation
Installation Tips
To connect or remove a BNC connector
Connecting BNC Cameras
Connecting and Removing BNC cables
To install BNC cameras to your system
2 Right-Button
Mouse Control
PAUSE/FRAME
Remote Control 16 Channel
4 Playback Controls
PLAY
To power the system OFF
Password
Starting the System
To power the system ON
Prerequisite
Restoring the system’s resolution if you see a blank screen
Adjusting the DVR’s Output Resolution
To restore the DVR’s default resolution
Using the On-Screen Display
Using the Menu bar
About the menu bar icons
To access the menu bar
To use the Virtual Keyboard
Using the Virtual Keyboard
Date Format Select MM/DD/YY or , DD/MM/YY, or YY/MM/DD
Setting the Date and Time
To set the date and time
2 Click System
Daylight Saving Time Select Enable
Configuring Daylight Savings Time DST
Using a NTP server to set your system time
To enable NTP
Enable Select Enable
To enable audio recording
Recording
Event Recording
Recording Audio
To begin playback
Playback
To back up video
Backing Up Video
On-Screen Playback Controls
To use the on-screen playback controls
3 Configure the following
To start the AVI Generator
Viewing Backed Up Video
Converting Backed Up Video to AVI Files
To install the AVI converter
Save As Start
Managing Passwords
Changing The System Password
To change the admin password
To add a new user
Adding users
Select the menus that the user will have access to
Select which channels will have access to Backup
Preview, Playback and PTZ Control
To open the Main Menu
Using the Main Menu
Changing the position of the channel name
Adjusting the image color
Configuring the Time and Recording Time display
Changing the channel name
Adjusting the video margin
Configuring Sequence Time
Changing the output resolution
Adjusting Transparency
To configure a privacy zone
Adding a privacy zone
To configure pre-recording settings
Configuring Pre-recording Settings
Configuring Backup File Duration Pack Duration
Configuring the recording type Continuous, Motion, Alarm
To change the recording quality of the system
Configuring recording quality
Enabling audio recording
To enable audio recording
Video Playback Controls
Video Search
Search
To search for video on the system
To perform an Event Search 1 Click the Event Search tab
Backing up video files
Event Search
To back up video files
To perform a Log search
Log Search
To configure DHCP and Static IP settings
Configuring Network type DHCP & Static IP
Enabling Auto Port Forwarding
Changing the DVR’s Client and HTTP Port
To set up e-mail notification
Setting up E-mail Notification
Adjusting remote connectivity streaming rates
To adjust the SubStream settings
Configuring mobile connectivity settings
To configure mobile connectivity settings
If you want to use Lorex’s e-mail server
Configuring DDNS settings
To configure the system DDNS settings
DDNS Select Enable
Configuring Motion Settings
Alarm
To configure motion settings
To configure the Alarm tab
Configuring Alarm Settings
To configure PTZ settings
Configuring Hard Drive settings
Configuring PTZ settings
Formatting a USB memory stick
ParitySelectfromNone,Odd,Even,Mark or Space
Protocol Select from Pelco-D or Pelco-P
Changing Date format
Configuring the system date and time
Configuring DST Daylight Savings Time
System
To configure Auto Logout
Configuring Auto Logout
Adding Users & Changing the Admin password
Viewing system information
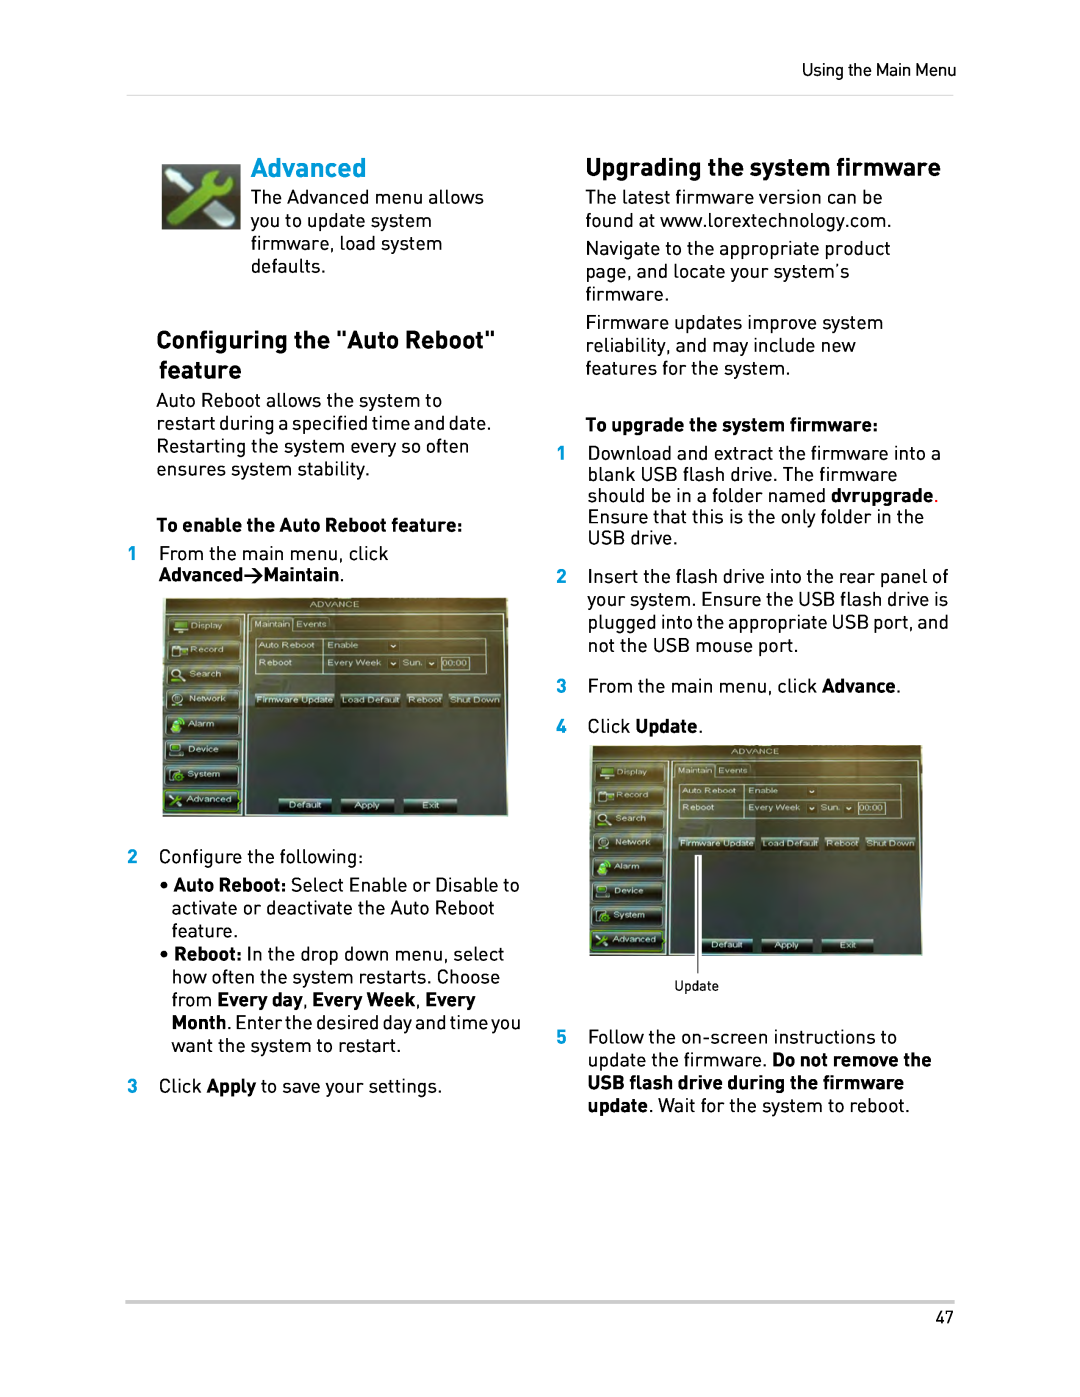
To upgrade the system firmware
Configuring the Auto Reboot feature
Upgrading the system firmware
To enable the Auto Reboot feature
To load system defaults
Loading System Defaults
Configuring system warnings
Restarting or shutting down the system
Page
Mac remote viewing
Remote Connectivity
System Requirements
PC remote viewing
INTERNET
Accessing your DVR within a local network LAN
Prerequisites
To connect your DVR to the Local Area Network LAN
For example
http//192.168.5.11880
Step 1 of 2 Obtain the DVR’s local IP address and HTTP Port
Step 2 of 2 Enter the DVR’s local IP address into the browser
To set up remote connectivity with your DVR, you must
Accessing your DVR Remotely
Step 1 of 4 Port Forwarding
Step 2 of 4 Create a DDNS Account
3 Click Warranties to register your product for warranty
Enter your product and purchase details Click Save Warranty
Enter your address information Click Create Address
Select your address or enter a new address
8 Fill out the My DDNS form
Step 3 of 4 Enable DDNS on the DVR
To enable DDNS in your DVR
2 Click NetworkDDNS
Example of a DDNS address
http//tomsmith.lorexddns.net80
Step 4 of 4 Enter the DDNS Address into the browser
number of your DVR For example
Remote Viewing
Remote Viewing on the Mac
Remote Viewing on the PC
Logging into the system
3 Viewing options
To log in to the DVR
If you receive an error taking a screen shot
Changing Viewing Modes
Taking Screen Shots
To change the DVR’s viewing mode
Recording Video
To record video
To change the save directory of the image or recorded video
To open the sub-menu
Adjusting sub-menu options
Showing & Hiding Channels
To show or hide video in the main video window
To control the PTZ settings on the DVR
Configuring PTZ settings
To playback video
Video Playback PC
Video Playback Controls
1 Click the Remote Setting tabDisplayLive
Configuring OSD Settings
Configuring Privacy Zone Settings
To configure system OSD settings
Configuring Recording Parameters
To configure system recording parameters
1 Click the Remote SettingRecordRec Parameters
1 Click the Remote Setting tab RecordSchedule
Configuring The Recording Schedule
Configuring System Recording Quality
To configure the recording schedule
Configuring Basic Network Settings
To configure basic network settings
1 Click the Remote Setting tabNetwork
Configuring the system Substream
To configure the system’s substream
1 Click the Remote Setting tabNetworkSubStream
1 Click the Remote SettingNetwork Email
Configuring E-mail Notification Settings
Configuring your system to beep during motion
To configure e-mail notification settings
To configure DDNS settings 1 Click the Remote Setting tabDDNS
Configuring DDNS Settings
Changing the Mobile Port
To change the mobile port 1 Click the Remote Setting tabNetworkMobile
Drag the mouse cursor to select desired motion recording area
Configuring Motion Settings
DDNS Select Enable
To configure motion settings 1 Click the Remote SettingAAlarmMotion
Configuring Alarm Notifications
To configure alarm notifications
1 Click the Remote Setting tabAlarm Alarm
1 Click the Remote Setting tabDeviceHDD
Configuring hard drive recording mode
Configuring PTZ Parameters
To configure the hard drive recording mode
1 Click the Remote Setting TabSystemGeneral
Configuring the system time
Changing the system’s menu time out
To configure the system time
Configuring System User Accounts
To configure the user accounts menu
1 Click the Remote Setting Tab SystemUsers
To upgrade the system firmware
Viewing System Information
Upgrading System Firmware
To view system information 1 Click the Remote Setting tabSystem Info
1 Click the Remote Setting tabAdvancedLoad Default
Restoring Default Settings
Configuring Event Settings
To restore the system’s system defaults
1 Click the Remote Setting tabAdvanceMaintain
Configuring Auto Maintain
Changing the save directory
To configure Auto Maintain
Prerequisites
Lorex Player
To install Lorex Player
Minimum System Requirements
Click here to open the Advanced Config menu Add file Remove file
About the Advanced Config menu
Lorex Client 11 Interface Overview
To open the Advanced Config menu
Login Name and Password
Mobile Apps
iPhone
Step 1 of 3 Downloading the App
Step 2 of 3 Configuring Lorex Mobile Eco
Deleting Accounts
Step 3 of 3 Connecting to your DVR
Mobile Apps
Taking Snapshots
Changing channels in Quad View
To take images
3 Pan & Tilt camera PTZ only 4 Zoom in/out PTZ only
Interface Overview
System requirements
Step 2 of 2 Configuring Lorex Mobile Eco
BlackBerry
Step 1 of 2 Downloading the App
Controls
Connecting to the DVR through the Device List
Windows Mobile
Step 1 of 2 Downloading the App
Step 2 of 2 Configuring and Connecting to Lorex Mobile
System requirements
Step 2 of 2 Configuring and Connecting to Lorex Mobile Eco
Step 1 of 2 Downloading the App
Android
Then, touch the channelyouwant to add
Settings
Viewing Controls
Touch +
Step 1 of 2 Downloading the App
Step 2 of 2 Configuring and Connecting to Lorex Mobile Eco
Symbian OS
Play Settings
Appendix A System Specifications
Appendix A System Specifications
I have turned off the system and performed the following
Appendix B Networking Checklist
I have enabled Port Forwarding on my router
I have the following
To enable DDNS on your system
I have configured my system to connect to the DDNS server
I can access my system from a remote PC
I have created a DDNS account for remote access to my system
Appendix C How do I find my IP & MAC address?
Finding Your External IP Address
To find your IP address and MAC address
Router
Appendix D What is Port Forwarding?
NETWORK EXAMPLE
Router
Appendix E Internet Setup Wizard PC only
Installation
To install the Lorex Auto Port Forwarding Wizard
Example
Obtaining Your Router Model Number and Version
Configuration
Initial Startup Select language
Step 1 Populate the router database
Step 2 Enter your router settings
1 Click the Test Your Connection button
Configuring multiple routers
Step 3 Update the router settings
Step 4 Test your connection
Scenario A Router/Modem combination + Router
Scenario B Multiple Routers
EXAMPLE
EXAMPLE
Configuring a DMZ host connection
Example
Locating your Router IP - The Status Page
Example
Appendix F Assigning A Static IP To Your DVR
What’s the difference between DHCP and Static IPs?
DHCP
Step 1 of 2 Enter the desired static IP address in the DVR
Setting up a static IP
Scenario Example
Static IPs
Prerequisites
Static DHCP Select Enabled and then click Apply
About IP Ranges
Step 2 of 2 Enter the desired static IP address in the router
To enable the Auto Port Forwarding feature
Appendix G Auto Port Forwarding Router Compatibility List
Appendix H Connecting a PTZ Camera
To enter PTZ camera settings in the DVR
To connect a PTZ camera to the system
Press & hold 6 sec
Using the PTZ Menu Local DVR
Appendix H Connecting a PTZ Camera
To control the PTZ camera locally on your DVR
BNC to RCA adapter
Appendix I Connecting Additional External Monitors
Appendix J Recording Audio
Connecting Audio Cameras
16 Channel Model
Appendix K Full Connectivity Diagram
Appendix L Replacing the Hard Drive
Removing the Hard Drive
To remove the hard drive
This step cannot be undone To format the hard disk
Replacing the Hard Drive
Formatting the Hard Drive
To replace the hard drive
Year
Why is the DVR timestamp important?
Appendix M Daylight Saving Time on your DVR
When should I adjust my system clock?
Appendix N Remote Viewing Mac
Appendix N Remote Viewing Mac
Remote Viewing on the Mac
Prerequisite
3 Viewing options
Launching Lorex Player Mac
Viewing recorded video files
Lorex Player Mac interface
To install Lorex Player Mac
To load multiple video files saved onto your hard drive
Loading Individual Video Files
Loading Multiple Video Files
To load files saved onto your hard drive
ch type
Video Playback Mac
To playback video
Select year Select month Select date
Configuring the system
Solutions
Troubleshooting
Troubleshooting
Error
Solutions
Troubleshooting cont’d
Troubleshooting
Error
Page
1 - 8 8 8 - 4 2 - L O R E X 1 - 8 8 8 - 4 2 5 - 6 7 3
WITH A FULL RANGE OF CAMERAS & ACCESSORIES
EXPAND AND CUSTOMIZE YOUR SYSTEM