Copyright Notice
TransPort LT User’s Guide
BGJ
User’s Guide Copyright Notice
This page intentionally left blank
Table of Contents
Drive Image System Requirements
155
149
159
161
This page intentionally left blank
Purpose
Welcome
Further Reading
Areas Covered
Welcome Areas Covered
Manual Conventions
Warranty
Manual Comments
Special Text
This page intentionally left blank
Unpacking the TransPort
Getting Started
Getting Started Unpacking the TransPort LT
System Information
Personal Inventory
Getting Started Personal Inventory
Address
Getting Started Heat, Cold, Humidity, and Glare
This page intentionally left blank
Getting Started Operating Environment
Operating Environment
This page intentionally left blank
Introducing Your TransPort LT TransPort LT Features
TransPort LT Features
Introducing Your TransPort LT
Bottom View of Computer
Connecting the AC Adapter
Using Your Computer for the First Time
Turning on the TransPort LT
Turning On the Computer’s Power
Understanding Post
APM Mode
Adjusting the LCD Display
Introducing Your TransPort LT Adjusting the LCD Display
Turning Off Your Computer
Introducing Your TransPort LT Tips for Using Your Computer
Tips for Using Your Computer
Click Shut Down
Introducing Your TransPort LT Traveling with Your Computer
Traveling with Your Computer
Introducing Your TransPort LT Handling Spills
Introducing Your TransPort LT
Using the Keyboard
Using Special Function Keys
Using the Embedded Numeric Keypad
Introducing Your TransPort LT Using the Keyboard
Fn Key Function Combination
Using the Touchpad
Using the Touchpad
Mouse Action How To
Reading the System Status Lights
Describes the meaning of the lights System Status Lights
Introducing Your TransPort LT Connecting Peripheral Devices
Connecting Peripheral Devices
IconConnector
Using the Flex-Bay
Using the SmartBay Utility
To Install a Device in the Flex-Bay
To Remove a Device from the Flex- Bay
Introducing Your TransPort LT Using the Floppy Drive
Using the Floppy Drive
To start the SmartBay utility
To insert a device Open the SmartBay Hotswap Utility
Inserting a Floppy Disk
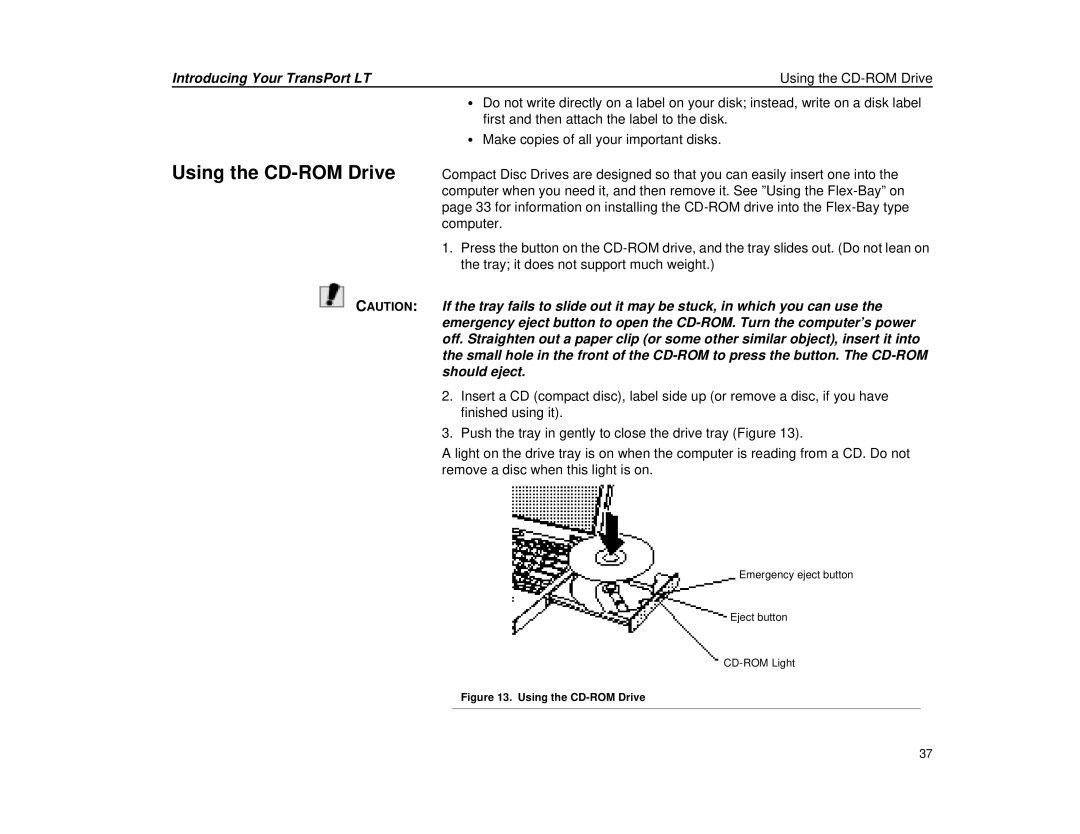
Using the CD-ROM Drive
Using the CD-ROM Drive
To play an audio compact disc
Introducing Your TransPort LT Using the Hard Drive
Using the Hard Drive
To remove the CD
Removing the Hard Drive
Removing the Hard Drive
Installing a Hard Drive
Using the Battery
Charging the Battery
Introducing Your TransPort LT Using the Battery
Removing the Battery
Safely Using the Battery
Orientation so that the battery fits in its slot properly
Installing the Battery
Monitoring the Battery Charge
Introducing Your TransPort LT Using the Battery
Set options under Battery Status and Alarm Settings
Battery Warnings
Doesn’t dee
Condition Action to Take
Precautions Before Use
Using the Modem
Introducing Your TransPort LT Using the Modem
Click Control Panel
Modem Properties Dialog Box
Description of 56K
Data communications
Modem Specifications
Modem Commands
Installing the Modem Driver in Windows 95/98
On the server
Using AT commands
Depending on the server
Display the result value
Basic AT Commands
ATS0?
Resolution and Color Depth
Video Features and Configuration
Video Features and Configuration Resolution and Color Depth
Video Features and Configuration
Configuring Display Features
Selecting a Monitor Type
Changing Color Depth and Resolution
Display Properties window appears
Changing the Video Driver
Enter location of the driver files
Display Properties window appears
Working with PC Cards
Video Features and Configuration Working with PC Cards
Maintaining PC Cards
Using PC Cards
Inserting a PC Card
Video Features and Configuration Working with PC Cards
This page intentionally left blank
Using Options AC Adapter
Using Options
AC Adapter
Auto Adapter
Before You Install Memory
Battery Pack
Using Options
Memory Modules
Using Options Memory Modules
Installing a Memory Module
Removing a Memory Module
CD-ROM Drive DVD-ROM Drive Module Secondary Battery
Using Options Port Replicator
Features of the Port Replicator
Port Replicator
Back view of the port replicator
Installing a Port Replicator
CRT key may cause malfunction on TV-Out
Removing a Port Replicator
Drivers
Drivers and System Resources
IRQs
Drivers and System Resources
Drivers and System Resources Service Pack 6A for Windows NT
Service Pack 6A for Windows NT
Installing the LAN Driver in Windows
This page intentionally left blank
Starting System Setup
Using System Setup
Using System Setup Starting System Setup
Menu Function
Navigation Alternate Function Key
Main Menu
Using System Setup Main Menu
Using System Setup
Feature Option Description
Using System SetupMain Menu
Lower performance
Opens the I/O Device Configuration submenu if you
Using System Setup Advanced Menu
Advanced Menu
IRQ4 default, 2F8 IRQ3 , 3E8 IRQ4 , or 2E8 IRQ3 . When
Enabled , you can set the Base I/O Address field to 3F8
IRQ4 , 2F8 IRQ3 default, 3E8 IRQ4 , or 2E8 IRQ3
IRQ7 default , 378 IRQ5 , 278 IRQ7 , 278 IRO5 , 3RC
Security Menu
Using System Setup Security Menu
Using System Setup Power Menu
Power Menu
Normal
Maximum
Power
Saving
Set to Save to RAM, not Save To Disk. The default
Using System Setup Boot Menu
Boot Menu
Disabled
Diskette
Exit Menu
Using System Setup Exit Menu
System Passwords
Using System Security
Creating a Password
Using System SecuritySystem Passwords
Using System Security
Deleting a Password
Password
Locking the Floppy Drive
Locking the Keyboard
This page intentionally left blank
Maximum Power Saving Mode Standby Mode
Using Power Management Options
Using Power Management Options Maximum Power Saving Mode
Enabled
Suspend Mode Precautions
Suspend Mode
Using Power Management Options Suspend Mode
Using Power Management Options Using PowerProfiler
Using PowerProfiler
Using Power Management Options Using PowerProfiler
Creating a Save-To-Disk Partition
Creating a Save-To-Disk Partition Using PowerProfiler
Creating a Save-To-Disk Partition Using PowerProfiler
Software Utilities
MRestore CD-ROM
PartitionMagic Drive Image
Software Utilities
Software Utilities Drive Image
Creating Image Files
Drive Image Professional
Software Utilities Drive Image Professional
Drive Image System Requirements
102
103
104
105
106
Check for File System Errors check box selected
Disable SmartSector Copying
Advanced Options
Verify Disk Writes
Split Image File Into Multiple Files
ImageShield
Restoring Image Files
PQtools\userinfo
109
110
111
112
113
Resize Options
PartitionMagic
Check for File System Errors
Skip Bad Sector Check
Verify Check Writes
Partition Map
Partition Information
Partition List
ReadMe File
PartitionMagic Help
Completing Tasks Manually
Selecting a Hard Disk
Applying Changes to Your System
Selecting a Partition
Changing PartitionMagic Preferences
Ignore OS/2 EA Errors on FAT
Software Utilities PartitionMagic
Click Ignore OS/2 EA Errors on FAT
Occur because problems might go undetected
Skip Bad Sector Checks
Set as Read-Only for PartitionMagic
Creating Partitions
Creating Bootable Partitions
Help
To Create a Partition
123
Apply
Deleting Partitions
Scenarios
Partition Type Select FAT
Basic Concepts in Help
Changing Partition Labels
Formatting Partitions
Converting FAT to Ntfs
Converting FAT to FAT32
129
Drive Copy
Hard drive while using the FAT file system
Copying Entire Drives
Click Set Active
Help Screen
Phdisk Utility
Create Option
Software Utilities Phdisk Utility
Calculation
Automatic Memory Size
User-specified Memory Size
Partition or /P
Phdisk Sign-on Message
Fatal Error
Unrecognized Option
PHDISK/CREATE Failed to
Reformat
136
Restoring your Computer To reinstall your Operating System
To reinstall your Operating System
Restoring your Computer
Windows
Choose Start Windows 98 Setup
Operating Problems
Troubleshooting
Troubleshooting Operating Problems
Troubleshooting Infrared Problems
Infrared Problems
PC Card does not work correctly
Troubleshooting Modem Problems
Modem Problems
When using a PBX phone system I cannot dial on my modem
142
System Specifications
Specifications
Specifications System Specifications
External AC Adapter
Specifications
IDE Adapter Submenu
Recording the Computer Hardware Configuration
Ntsc LCD
Security Menu
Boot Menu
Appendix a Regulatory FCC Notice
Appendix a Regulatory
150
Appendix a Regulatory CTR21 Statement
CTR21 Statement
Turvallisuusluokan 1 Ylittävälle NÄKYMÄTTöMÄLLE
Appendix a Regulatory Power Cord Requirement
Country Accredited Applicable Agency
General Requirements
Appendix a Regulatory
Appendix B Important Safety Instruction
156
Appendix B Important Safety Instruction Battery Disposal
Battery Disposal
158
Appendix C Abbreviations
Appendix C Abbreviations
IrDA
Milliampere
PS/2
PCI
Appendix D Glossary
Appendix D Glossary
Conventional memory Hard drive
DMA Direct Memory Access
Disk
Disk cache
RAM Random Access Memory
MB megabyte Post Power On Self Test
Resolution
Megabit
Zoomed video
TFT Thin Film Transistor LCD
Index
Index
Index
Cmos complementary metal-oxide semiconductor
Suspend 132 Power management features
Index
VGA