Operations Manual
NEC America, Inc
Liability Disclaimer
NEC America, Inc
Table of Contents
Report Generation
Route Groups
Contents
List of Figures
FIGURESAttendant Console Statistics Operations Manual
Interface to other OAI Applications
What is Attendant Console Statistics?
Overview
Attendant Console Statistics software application
Event Collector
How To Use This Manual
Cont
Manual Administration Menu Organization
Stats Administration Menu
Appendix Example Reports
Before Installation
Informix Database Installation
Database Space Creation
Installation Procedure
APM Administration Main Menu
Floppy Disk Device Cartridge Tape Device
Installation & Configuration
Installation & Configuration
Application configured
Status messages show the installation of the new database
Enter
Installation & Configuration
After Installation
Continue to Steps 4 and 5 on the next
Following
MCS Configuration
McsServerX applicationsMcsServer1, McsServer2, etc. to
Oai/app/mcs/menus/Mserver.cfg
Application Configuration
APM System Configuration
Components
Characteristics
Component
Parameter Definition
Primary Configuration Parameters
Parameter StatPatroller StatLogger Values
Database Support
Are described in the table below
StatPatroller Component
Initialize
Components StatLogger Component
On the APM System Operations Menu, select the Non-CRT
Application Start-Up
Logging in to Console Stats General Key Use
Main Menu
Main Menu Screen
Main Menu Options
Selecting Menu Options
For example Report Formats
Quit Console Stats
Using Report Formats
Report Statistics Attendant Report Statistics
Queue Report Statistics
Route and Station Group Reports Statistics
Station operations
Intervals Statistics Example Reports Procedure Overview
Report Formats Menu
Main Menu Report Formats Selection
Attendant, Queue, Route, & Station Report Formats
Format
Add a Report Format Window
Adding a Report
Through all desired remaining report statistic fields
From the statistic type pop-up window and press Enter
Finding a Report Format
Example Queue Reports Screen
Find a Report Format Window
Modifying a Report Format
Example Route Reports Screen
Modifying a Report
Format window -8 will be displayed
Attendant, Queue, Route, & Station Report Formats
Deleting a Report Format
Example Station Reports Screen
Deleting a Report
Format window -10 will be displayed showing the selected
Report to delete
Printing a Report Format
11 Example Attendant Reports Screen
Designated in Step
Printing a Report
Print of the selected report format and press Enter
Report Formats menu screen Figure
Using Report Generation
Access to Generated Reports
Procedure Overview
Report Generation Menu
From the Console Stats Main Menu -1, highlight to select
Report Generation option and press Enter
Generating Reports
Generating a Report
Generating a
Report
File
Finding a Report to Generate
Finding a Report To begin another search, repeat Steps
Using Automated Report Generation
Procedure Overview Current Time Interval
Automated Report Generation Menu
Automated Report Generation option and press Enter
Automated Report Generation Screen
Generating Automated Reports
Set a Report Schedule
Set a Report
Schedule
Filter an Automated Report
Filter Events Window
Report Generation screen -2 will again be displayed.
Filter an
Automated Report
Previous steps
Modify an Automated Report
Modify An Automated Report Window
To save the changes
Modify an
Keys for each day and pressing Enter
To modify
Cancel an Automated Report
Cancel An Automated Report Screen
Cancel
Cancel an
Automated report will be canceled
Ports are canceled
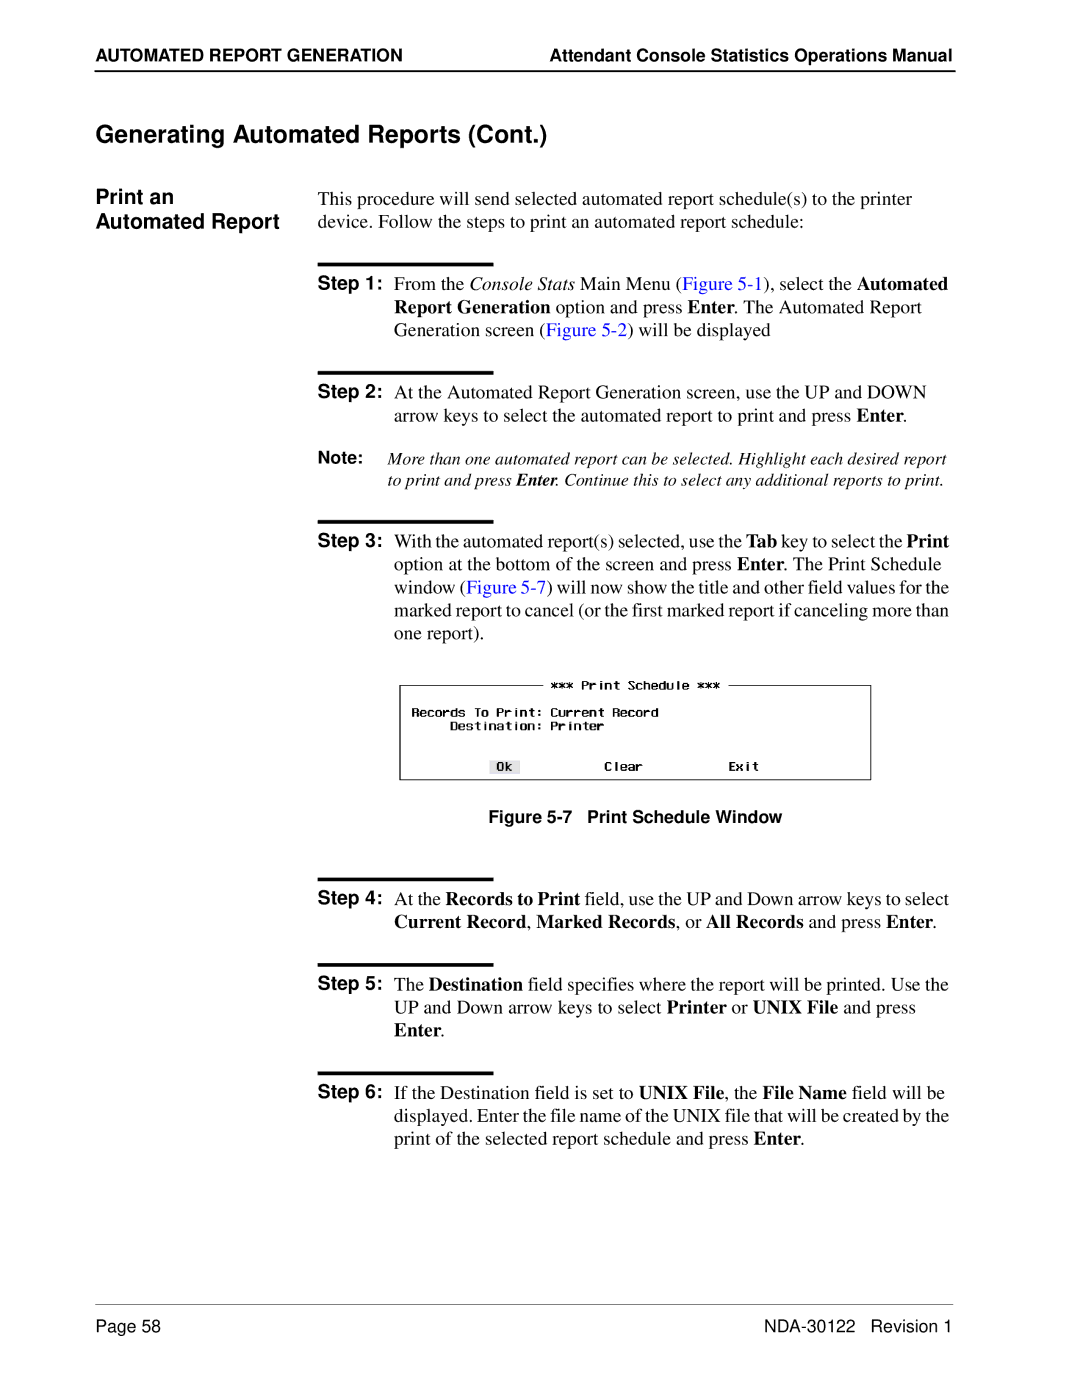
Print an Automated Report
Print Schedule Window
Print an
Automated Report Generation
Automated Reports
Using Report Viewing
Report Types Attendant Login Reports
Non-Automated Reports
Procedure Overview
Report Viewing Menu
Report Viewing option and press Enter
Viewing an Attendant Login Report
Viewing Reports
Finding Text Option
View Report Screen Attendant
Viewing an Attendant Login Report Printing Text Option
Exit Attendant Login Screen
Viewing an Automated Report
View Automated Reports Screen
Viewing an
View Report screen Figure
Use the Down arrow, Page Down, or End keys
Viewing an Automated Report Printing Text Option
Exit Automated Report Screen
Viewing a Non- Automated Report
Non-Automated Reports Screen
Viewing a Non
Displayed on the View Report screen Figure
Viewing a Non- Automated Report Printing Text Option
Exit Non-Automated Report Screen
Using Route Groups
Route Groups
Route Groups Menu
Main Menu Route Groups Selection
Route Groups
Adding a Route
Group
Route Groups screen Figure
Finding a Route Group
Find a Route Group Window
Finding a Route
Number of the route group to be found and press Enter
Modifying a Route Group
Modify a Route Group Window
Modifying a Route
Changes. The Route Groups screen will again be displayed
Group selected to modify. Repeat Steps
Deleting a Route Group
Delete a Route Group Window
Group will be deleted
If canceled, no route groups will be deleted
Deleting a Route
Lete
Printing a Route Group
Print Route Groups Window
Route Groups
Using Station Groups
Station Groups
Station Groups Menu
Main Menu Station Groups Selection
Station Groups
Adding a Station Group
Adding a Station
Return to the Station Groups screen Figure
Finding a Station Group
Find a Station Group Window
Station Groups
Modifying a Station Group
Modify a Station Group Window
Station Groups
Deleting a Station Group
Delete a Station Group Window
Deleting a Station
Printing a Station Group
Print Station Groups Window
Station Groups
Log File Display
Using the Administrative Menu
Logging
Logout
Database Administration
Menu
Administration
Database
Menu Options
Set Database Space
Specify name of desired database space
Install Database Screen
Remove Database Screen
Build Database Indexes
Build Database Indices Screen
Erase Database Indexes
Erase Database Indices Screen
Display Table Count
Display Table Count Screen
Update System Catalog
When the update is complete, press Enter
Database Administration
Report Generator Log Files
Log File Display
Menu Log Files
Statistic Logger Log Files
Menu Log Files
Messages that occur during performance of menu functions
From the Log File Display screen -9, press the ’M’ key
Search
Command
Screen Options
Top/Bottom
Menu Log Files Screen Options
Autoscroll
Quit
Report Generator Log Files
12 Report Generator Log Files Screen
13 Report Generator Log Files Data Screen
Report Generator Log Files Screen Options
Statistic Logger Log Files
14 Statistic Logger Log Files Screen
15 Statistic Logger Log Files Data Screen
Statistic Logger Log Files Screen Options
16 Patroller Log Files Screen
Patroller Log Files
17 Patroller Log Files Data Screen
Patroller Log Files Screen Options
Unix
Logout
Attendant Login Report Attendant Current Times Report
Appendix Example Reports
Example Reports
Example Reports
A-4 NDA-30122 Revision
Station Daily Outbound Report
A-6 NDA-30122 Revision