ZR-6
Niles Audio Corporation 1-800-BUY-HIFI
BOX Contents
Introduction
Congratulations
Table of Contents
Introduction
Features and Benefits
Level. Doorbell chimes require the DBI-1 Doorbell Interface
Source for background music while entertaining
ZR-6 Multizone Receiver Front Panel
System Parts Guide
ZR-6 Multizone Receiver Programming Panel
17 18 19 20 21 22 23 24 25 26 27 28
ZR-6 Multizone Receiver Rear Panel
System Parts Guide
Control screens for the connected sources
TS-PRO Color Touchscreen Controller Sold Separately
Playing device
Room naming
Played source
SOLO-6MD WEATHER-RESISTANT Master Keypad Sold Separately
SOLO-6IR WEATHER-RESISTANT Master Keypad Sold Separately
Accessory Keypad FG01442
Is on
ZR-6 MultiZone Receiver
Last KEY Returns to the previous channel
Menu Button Displays a menu for the selected source device
8L Learning Remote Control Included
STAND-ALONE ZR-6 Multizone Receiver
System Wiring Diagrams
Stand-Alone ZR-6 MultiZone Receiver
Balanced Video Output
Control Connection
Adding a VS-6 for video distribution
Source Device Control
Expansion Ports
Keypads
External Control
On Next
Expanding to 18 zones. Slave #1 ZR-6 detailed
Expanding to 18 zones. Slave #2 ZR-6 detailed
Home Theater Sync
IR Control Input
RS-232 Port
Connecting an external RS-232 control system
Keypad Power Value KPV
Adding Additional Keypads to a Zone
Niles ZR-KE Keypad Expander
Adding AN External Amplifier T0 Zone 4, 5
Preamplifier Outputs
12V Trigger Output
Doorbell Paging
System Paging
ZR-6 Multizone Receiver System Installation
System Installation
Connect the Loudspeakers
Connect the External Power Amplifiers
Connect the Niles IR Microflashers
Connect a High Output Flasher
Connect the Slave ZR-6 Multizone Receiver
Connect the Keypads
Connect the AM and FM Antennas
Connect the 12V Outputs
Connect the HT Home Theater Sync if Needed
Connect the Main Power Cable
Connect the External Controller
IR Input
Guidelines
Keypad Installation
Choose a Mounting Location
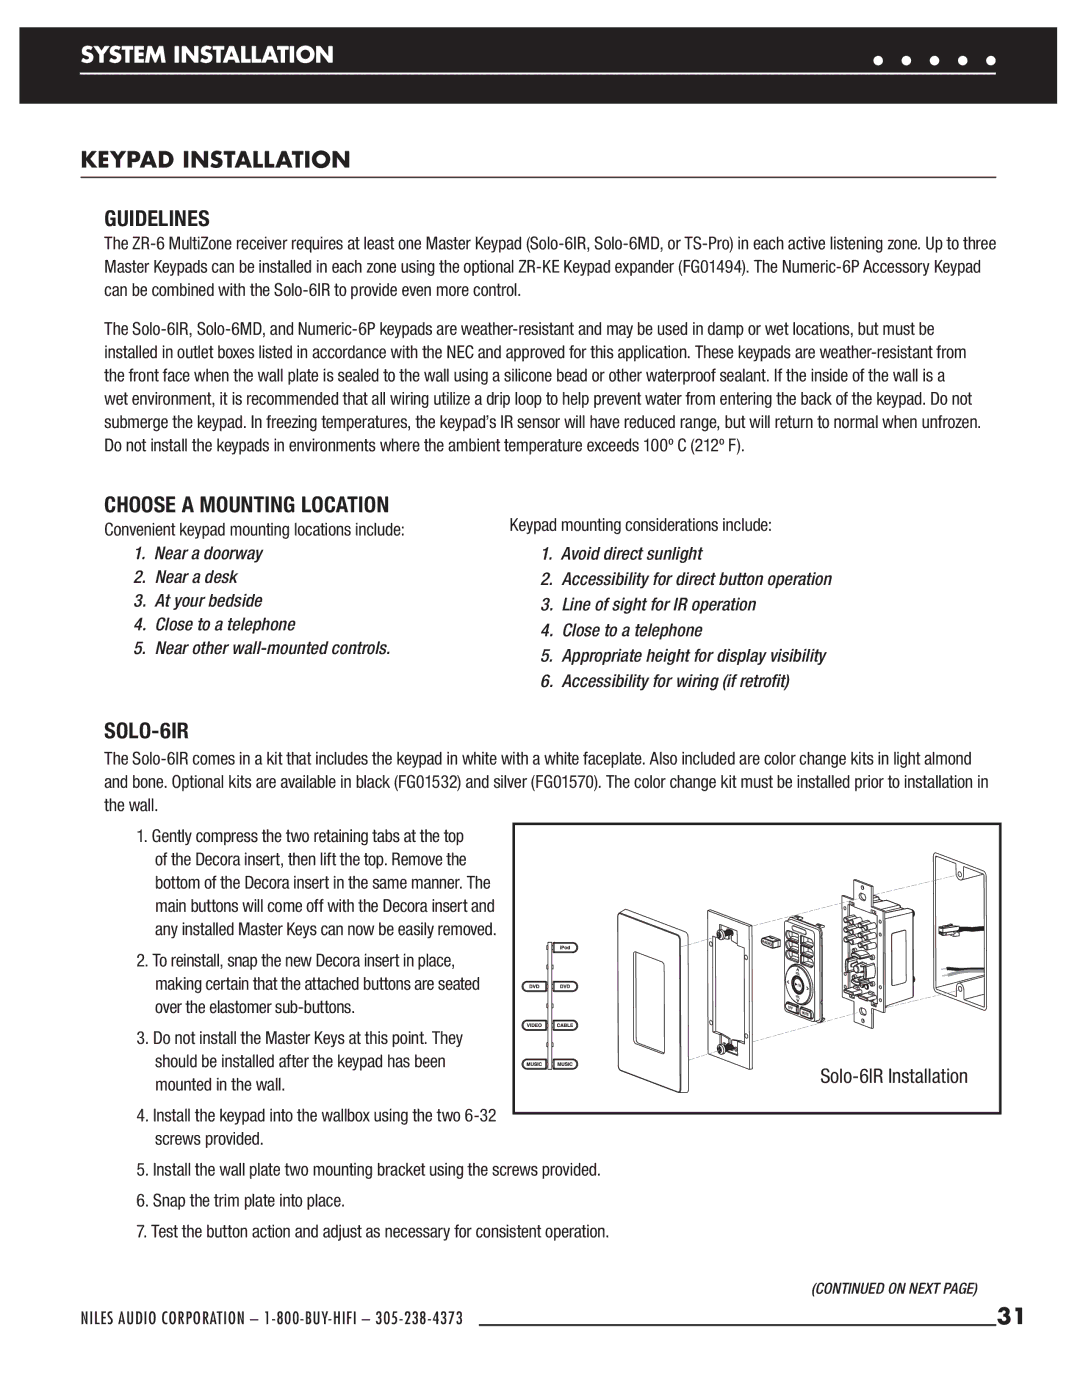
SOLO-6IR
SOLO-6MD
Install the SOLO-6IR Master Keys
Installing Keypads in WET Areas
Install the Keypads Into Junction Boxes
NUMERIC-6P
Connect the CAT-5 Cable to the Keypad
TS-PRO
Touchscreen Installation
System Configuration
Configuring the ZR-6 Multizone Receiver
Tech TIP
Paging
Party or Whole House Mode
Mode Volume
Maximum Volume Level
Display
Zone 5 PRE-OUT
Zone 4 PRE-OUT
Zone 6 PRE-OUT
This must be confi gured on each slave as well as the master
Naming the Source Devices
Erasing Tuner Preset Information
IR Programming
Programming Source Device IR Command Codes
Considerations
All zones should be off before entering programming mode
Programming SOLO-6MD and SOLO-6IR Command Code Mapping Chart
Device Code Button on Keypad DVD
Programming TS-PRO Command Code Mapping Chart
DVR SAT TV
Fixed Device Codes
Programming R-8L IR Command Code Mapping Chart
Storing IR Commands in Library
To Learn Source Device Commands
Storing IR Commands in VS-6/LIBRARY
Be Play
To edit or erase the Power On Command
Editing or Erasing Individual IR Commands
IR Program Editing and Erasing
Building IR Sequences for Source Devices
Erasing Individual Device Sequences
Erasing IR and Sequence Programming for ALL Sources
Display will show Erase ALL IR+SEQ SRC 3 -/NO +/YES
System ARCHIVING/UPDATING
Archiving and or Updating the ZR-6 Multizone Receiver
Updating the ZR-6 Multizone Receiver Firmware
System Settings
Setting UP the AM/FM Tuner
To Store Presets in the Tuner
Source Device Level Adjustment
Setting UP the Zone Keypads
Zone Turn on Volume Level
Bass Adjustment
Keypad Setup
Treble Adjustment
SOLO-6MD Keypad
IR Sensor ON/OFF
Display Settings
Audio Settings
Keypad Configuration
Release the button when the confi guration screen appears
Zone TURN-ON Volume
Source Level Adjustment
Last Volume or Pre Set Volume
Press Play/Pause/Select to store the new setting
Audio Settings
Keypad Setup
Display Settings
TS-PRO Touchscreen
Saving a Preset Radio Station
Radio Preset Names
Virtual Room Timeout
Custom Image Display
Source Level Adjustment
Keypad Configuration
Screen Calibration
Custom Image Display
To set the zone turn-on volume
Zone TURN-ON Volume
Programming the Remote
Room Names
Configuring the TV and AUX Devices
Programming the R-8L HAND-HELD Learning Remote Control
Installing the Batteries
Searching for a Code
If the R-8L remote was set up using the procedure from
Precautions
Programming Sources 2, 3, 4, 5,
Programming a Learning Button
Restoring ALL Button Functions To Factory Settings
Erasing a Single Learned Button
Programming a Sequence
From the SOLO-6IR Keypad
Operating the ZR-6 Multizone Receiver
NUMERIC-6P Accessory Keypad
From a SOLO-6IR with NUMERIC-6P Accessory Keypad
Miscellaneous
Additional Radio Functions
From the SOLO-6MD Keypad
When a source’s Now Playing screen is displayed, the Vol
Selecting a Source
Remains for 3 seconds after the key is released
Soft keys to
Direct Tuning a Radio Station
All menu items that don’t begin with a letter, e.g Tears
If necessary, press
Party WHOLE-HOUSE Mode
From the TS-PRO Touchscreen
Operating a Listening Zone
Press-and-hold the Off key to turn the entire system off
From the R-8L Learning Remote Control
Play the AM/FM Tuner
Play Sources
Troubleshooting
Troubleshooting
Problem
Solution
Zone does not turn on when in the Paging Mode
Zone does not turn on when in the Party Mode
LED does not blink when you press a key
LED blinks one long blink while in Setup mode
LCD Panel Message
ZR-6 Error Codes
Specifications
Hardware Configuration
Control Command Strings
RS-232 Control Protocols
Communication Parameters
Command
Command zsc,3,01cr selects the tuner in zone
Transport command
Indicates the command type source
Syc = system command Zsc = zone specific command
Znc = zone command
Codes for ZR-6 Specific Commands
Command supports hold function
Record 144 Shuffle Group Disc Favorites 126 Down 127
Appendix a Source Device Screen Library
Niles Audio Corporation 1-800-BUY-HIFI
Appendix a Source Device Screen Library
Appendix a Source Device Screen Library
Appendix a Source Device Screen Library
Appendix a Source Device Screen Library
Appendix a Source Device Screen Library
Appendix a Source Device Screen Library
Appendix a Source Device Screen Library
Stored IR Sequence Radio
IR Programming Worksheets
Stored IR Sequence Source
Niles Remote Source Function Button
Stored IR Commands Source
IR Programming Worksheets
IR Programming Worksheets
IR Programming Worksheets
IR Programming Worksheets
IR Programming Worksheets
IR Programming Worksheets
IR Programming Worksheets
IR Programming Worksheets
Source Function
Stored IR Commands Library
100
Stored IR Commands Library 2/VS-6
101
L e s a u d i o C o r p o r a t i o n