■Alarm Operation
●Suspending Alarm Input
Suspending the alarm function may be convenient during setup procedures or when alarm recording is not needed. In ON position, any alarm input is ignored and the recorder performs as follows:
•The alarm event will be logged in the alarm history.
•The recorder does not enter alarm recording.
•The alarm buzzer does not sound.
•The ALARM SUSPEND indicator lights.
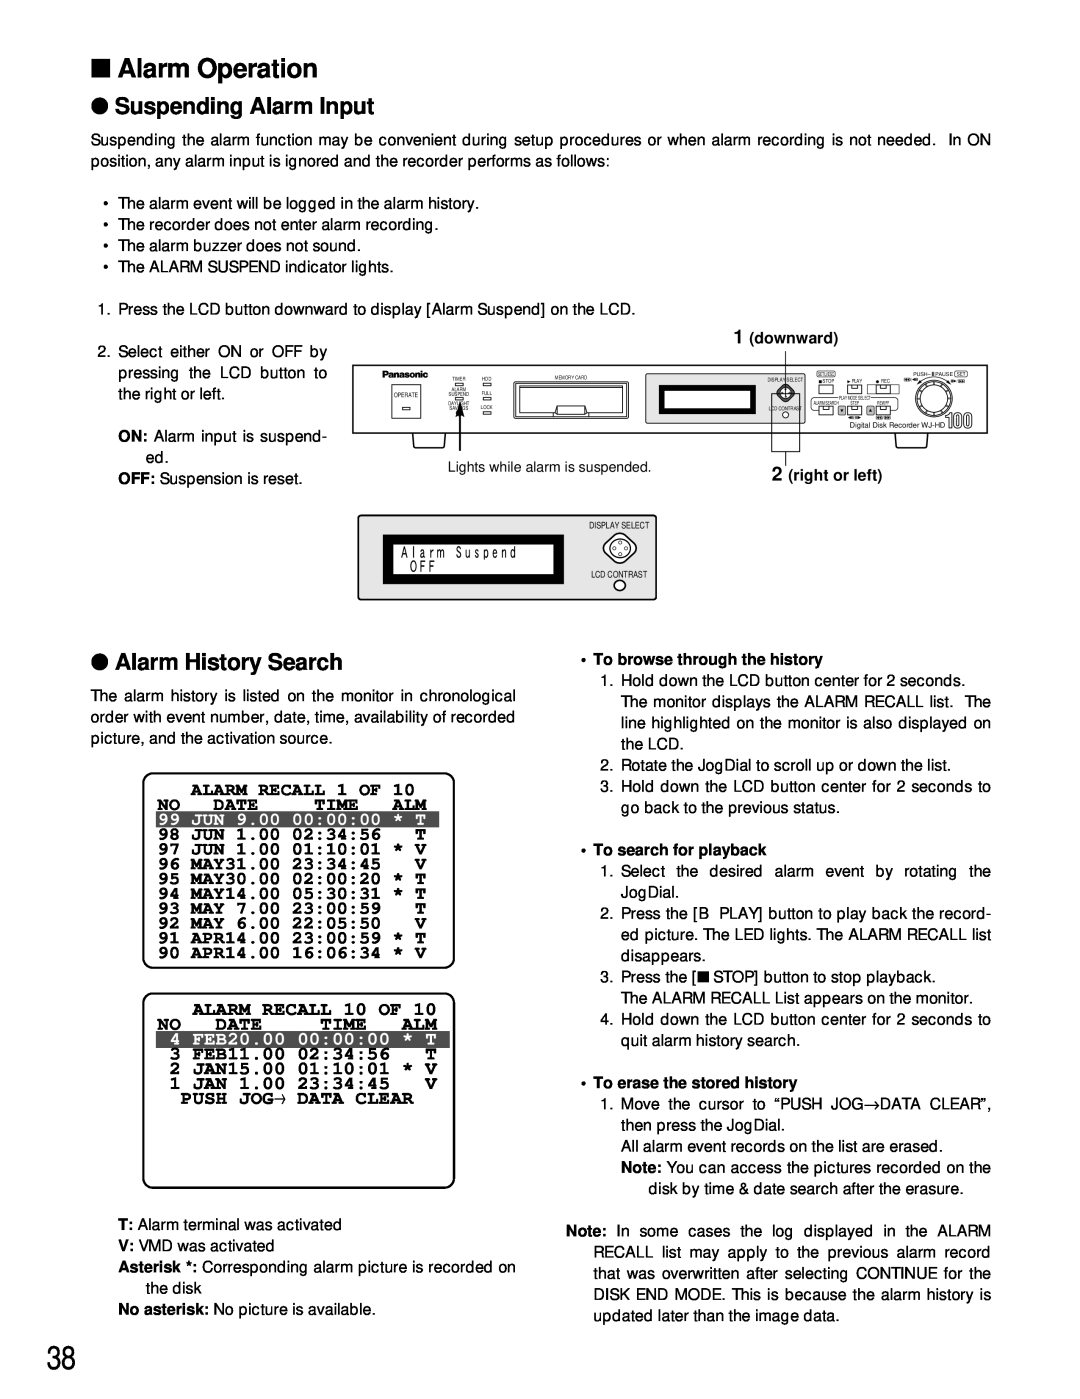
1. Press the LCD button downward to display [Alarm Suspend] on the LCD.
2.Select either ON or OFF by pressing the LCD button to the right or left.
ON: Alarm input is suspend- ed.
OFF: Suspension is reset.
OPERATE
TIMER | HDD | MEMORY CARD | ||
|
|
|
|
|
ALARM
SUSPEND FULL
DAYLIGHT
SAVINGS LOCK
Lights while alarm is suspended.
1(downward)
DISPLAY SELECT | SETU/ESC |
|
| PUSH– | PAUSE SET |
STOP | PLAY | REC | / | / | |
|
| PLAY MODE SELECT |
|
|
|
LCD CONTRAST | ALARM SEARCH | STEP | REW/FF |
|
|
|
|
|
|
| |
|
| / | / |
|
|
Digital Disk Recorder
2 (right or left)
DISPLAY SELECT
LCD CONTRAST
●Alarm History Search
The alarm history is listed on the monitor in chronological order with event number, date, time, availability of recorded picture, and the activation source.
NO | ALARM RECALL 1 OF | 10 | |
DATE | TIME | ALM | |
99 | JUN 9.00 00:00:00 | * T | |
98 | JUN 1.00 02:34:56 | T | |
97 | JUN 1.00 01:10:01 | * V | |
96 | MAY31.00 23:34:45 | V | |
95 | MAY30.00 02:00:20 | * T | |
94 | MAY14.00 05:30:31 | * T | |
93 | MAY 7.00 23:00:59 | T | |
92 | MAY 6.00 22:05:50 | V | |
91 | APR14.00 23:00:59 | * T | |
90 | APR14.00 16:06:34 | * V | |
NO | ALARM RECALL 10 OF 10 | ||
DATE | TIME | ALM | |
4 | FEB20.00 00:00:00 | * T | |
3 | FEB11.00 02:34:56 | T | |
2 | JAN15.00 01:10:01 | * V | |
1 | JAN 1.00 23:34:45 | V | |
| PUSH JOG→ | DATA CLEAR | |
T:Alarm terminal was activated
V:VMD was activated
Asterisk *: Corresponding alarm picture is recorded on the disk
No asterisk: No picture is available.
•To browse through the history
1.Hold down the LCD button center for 2 seconds. The monitor displays the ALARM RECALL list. The line highlighted on the monitor is also displayed on the LCD.
2.Rotate the JogDial to scroll up or down the list.
3.Hold down the LCD button center for 2 seconds to go back to the previous status.
•To search for playback
1.Select the desired alarm event by rotating the JogDial.
2.Press the [B PLAY] button to play back the record- ed picture. The LED lights. The ALARM RECALL list disappears.
3.Press the [■ STOP] button to stop playback.
The ALARM RECALL List appears on the monitor.
4.Hold down the LCD button center for 2 seconds to quit alarm history search.
•To erase the stored history
1.Move the cursor to “PUSH JOG→ DATA CLEAR”, then press the JogDial.
All alarm event records on the list are erased.
Note: You can access the pictures recorded on the
disk by time & date search after the erasure.
Note: In some cases the log displayed in the ALARM RECALL list may apply to the previous alarm record that was overwritten after selecting CONTINUE for the DISK END MODE. This is because the alarm history is updated later than the image data.
38
