Operating Instructions
Federal Communications Commission Declaration of Conformity
Operating Environment
Model Number SC-07 / SC-05 Responsible Party Name
Keep in a Secure AREA. this is for Your Security
Risk of Electric Shock Do not Open
Wash hands after handling
Contents
Using other functions
Other Settings
Other connections
Playback with Home Media Gallery inputs
Additional information
Controlling the rest of your system
Before you start
Installing the receiver
Before you start Chapter
Checking what’s in the box
Simple Home Theater Guide Chapter
Simple Home Theater Guide
Introduction to home theater
Listening to Surround Sound
1a.Full Auto Mcacc
Follow the instructions on-screen
Simple Home Theater Guide
Problems when using the Auto Mcacc Setup
Playing a source
Select the input source you want to play
Phase Control OFF
Using Phase Control
Phase Control on
Source.1
Full Band Phase Control OFF
Using Full Band Phase Control
Phase Control indicator on the front panel lights
Fullband PHASE.1
Full Band Phase Control on
Connecting your equipment Chapter
Connecting your equipment
Rear panel
When making cable connections
Connecting your equipment
Connecting using Hdmi
Connecting your equipment About the video converter
If you have an Hdmi or DVI with Hdcp equipped
Be careful to connect the terminal in the proper direction
About Hdmi
SC-07
Connect using an Hdmi cable
Connecting your equipment Connecting your TV and DVD player
STB
For a second recorder, use the DVR 2 in inputs
Use a three-way component video cable
Connecting your equipment Using the component video jacks
About the WMA9 Pro decoder
Connecting your equipment Connecting digital audio sources
Use an optical cable for the connection
Connecting a component to the front panel inputs
Connecting your equipment Connecting analog audio sources
Connecting the speakers
Connecting your equipment Installing your speaker system
Placing the speakers
Bare wire connections
Banana plug connections
THX speaker system setup
Connecting antennas
Connecting external antennas
FM wire antenna
Plugging in the receiver
AM loop antenna
Controls and displays Chapter
Controls and displays
Front panel
STANDBY/ON
Controls and displays
Operating range of remote control unit
Controls and displays Display
RECEIVER
Controls and displays Remote control
Multi Operation
Input Select
Mute
SOURCE
Listening to your system Chapter
Listening to your system
Listening in surround sound
Auto playback
Using the Advanced surround effects
Using the Home THX modes
Listening to your system
PRO LOGIC+THX Cinema
Listening in stereo
Using Front Stage Surround Advance
Tip
Selecting Mcacc presets
Listening to your system Using Stream Direct
Choosing the input signal
Hdmi Digital Analog
Using the Virtual Surround Back mode
Using surround back channel processing
Hdmi Digital
Auto
Mode
Pro Logic
Using the tuner Chapter
Using the tuner
Listening to the radio
Naming station presets
Using the tuner Saving station presets
Listening to station presets
Abcdefghijklmnopqrstuvwxyz
Select the setting you want to adjust
Making receiver settings from the Advanced Mcacc menu
Advanced Mcacc menu
Advanced Mcacc menu Chapter
Select the parameters you want to set
Advanced Mcacc menu Automatic Mcacc Expert
Use / to select the item, then use / to set
Advanced Mcacc 1b.Auto Mcacc
Advanced Mcacc menu
If necessary, confirm the speaker configuration in the OSD.2
Mcacc Data Check
Manual Mcacc setup
1c.Manual Mcacc
Fine Speaker Distance
Fine Channel Level
Select ‘Standing Wave’ from the Manual Mcacc setup menu
Acoustic Calibration EQ Adjust
Adjust the parameters for the Standing Wave Control
Standing Wave
How to interpret the graphical output
How to use Acoustic Calibration EQ Professional
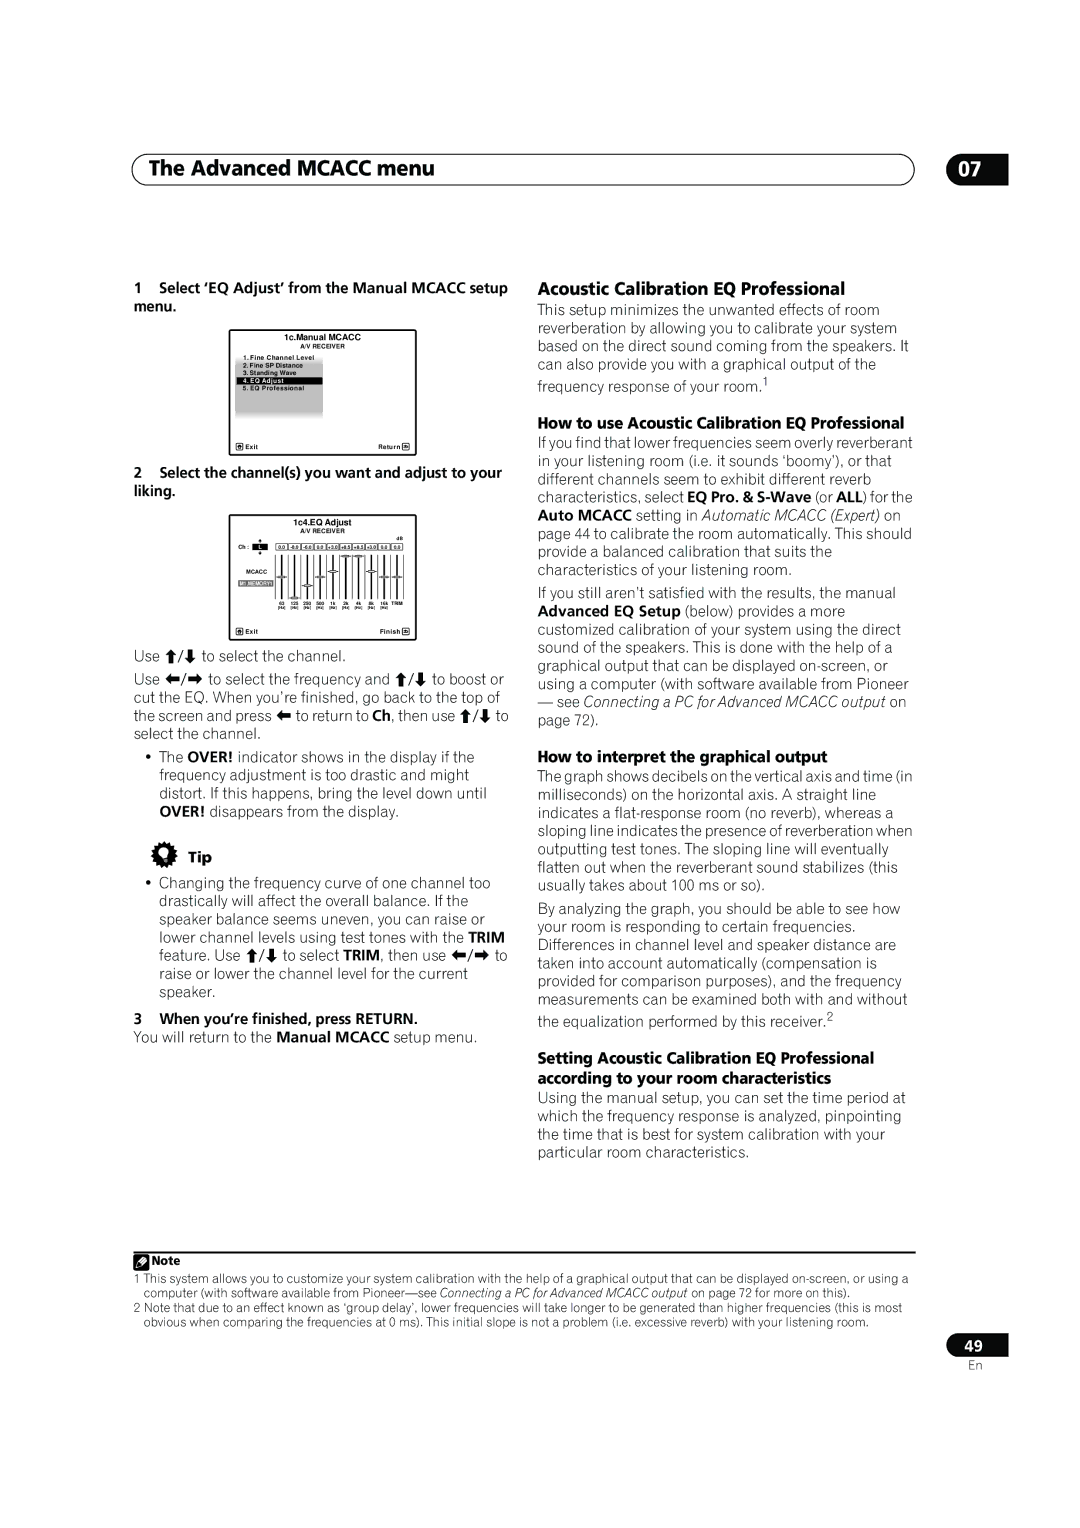
Select ‘EQ Adjust’ from the Manual Mcacc setup menu
Select the channels you want and adjust to your liking
Select ‘EQ Professional’, then press Enter
Using Acoustic Calibration EQ Professional
Select an option and press Enter
1c.Manual Mcacc 1c5.EQ Professional
Select the setting you want to check
Set the operation selector switch to RCV, then press
Checking Mcacc Data
Select ‘MCACC Data Check’ from the Home Menu
Channel Level
Speaker Setting
Speaker Distance
Standing Wave
Data Management
Group Delay
Acoustic Cal EQ
Clearing Mcacc presets
Renaming Mcacc presets
Copying Mcacc preset data
System Setup menu Chapter
System Setup menu
Making receiver settings from the System Setup menu
Manual speaker setup
Surround back speaker setting
System Setup menu
Speaker Setting
Select a setup option
Select ‘Channel Level’ from the Manual SP Setup menu
Confirm your selected setup option
Adjust the level of each channel using /
Speaker Distance
THX Audio Setting
Curve
4a.Manual SP Setup 4a6.THX Audio Setting
Connecting your XM Radio receiver
Using XM Radio
Other connections
Other connections Chapter
Using XM HD Surround
Using Sirius Radio
Saving channel presets
Using the XM Menu
Press Sirius to switch to the Sirius input
Connecting your SiriusConnect Tuner
Listening to Sirius Radio
Chuck Berry
Using the Sirius Menu
Connecting the multichannel analog inputs
Selecting the multichannel analog inputs
Use Input Select to select Multi CH
Switching the speaker system
Speaker B setup
Speaker B setting only.1
Bi-amping your speakers
Bi-wiring your speakers
Connecting additional amplifiers
Make sure that the + / connections are properly inserted
Large
Making MULTI-ZONE connections
Other connections MULTI-ZONE listening
MULTI-ZONE listening options
ZONE2
MULTI-ZONE setup using speaker terminals Zone
Basic MULTI-ZONE setup Zone
Audio
Secondary MULTI-ZONE setup Zone
Using the MULTI-ZONE controls
Digital Audio
Panel
Button What it does
Connecting an IR receiver
Input Use to select the input source in the currently
Select selected sub zone
Or off just by pressing the input functions you’ve set on
Using this receiver with a Pioneer flat panel TV
DVD
Using the SR+ mode with a Pioneer flat panel TV
Advanced Mcacc output using your PC
Other connections Connecting a PC for Advanced Mcacc output
System must have internet access
Mcacc Data Check 2g.Output PC
Playback with Home Media Gallery inputs Chapter
Playback with Home Media Gallery inputs
Steps to enjoy the Home Media Gallery
Connecting an iPod
Connecting to the network through LAN interface
Specifications of a LAN terminal
Playback with Home Media Gallery inputs
About network playback
Introduction
Windows Media Connect
Windows Media DRM
Server without the mark cannot be accessed
Content playable over a network
Playback with Home Media Gallery
Authorizing this receiver
Item. To return to the list screen, press Return
Enter
Case of a USB memory device or a server
Repeat to play back the desired song or photo
Finding what you want to play
About the playback screen
To return to the previous level any time, press
Use / to browse the selected category e.g., albums
Playing back audio files stored on a USB memory device
Switching the iPod controls1
Finding what you want to play
Basic playback controls
Listening to Internet radio stations
Reconnect the USB device with the receiver switched
About Internet radio
Off
About list of Internet radio
Use / to select ‘Get access code’, then press
Saving and retrieving Internet radio stations
Use / to select ‘Help’, then press Enter
Playing back your favorite songs
Listening to Neural Music Direct
About Neural Music Direct
About the Favorites folder
Music files
About playable file formats
Advanced operations for Internet radio
Setting up the network
Saving Internet radio stations
Retrieving saved Internet radio stations
Proxy Hostname/Proxy Port
Select ‘Setup’ and press Enter to confirm your selection
Select ‘Change’ and press Enter to confirm your selection
Enter the IP address
Press Enter to complete the network setup procedure
Checking the network settings
Enter the alternate DNS server address
Enter the address of your proxy server or Domain name
Default Gateway
Software update
Dhcp Dynamic Host Configuration Protocol Server
Glossary
IP Internet Protocol address
MAC Media Access Control address
Mass Storage Class devices
Neural Surround
Hdmi Control Chapter
Hdmi Control
Making the Hdmi Control connections
Before using synchronization
Hdmi Control Setting the Hdmi options
Setting the Hdmi Control mode
Setup
Synchronized amp mode operations
Hdmi Control Synchronized amp mode
Canceling synchronized amp mode
About Hdmi Control
Other Settings Chapter
Other Settings
Input Setup menu
Component
Input function default and possible settings
Other Settings
Changing the OSD display language OSD Language
Language used on the on-screen display can be changed
Multi Channel Input Setup
Other Settings Other Setup menu
Select ‘Multi Ch In Setup’ from the Other Setup menu
Select the ‘SW Input Gain’ setting you want
SR+ Setup for Pioneer flat panel TVs
Zone Audio Setup
Flicker Reduction Setup
Using other functions Chapter
Using other functions
Setting the Audio options
Press Return to confirm and exit the menu
Using other functions
Current source, setting and status of the receiver
Using other functions Setting the Video options
Making an audio or a video recording
Video Parameter menu, it is unavailable due to
Reducing the level of an analog signal
Using the sleep timer
Dimming the display
Checking your system settings
Using other functions Switching the Hdmi output
Resetting the system
Hdmi OUT
Setting Default
Default system settings
MULTI-ZONE
SR+
Selecting preset codes directly
Setting the remote to control other components
Controlling the rest of your system
Controlling the rest of your system Chapter
Use / to select ERASE, then press Enter
Erasing one of the remote control button settings
Press and hold the button to be erased for two seconds
Confirming preset codes
Resetting the remote control presets
Controlling the rest of your system
Renaming input source names
Following remote control commands can be selected
Select the button for the command you want to input
Programming a multi-operation or a shutdown sequence
Using System off
Using multi operations
Controls for TVs
Press Multi Operation
& Enter
SOURCE
CLR
Decide which component you want to use the remote sensor
Additional information
Speaker Setting Guide
Additional information Chapter
Additional information
Positioning and adjusting the subwoofer
Position of front speakers and monitor
Positional relationship between speakers and monitor
Position of center speaker and monitor
Power
Additional information Troubleshooting
Symptom Remedy
Digital Video Scaler
No sound
Symptom
Other audio problems
Video
Settings
Display
Professional Calibration EQ graphical output
SEL
Remote control
Configuration B
Configuration a
Hdcp Error shows
Important information regarding the Hdmi connection
Causes Remedies Refer to
Symptoms
Symptoms Causes Remedies Refer to
About status messages
Symptom Cause
XM radio messages
Status messages Descriptions
Hdmi C ERR 1A0
Sirius radio messages
Hdmi C ERR 1B0
Hdmi C ERR 1C0
Dolby
Additional information Surround sound formats
DTS Digital Surround
Windows Media Audio 9 Professional
DTS Neo6
DTS 96/24
Additional information About THX
THX Games
About Neural THX Surround
THX Loudness Plus Description
THX Ultra2/Select2 Cinema
About Sirius
Additional information About XM
About Flac
Flac Decoder
Input signal format Standard
Stereo 2 channel signal formats
Auto Surround
ON/AUTO
PRO LOGIC+THX
129
130
131
132
Input signal format
Multichannel signal formats
Additional information Specifications
Features
Additional information Cleaning the unit
Our philosophy
Home Media Gallery
THX certified design In case of SC-05
THX certified design In case of SC-07
Hdmi and digital video conversion
DCDi
Once you have established a comfortable sound level
To establish a safe level
Decibel Level Example
Pioneer Corporation