4506
Overseas Affiliates
⇒ P.189 Power Connection
Means Power ON. c means Stand by
Page
Safety Information
Safety During Operation
Iii
How to Read This Manual
Symbols
Preparation
Limitation
Table of Contents
103
106
108
111
117
118
119
130
169
173
187
188
Page
What You Can Do with This Machine
Page
Main power switch
Guide To Components
Right side cover/Lower right cov
Options
Operation Panel
Using the Touch Panel Display
Selecting Functions
Manual Auto Paper Select key
Entering Numbers
Checking the Functions You Have Selected
Check Modes key
Color Sample Chart
Turning On the Power
Turning on the Main Power
Power Switches
Operation switch right side of the operation panel
When the machine is set for user codes
When the Energy Saver indicator is lit
Starting the Machine
Turning off the main power
Shutting down the machine
When you set originals on the exposure glass
When you set originals in the document feeder
Originals
Recommended Originals
Originals
Setting Originals on the Exposure Glass
Setting a Stack of Originals Document Feeder
Basics
Setting one Original at a Time Document Feeder
Basics
Setting Originals of Different Sizes in the Document Feeder
Setting Custom Sized Originals
Press the Custom Size Orig. key
Setting Custom Sized Originals
Removing the Platen Cover to Copy a Large Original
Basic Procedure
Copying
Adjusting Copy Image Density
Auto image density
Press the Auto Image Density key
Manual image density
Combined auto and manual image density
Selecting a Color Mode
Auto color select mode
Full color copy mode
Press the Auto Color Select key
Black & White copy mode
Single color mode
Press the Black & White key
Press the Single Color key
Press the Single Color key Press the User Color 10 key
Twin color mode
Color Copy
Red & Black
Twin Color Color Copy
Twin Color Red & Black Copy
Auto Text/Photo mode
Selecting the Original Image Type
Press Print
Glossy Photo
Text mode
Photo mode
Special original mode
Press the Special Original key
Selecting the Copy Paper Size
Auto paper select
Manual paper select
Copying from the Bypass Tray
Image Rotation
11, 51/2 ⋅ 81/2
Copying onto standard size paper with the bypass tray
Press the Normal, Thick or OHP key
Copying onto custom size paper with the bypass tray
Horizontal size Vertical size Extender Paper guides
Select Custom 1, Custom 2, Custom 3 or Enter Size keys
Basic Procedure
Making A3, 11 ⋅ 17 full bleed copies
Make sure that the paper guides match the paper size
Copying onto the reverse side of paper
ABC
Open the bypass tray Insert the paper into the bypass tray
Auto Reduce/Enlarge
Press the Auto Reduce/Enlarge key
Energy Saver Mode
Auto Off Mode
Interrupt copying
Storing your settings
Auto Start
Program
Recalling your settings
Check Modes
Preset R/E
Counter
Reducing
Press the Reduce/Enlarge key
Enlarging
Using the and + keys
Zoom
Using the number keys
Directional Magnification %
Press the Reduce/Enlarge key Press the Directional Mag. key
Directional Size Magnification mm
Basic Procedure
Copying
Duplex-Making 2 Sided Copies
Sided → 2 Sided
Press the Duplex/Combine key
Press the 1 Sided→2 Sided key
Press the Duplex/Combine key Press the 2 Sided→2 Sided key
Book → 2 Sided
Multi → 2 Sided
Original
Series Copies
Book → 1 Sided
Series Copies
Sided → 1 Sided
Setting originals Originals set in the document feeder
Combine
Combine 2 Originals
Press the Duplex/Combine key
Combine 4 Originals
Shifting the Image
Shift
Margin Adjustment
Press the Margin Adjustment key
When you use front cover mode with 1 Sided → 1 Sided mode
Cover Sheet
Front Cover
Front and Back Cover
Back Cover Copy
Back Cover Blank
Press the Front&Back Cover key
Copying
Color Creation
Color Conversion
Press the Color Creation key
Press the Color Conversion key
Color Erase
Color Background
Press the Color Background key
Image Creation
Mirror
Press the Image Creation key Press the Mirror Image key
Positive/Negative
Finishing
Sort
Finishing
Stack
Staple
For stapling, the following limitations apply
Changing the staple position
Having copies stapled automatically after copying
Stapling copies manually after copying
Combination Chart
Bin sorter stapler. ⋅ Bin sorter stapler. →
OHP
ColorTwin Text Photo
100
101
102
Color Balance Adjustment
Color Balance
103
Storing the adjusted color balance
Color Balance Program
104
Press the Color Balance Program key
Recalling the color balance
105
Color Adjustment
Press the Color Adjustment key
106
Adjust the color with the keys
107
Image Adjustment
108
Press the Image Adjustment key
Soft/Sharp, Contrast, Background Density, and Pastel
109
110
Adjusting Colors Based on the Selected Color
Program User Color
111
Press the Prog. User Color key
112
Mixing Colors Manually with the Number Keys
113
114
Sampling the User Color Option
115
116
What is Area Editing?
117
How to Edit Areas
118
Designating Areas
119
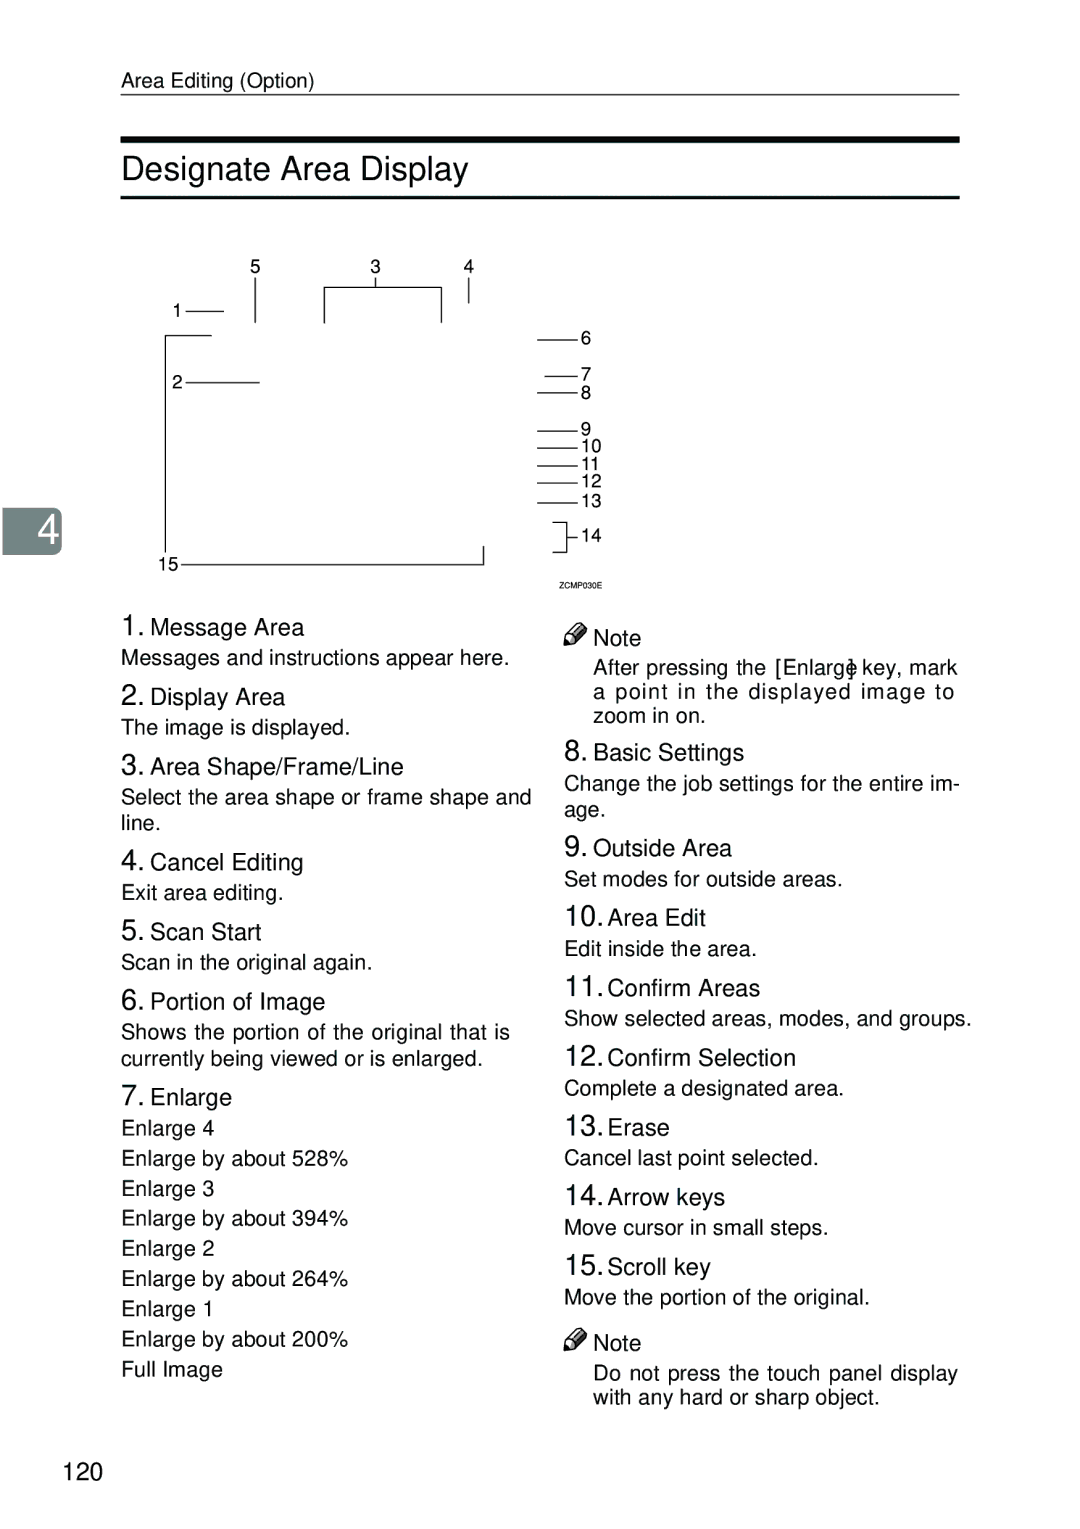
Designate Area Display
120
Designate Area Tools
121
Area Shapes
Rectangle
122
Press the Confirm Selection key
Right Angle Polygon and Polygon
123
Closed Loop
Multi-Closed Loop
124
Press the Area Editing key
Frame/Line
Rectangle frame
125
Press the Frame / Line key
Right Angle Polygon frame and Polygon frame
126
Press the Area Editing key Press the Frame / Line key
Line
127
128
129
Selecting Modes for Designated Areas
130
Press the Col. /Image Adjust., Color Creation key
Area Editing
Basic modes
131
Delete Area
132
Save Area
133
Editing color and widths
134
Selecting Modes for Outside Designated Areas
135
Save Area
136
Press the Area Edit or Outside Area key
137
Changing Basic Settings for the Entire Image
Press the Basic Settings key
138
139
Checking and Changing Areas
Change Modes
140
Press the Confirm Areas key
Press the Change Setting key
Adding Areas
141
Erasing an Area
142
Erasing a Group
143
144
Press the Delete Group key
Press the Cancel Editing key
Exiting Area Editing
145
Combination Chart for Area Editing
146
Combination Chart for Area Editing
147
148
If Your Machine Does not Operate as You Want
149
150
What to Do if Something Goes Wrong
If You Cannot Make Copies as You Want
151
152
Exposure Glass
153
Changing The Toner Cartridge
Loading Paper
Non-recommended Paper for Paper Trays
154
Loading Paper in the Paper Tray
155
Changing The Toner Cartridge
Pulling Out the Toner Cartridge
156
157
When you use the Cartridge Replacement Tool
158
Setting the New Toner Cartridge
159
Turn the knob clockwise to the T mark until it clicks
Clearing Misfeeds
Check the Misfeed Location Display
161
Clearing Paper Misfeeds
162
163
Adding Staples
164
165
Removing Jammed Staples
166
167
168
Changing Paper Size
169
170
Changing Paper Size with the User Tools
171
Press the System Settings key
172
Accessing the User Tools
Press the System Settings or Copier Features key
User Tools
173
Exiting from the User Tools
174
System settings
175
176
177
178
General Features
179
180
181
Select the User Ratio 1 or User Ratio 2 key
Program
Change
Clear
Delete All
Reset Counters
Counter List Print
183
184
Duplex/ADF/Sorter
Special Mode Programs
Auto Color Calibration
185
186
Dos and Donts
187
Where to Put Your Machine
Machine Environment
Optimum environmental conditions
Environments to avoid
Power Connection
189
Access to Machine
190
Maintaining Your Machine
Exposure Glass
Platen Cover
191
Document Feeder
192
Remarks
Copier
193
Use and Storage of Supplies
Copy Paper
194
Paper Storage
Toner Storage
195
196
Mainframe
Copying speed full size Full color 4 colors
Black, Yellow, Magenta, Cyan
Blue Magenta + Cyan, Green Yellow + Cyan
Red Yellow + Magenta
Power consumption
Non-reproduction area
Toner replenishment
Warm-up time
Noise Emission *1 Sound power level
Dimensions W ⋅ D ⋅ H up to the exposure glass
Weight
Sound pressure level *2
Document Feeder Option
Bin Sorter Stapler Option
Paper size for bins
Bin capacity
Stapler capacity
203
Bin Sorter Option
204
Sheet Tray Unit Option
Available paper size
Paper capacity
205
206
Multi-access
Sample operations
207
208
Tion
Index
209
210