Manuals
/
RTS
/
Computer Equipment
/
Network Card
RTS
ADAM
manual
Eight Frame Tribus System Non-Redundant
Models:
ADAM
1
15
48
48
Download
48 pages
3.75 Kb
12
13
14
15
16
17
18
19
Specification
Install
Intercom Alarms
Configuration
Download Firmware Upgrades
Features
Cancel Button
Page 15
Image 15
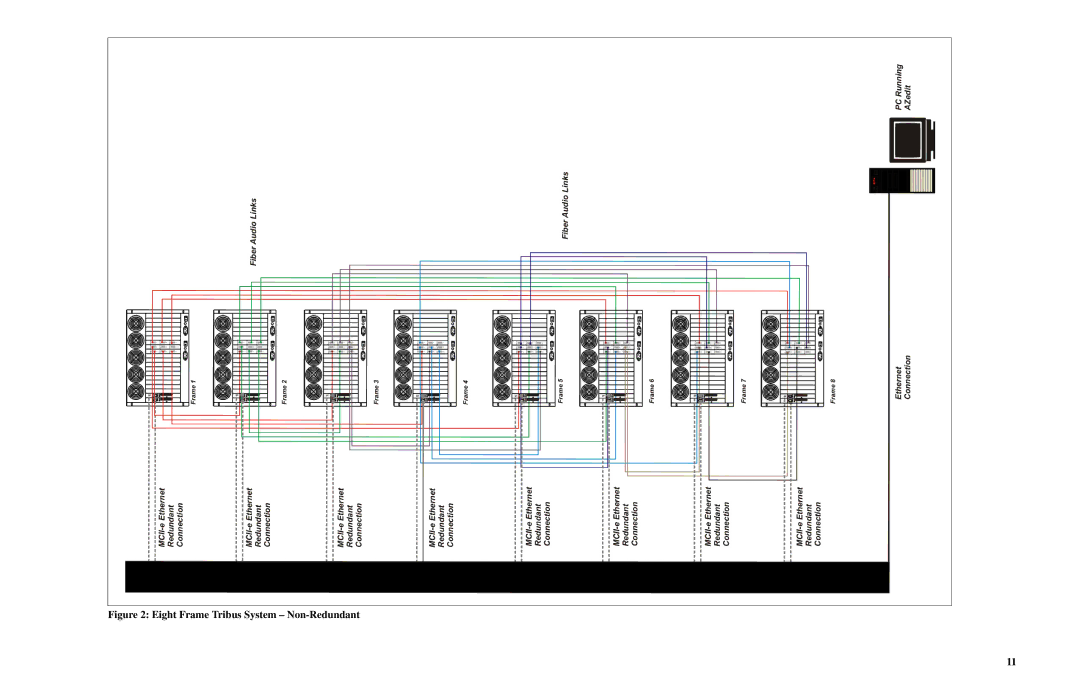
Figure 2: Eight Frame Tribus System –
Non-Redundant
11
Page 14
Page 16
Page 15
Image 15
Page 14
Page 16
Contents
Adam
See the enclosed warranty card for further details
Contents
Page
Figures
Page
Version Requirements
General Description
Interface with Adam
Features
Specifications
Configuration Requirements
Board Performance
Fail-Over Modes
Full Redundancy
Partial Redundancy
Non-Redundancy
Page
Eight Frame Tribus System Non-Redundant
Page
Debug Information
Uploading Debug Information Status window appears
Navigate to C\Telex\AZedit\Debug
To find the file you just created, do the following
Page
Installation
To install the Tribus into an Adam frame, do the following
Requirements
Configuration
Intercom Configuration window appears
Select the The number of frames in the intercom radio button
Click Intercom Sizing Wizard
Select the Enable Test Audio recommended check box
Intercom Configuration window reappears
Click the browse button
Click the Frame 2 IP Address 1 field
Base 8 Port Number System
Base 8 vs. Base 16 Port Number Systems
Page
Base 16 Port Numbering System Example
Base 16 Port Number System
Force Autonomous Mode Check Box
Connect To Frame Menu
AZedit Connections
Frame Column
Frame Mapping Table Window
MAC Address 2 Column
IP Address 1 Column
MAC Address 1 Column
IP Address 2 Column
Accept Frame Mapping Table from Other Frames Check Box
Base 16 Column Check Box
Move Up Button
Move Down Button
Select Frame Window
Test Button
Done Button
OK Button
Cancel Button
TBX Links Status Window
TBX Column
Comm Column
Partner Column
Link Up/Dn Column
Audio C Column
Intercom Alarms
Audio a Column
Audio B Column
Intercom Alarms Window
To open the Intercom Alarms window, do the following
Alarm Time Column
Resolved Time Column
Description Column
Logging Window
Configure Logging Window
Ethernet Radio Button
J1 Radio Button
J9 Radio Button
J10 Radio Button
Download Firmware to the TBX-Tribus Card
Download Firmware Upgrades
Click Begin Download
Firmware Download window appears
Successful Download Message Click OK
Verify the Tribus card firmware has been updated
Top
Page
Image
Contents