DVD-R150 DVD-R155
Important Note
Getting Started
Be Sure to Operate Recorder Correctly AS Instructed
Important Safety Instructions
Precaution
Maintenance of Cabinet
Handling Cautions
Disc Storage
Disc Specifications
DVD-RAM Disc Playback and Recording
DVD+RW Disc Playback and Recording
Protection
Do not use the following discs
Contents
Playback
Troubleshooting Specifications English
EZ REC Mode
General Features
Recording
How to use the DVD Recorder
Select the disc type
Preparing the Remote Control
Accessories
Unpacking
Playing
Brand Button
Controllable TV Codes
Front Panel Display
Description
Front Panel
Rear Panel DVD-R155
Rear Panel DVD-R150
Tour of the Remote Control
Connecting the DVD Recorder
Connecting & Setting Up
TV mode
DVD mode
Progressive Scan Output 576p
Antenna + DVD Recorder + external decoder box + TV
Video, Component video and Progressive Output Modes
You will enjoy high quality images
Case 2 Connecting to an S-Video output jack
Case 1 Connecting to a Video Composite output jack
If your TV has audio input jacks, use this connection
Case 1 Connecting to your TV
Images
Case 2 Connecting to a stereo amplifier with AV output jacks
Case 1 Connecting to a TV with Hdmi Jack
Connecting HDMI/DVI to a TV DVD-R155 only
Why does Samsung use HDMI?
What is the HDCP?
Case 2 Connecting a Camcorder to the DV in jack
Connecting to AV3 IN, DV input jack
On-Screen Menu Navigation
System Setup
Plug & Auto Setup
DVD-Recorder Clock Set
Setting the Clock
Auto Channel Memory
Presetting Channels with the Manual Setup function
Presetting Channels with the Auto Setup function
Refer to following table when selecting your country
Press the OK button to stop the Auto Setup
Setting up the Language Options
EP Mode Time Setting
Setting up the System Options
Quick Recording Setting
This function allows you to setup the system setting
TV Menu
For using Anynet+HDMI-CEC
Anynet+HDMI-CEC DVD-R155 only
DVD-Recorder Audio
Setting up the Audio Options
Digital Output
This is only active when a Dolby Digital signal is detected
Setting up Video Options
Dynamic Compression
TV Aspect
Canceling the Progressive scan
Setting up the Progressive scan
Video output
Output jack
DivXR Registration
HDMI/DVI Resolution DVD-R155 only
About the Rating Level
Setting up the Parental Control
About the Change Password
Recordable discs
Recording
This section shows various DVD recording methods
DVD-RAM DVD-RW DVD-R
Recording Formats
DVD-RAM/-RWVR mode
DVD-RWVideo mode/-R
DVD-RAM
Unrecordable video
Recording Mode
Mode Characteristic Recording Times Data
DVD-RW Ver.1.1 With Cprm VR mode Video mode
Concerning Copy Control Signals
Content Protection for Recordable Media Cprm
About Info Button
Recording immediately
To stop recording
Copying from a Camcorder
030 100 .. 500 .. normal
Making a One Touch Recording OTR
03 TUE
Making a Timer Recording
Speed Recording Mode
You can make the Timer Recording up to 12 programmes
If the timer settings overlap
Follow these directions to edit the timer record list
Editing the Scheduled Record List
DVD-RecorderShowView
Using the ShowView Feature
Deleting the Scheduled Record List
DVD-Recorder Programme
ShowView Extended
Region code DVD-Video only
Playback
Disc types that can be played
DTS
Discs that cannot be played
Playing a Disc
Using the playback related buttons
Using the Disc Menu & Title Menu
For DVD-VIDEO discs
For DVD-RAM/DVD±RW/±R discs
Step Motion Play
Slow Motion play/Step Motion Play
Skipping Chapters or Tracks
If you press the Skip button
Repeat Play
Using the Anykey button
Moving to a desired scene directly
Playing Repeatedly
Selecting the Subtitle Language
Using one Touch button
Selecting the Audio Language
Changing the Camera Angle
Setting Bookmarks
Using Bookmarks
Zooming-In
Playing back a bookmark
Setting Markers
Using the Markers
Clearing a bookmark
Playing back a Marker
Audio CDCD-DA Screen Elements
Playing back an Audio CDCD-DA/MP3
Playing an Audio CDCD-DA
Playing back an MP3 Disc
Press the Cancel button to return to normal playback
Repeat Playback of an Audio/MP3 Disc
MP3 Screen Elements
Playing back a Picture Disc
Play Option Mode
To Programme Tracks
You can register a maximum of 30 tracks in the playlist
Adpcm
Playing back MPEG4 Disc
MPEG4 Function Description
Title List Screen Elements
Playing the Title List
Recording on Free space
Rename, Delete, Edit, Protection See pages 57~61
Basic Editing Title List
Editing
RenamingLabeling a Title
Title List
Status
Locking Protecting a Title
Deleting a Title
Edit Title List Screen Elements
Deleting a Section of a Title
Adding a chapter
Editing a Chapter
Deleting a chapter
Chapter Edit Screen Elements
Hiding a chapter
Dividing a Title
Deleting all chapters
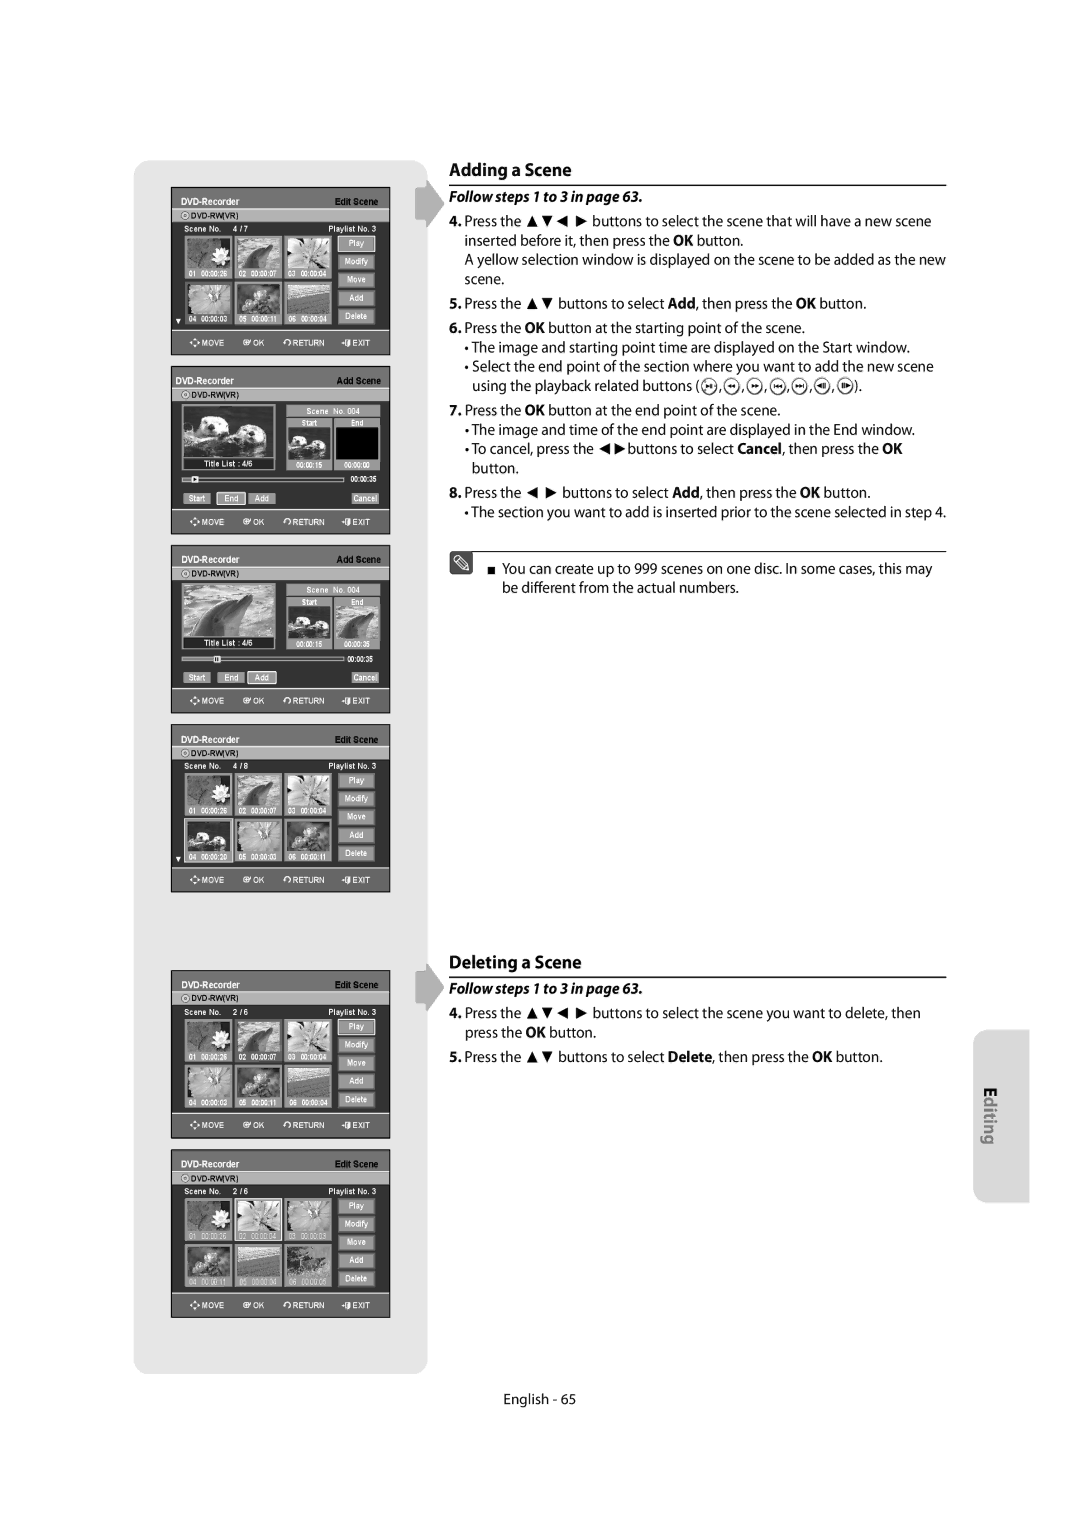
Follow steps 1 to 3
Creating a Playlist
Advanced Editing Playlist
Playing Entries in the Playlist
Follow these instructions to play the playlist entries
Editing a Scene for the Playlist
Renaming a Playlist Entry
Playing a Selected Scene
Follow these instructions to edit scenes for a playlist
DVD-Recorder Edit Scene
Modifying a Scene Replacing a Scene
Moving a Scene Changing the Position of a Scene
Deleting a Scene
Adding a Scene
Copying a Playlist Entry to the Playlist
Disc Manager
Deleting a Playlist Entry from the Playlist
Editing the Disc Name
Formatting a Disc
Disc Protection
DVD-RW
DVD-RAM/+RW
Finalising a disc
Unfinalising a disc V/VR mode
DVD-RW can be finalised or unfinalised in VR mode
Edit Compatible
Delete All Title Lists
Power
Troubleshooting
Additional Information
Playback
Timer Recording
Remote Control Unit
Sound
Hdmi DVD-R155 only
PAL-B/G, D/K
Specifications
MPEG-II
DVD Audio CDCD-DA
Contact Samsung World Wide
English Ελληνικά Български Română AK68-01273E
DVD-R150 DVD-R155
Προειδοποίηση
Ξεκινώντας
Προσοχη
Σημαντικη Σημειωση
Σημαντικές οδηγίες ασφάλειας
Προφυλάξεις
Προφυλάξεις κατά το χειρισμό
Συντήρηση του περιβλήματος
Προδιαγραφές δίσκου
Αποθήκευση δίσκων
CD ήχου
Αναπαραγωγή και εγγραφή δίσκου DVD±R
Αναπαραγωγή και εγγραφή δίσκου DVD+RW
Αναπαραγωγή και εγγραφή δίσκου DVD-RW
Αναπαραγωγή και εγγραφή δίσκου DVD-RΑΜ
Προστασία
Nicam
Περιεχόμενα
EZ REC Mode
Γενικά χαρακτηριστικά
Βήμα 1 Επιλέξτε τον τύπο δίσκου
Πριν διαβάσετε το εγχειρίδιο χρήστη
Χρήση ενός DVD-RAM
Χρήση δίσκου DVD±RW/+R
Βήμα 3 Εγγραφή
Αποσυσκευασία
Βήμα 4 Αναπαραγωγή
Εξαρτήματα
Κουμπί Λειτουργία
Κωδικοί τηλεοράσεων που μπορούν να ελεγχθούν
Μαρκα Κουμπι
Οθόνη πρόσοψης
Πίσω όψη DVD-R155
Πίσω όψη DVD-R150
Γνωριμία με το τηλεχειριστήριο
Πρόσθετες ρυθμίσεις
Σύνδεση και Ρύθμιση
Σύνδεση της συσκευής εγγραφής DVD
Μπορείτε να συνδέσετε τη συσκευή εγγραφής DVD σε
Συνδέστε τα καλώδια της κεραίας RF όπως φαίνεται
Στη συσκευή εγγραφής DVD, συντονιστή
Περίπτωση 1 Σύνδεση σε μια υποδοχή
Εξόδου βίντεο σύνθετου σήματος
Περίπτωση 2 Σύνδεση σε υποδοχή Εξόδου S-Video
Περίπτωση 1 Σύνδεση στην τηλεόραση
Συνιστωσών βίντεο
Κόκκινο άσπρο
Audio OUT
Το καλώδιο HDMI/DVI στην αντίστοιχη υποδοχή. Θα
Που διαθέτει υποδοχή Hdmi
Απολαύσετε εικόνα και ήχο άριστης ποιότητας
Περιγραφή σύνδεσης Hdmi
Στην υποδοχή DV in Εισοδοσ
Σύνδεση στην AV3 in Εισοδο
Υποδοχή εισόδου DV
Σύνδεση και αυτόματη ρύθμιση
Ρύθμιση συστήματος
Πλοήγηση στο μενού στην οθόνη
Αυτόματη Μνήμη Καναλιών
Ρύθμιση του ρολογιού
Menu
Προκαθορισμός των καναλιών με αυτόματη ρύθμιση λειτουργιών
Ρυθμίσεις των επιλογών συστήματος
Ρύθμιση των επιλογών της γλώσσας
Αυτόματη δημιουργία κεφαλαίων
Ρύθμιση του χρόνου τρόπου λειτουργίας ΕΡ
Ρύθμιση γρήγορης εγγραφής
Τρόπος λειτουργίας
Μενού τηλεόρασης
Anynet+HDMI-CEC μόνο για DVD-R155
Για να χρησιμοποιήσετε το Anynet+HDMI-CEC
Ψηφιακή Έξοδος
Ρύθμιση των επιλογών ήχου
Δυναμική Συμπίεση
Ρύθμιση των επιλογών βίντεο
TV Διάσταση
Αυτό είναι ενεργό μόνο όταν ανιχνεύεται σήμα Dolby Digital
Λειτουργίας
Έξοδος Βίντεο
‹ Ρύθμιση της προοδευτικής σάρωσης
‹ Ακύρωση της προοδευτικής σάρωσης
576p 720 x 720p 1280 x 1080i 1920 x
Ανάλυση HDMI/DVI μόνο για DVD-R155
Καταχώριση DivXR
Σχετικά με το Αλλαγή κωδικού πρόσβ
Ρύθμιση του γονικού ελέγχου
Σχετικά με το Επίπεδο ταξινόμησης
DVD-RAM DVD-RW DVD-R DVD+RW DVD+R
Εγγραφή
Εγγράψιμοι δίσκοι
DVD-RAM/-RW Τρόπος λειτουργίας VR
Μορφές εγγραφής
DVD-RWΤρόπος λειτουργίας Video/-R
Τρόπος λειτουργίας Χαρακτηριστικό Χρόνοι εγγραφής
Τρόπος λειτουργίας εγγραφής
Βίντεο που δεν έχει εγγραφεί
Σχετικά με σήματα ελέγχου αντιγραφής
Σχετικά με το κουμπί Info
Εγγραφή του τρέχοντος προγράμματος όταν βλέπετε τηλεόραση
Άμεση εγγραφή
Εγγραφή από εξωτερικές συσκευές που
Παρακολουθείτε
Για να διακόψετε την εγγραφή
Αντιγραφή από βιντεοκάμερα
Μόνο για DVD-R155
030 100 .. 500 .. Κανονικό
Δημιουργία εγγραφής με ένα πάτημα OTR
01 ΚΥΡ Κάθε μέρα 02 ΔΕΥ
Δημιουργία εγγραφής με χρονοδιακόπτη
ΔΕ-ΣΑ
ΤΡΙ ΔΕ-ΠΑ ΤΕΤ
Μπορείτε να ρυθμίσετε μέχρι 12 προγράμματα στην εγγραφή με
Αν οι ρυθμίσεις του χρονοδιακόπτη επικαλύπτονται
Gemstar Development Corporation Ελληνικά
Χρήση της λειτουργίας ShowView
Διαγραφή της λίστας προγραμματισμένων εγγραφών
OFF
ShowView Εκτεταμένη
Τύποι δίσκων που μπορούν να αναπαραχθούν
Αναπαραγωγή
Κωδικός περιοχής Μόνο για DVD-Video
Τύποι δίσκων που δεν μπορούν να αναπαραχθούν
Αναπαραγωγή ενός δίσκου
Χρήση των κουμπιών που σχετίζονται με την αναπαραγωγή
Χρήση του μενού του δίσκου και του μενού τίτλων
Για τους δίσκους DVD-VIDEO
Για τους δίσκους DVD-RAM/DVD±RW/DVD±R
Παράλειψη κεφαλαίων ή κομματιών
Αναπαραγωγή σε αργή κίνηση
Αναπαραγωγή με κίνηση Βήμα
Επανάληψη αναπαραγωγής
Χρήση του κουμπιού Anykey
Απευθείας μετάβαση στην επιθυμητή σκηνή
Επαναλαμβανόμενη αναπαραγωγή
Επιλογή της γλώσσας διαλόγων
Επιλογή της γλώσσας των υποτίτλων
Αλλαγή της γωνίας λήψης της κάμερας
Χρήση ενός κουμπιού επαφής
Χρήση σελιδοδεικτών
Μεγέθυνση
Ρύθμιση σελιδοδεικτών
Αναπαραγωγή από ένα σελιδοδείκτη
Διαγραφή σελιδοδείκτη
Χρήση δεικτών markers
Ρύθμιση δεικτών
Αναπαραγωγή από ένα δείκτη
Αναπαραγωγή ενός CD CD-DA ήχου
Αναπαραγωγή ενός CD CD-DA ήχου/MP3
Επανάληψη αναπαραγωγής δίσκων ήχου/ΜΡ3
Αναπαραγωγή δίσκων MP3
Προγραμματισμός κομματιών
Αναπαραγωγή δίσκων εικόνας
Τρόπος λειτουργίας επιλογής αναπαραγωγής
‹ Περιγραφή λειτουργίας MPEG4
Αναπαραγωγή δίσκων MPEG4
Εγγραφή σε ελεύθερο χώρο
Αναπαραγωγή λίστας τίτλων
Στοιχεία οθόνης λίστας τίτλων
Βασική επεξεργασία λίστα τίτλων
Eπεξεργασία
Μετονομασίαετικέτα ενός τίτλου
Λίστα Τίτλων
Διαγραφή ενός τίτλου
ΚλείδωμαΠροστασία ενός τίτλου
‹ Στοιχεία οθόνης επεξεργασίας λίστας τίτλων
Διαγραφή μιας ενότητας τίτλου
Τρόπος λειτουργίας VR
Προσθήκη κεφαλαίου
Επεξεργασία ενός κεφαλαίου
Διαγραφή ενός κεφαλαίου
‹ Στοιχεία οθόνης επεξεργασίας κεφαλαίου
Απόκρυψη ενός κεφαλαίου
Χωρισμός ενός τίτλου
Διαγραφή όλων των κεφαλαίων
Ακολουθήστε τα βήματα 1 έως 3 στη σελίδα
Δημιουργία λίστας αναπαραγωγής
Σύνθετη επεξεργασία λίστα αναπαραγωγής
Για να δημιουργήσετε μια καινούργια λίστα αναπαραγωγής
Για να επιστρέψετε στο μενού Επεξεργασία Λίστα Αναπαραγωγής
Stop
Αναπαραγωγή μιας επιλεγμένης σκηνής
Μετακίνηση μιας σκηνής αλλαγή της θέσης μιας σκηνής
Τροποποίηση μιας σκηνής αντικατάσταση μιας σκηνής
Πατήστε το κουμπί OK
Πρόσθεση μιας σκηνής
Διαγραφή μιας σκηνής
Επεξεργασία του ονόματος του δίσκου
Λειτουργία Mάνατζερ δίσκων
Αντιγραφή μιας εγγραφής στη λίστα αναπαραγωγής
DVD-VR Disc DVD-RAM DVD-RW
Προστασία δίσκου
Διαμόρφωση ενός δίσκου
Κατάργηση ολοκλήρωσης σε ένα δίσκο τρόπος λειτουργίας V/VR
Ολοκλήρωση ενός δίσκου
DVD-RWV
DVD-RWVRF
Συμβατότητα επεξεργασίας
Διαγραφή όλων των λιστών τίτλων
Αντιμετώπιση προβλημάτων
Πρόσθετες Πληροφορίες
Ενεργοποίηση
Εγγραφή
Εγγραφή με χρονοδιακόπτη
Ήχος
Hdmi μόνο για DVD-R155
Τηλεχειριστήριο
Scart
Τεχνικές προδιαγραφές
Page
Επικοινωνήστε με τη Samsung World Wide
Contact Samsung World Wide
Свържете се със Samsung World Wide
Contactaţi centrele Samsung World Wide
English Ελληνικά Български Română AK68-01273E
Инструкции за работа
Предупреждение
Начало
Внимание
Важна Бележка
Важни инструкции за сигурност
Предпазна мярка
Предупреждения при работа
Поддръжка на шкафчето
Спецификации на диска
Съхранение на дискове
Аудио CD
Възпроизвеждане и записване на DVD±R диск
Не използвайте следните дискове
Защита
DVD-RW режим VR Видеозапис
DVD-RW режим Video Видео
Случай 2 Свързване на камера към DV
Други видове свързвания на изходния аудио кабел
Преди да настроите каналите с функцията
Намал На 3D Шум изпълнение, адаптирано за
Преименуване на запис от списъка за
Възпроизвеждане на определен раздел
Възпроизвеждане на записи от списъка за
Общи характеристики
EZ REC Mode Режим Записване EZ
Преди да използвате ръководството за потребителя
Как да бъде използван DVD рекордерът
Стъпка 1 Изберете вида на диска
Стъпка 3 Записване
Стъпка 4 Възпроизвеждане
Разопаковане
Принадлежности
Проверете за поддържаните аксесоари по-долу
TV VOL
Управляеми кодове за телевизор
Марка Бутон
Дисплей на преден панел
Описание
Преден панел
Задно табло DVD-R155
Задно табло DVD-R150 Начало
Обиколка на дистанционното управление
Можете да свържете вашия DVD рекордер към
Свързване & настройка
Свързване на DVD рекордера Допълнителни съединения
Видео, Component видео и Нарастващи изходни режими
Други видове свързвания
Случай 2 Свързване на S-Video Изходно гнездо
Случай 1 Свързване с видео
Композитно изходно гнездо
Случай 3 Компонентни видео изходни
Гнезда
Случай 2 Свързване към стерео усилвател с AV изходни гнезда
Какво е HDCP?
Свързване на HDMI/DVI с телевизор само DVD-R155
AV3 in AV3 Входящи гнезда
Свързване към AV3 IN, DV
DV in DV Входящо гнездо
BoxSTB, DVD плейър или камера към
Навигация през екранни менюта
Настройване на системата
Включване & Автоматична настройка
Вж. следните съкращения, когато избирате Country Страна
Ще започне автоматично сканиране на канали
Настройване на часовника
Това меню се използва за настройване на текущия час
Авто Запам Канали
Натиснете бутона OK, за да спрете Автоматичната настройка
Преди да настроите каналите с функцията Ръчна настройка
Вижте следната таблица, когато избирате вашата страна
Английски, Скандинавски, Фински, Френски, Немски
Африканс, Баски, Каталонски, Датски, Холандски
Исландски, Индонезийски, Италиански, Малайски
Английски, Албански, Хърватски, Унгарски, Полски
EP Режим настройка на часа
Задаване на опциите за системата
Автоматично създаване на раздели
Настройка бърз запис
За използване на Anynet+HDMI-CEC
Anynet+HDMI-CEC само DVD-R155
Меню на телевизора
~ бутон
DVD-Recorder Аудио
Задаване на аудио опциите
Цифров Изход
ТВ Размер
Динам Компресия
Видео
DVD-RecorderВидео
AV1
Видео Изход
Настройване прогресиращо сканиране
Отменяне на прогресиращото сканиране
Разделителна способност HDMI/DVI само DVD-R155
DivXR Pегистрация
За Rating Level Ниво Оценка
Настройване на Pодителския Контрол
За Смяна Πаролата
Натиснете бутоните , за да изберете Ниво Оценка
DVD-RAM DVD-RW
Записване
Записваеми дискове
DVD-RAM/-RW режим VR
Формати на запис
DVD-RW режим Видео/-R
Скорости на
Режим на запис
Видео, което не може да бъде записано
Относно сигналите за контрол на копирането
Относно бутона Info
Вид Копиране Сигнал
Медия
Записване от външната апаратура, която гледате
Записване веднага
Записване на текущата телевизионна програма, която гледате
За да спрете записването
Копиране от камера
030 100 .. 500 .. нормален
Правене на тактилно записване OTR
Скорост Режим на записване
Правене на запис с таймер
Ако настройките на таймера се припокрият
Редактиране на планирания списък
Използване на функцията ShowView
Изтриване на планирания списък
Не можете да изтривате програми, които се записват текущо
Ако желаете да коригирате кода ShowView, който въвеждате
EZ REC Mode Режим Записване EZ
Възпроизвеждане
Не поставяйте чужди тела върху или в тавичката на диска
Изпълнение на диск
Натиснете бутона OPEN/CLOSE
За DVD-ВИДЕО дискове
Използване на менюто Диск & менюто Заглавия
За DVD-RAM/DVD±RW/±R дискове
Търсене на раздел или запис
Изпълнение на стъпки
Изпълнение с намалена скорост
Пропускане на раздели или Записи
Ако натиснете бутона Skip
Изпълнение с повторение
Използване на бутона Anykey
Преместване директно до желаната сцена
Възпроизвеждане с повтаряне
Избиране на аудио език
Избиране на език за субтитрите
Смяна на ъгъла на камерата
Използване на Тактилен бутон
Използване на Показалци
Увеличаване
Настройка на Показалци
Възпроизвеждане на показалец
Изчистване на показалец
Използване на Маркери
Настройване на Маркери
Възпроизвеждане на Маркер
Възпроизвеждане на Аудио диск CD-DA/MP3
Възпроизвеждане на Аудио дискCD-DA/ MP3
Натиснете бутона Search Търсене
Аудио CDCD-DA Екранни елементи
Екранни елементи MP3
Възпроизвеждане на MP3 диск
Повтаряне на възпроизвеждането на Аудио/MP3 диск
Програмиране на записи
Режим Опции на възпроизвеждане
Описание на функцията MPEG4
Възпроизвеждане на MPEG4 Диск
Екран албум Връща се на Екран албум
Записване на Св Простр
Екранни елементи на списъка със заглавия
Основно редактиране Списък със заглавия
Редактиране
Списък със заглавия
Списък за възпроизвеждане
Съобщението може да зависи от вида на диска
Заключване защитаване на заглавие
Изтриване на заглавие
Редактиране на екранните елементи на списъка със заглавия
Изтриване на раздел от диска
Разделът не може да бъде изтрит, когато включва неподвижна
Картина
Екранни елементи на Редактиране на раздел
Добавяне на раздел
Изтриване на раздел
Скриване на раздел
Разделяне на заглавие
Изтриване на всички раздели
Следвайте стъпки от 1 до 3 на стр
За да създадете нов списък за възпроизвеждане
Създаване на списък за възпроизвеждане
Редактиране на сцена от списъка за възпроизвеждане
Преименуване на запис от списъка за възпроизвеждане
Възпроизвеждане на избрана сцена
Ред.епизод
Избраната сцена е преместена на избраната позиция
Променяне на сцена смяна на сцена
Преместване на сцена смяна на позицията на сцена
Изтриване на сцена
Добавяне на сцена
Списъка за възпроизвеждане
Управление на диск
Редактиране на името на диска
Следвайте тези инструкции, за да дадете име на диска
Форматиране на диск
Защита На Диска
Дискът е форматиран
DVD-VR и DVD-V се дефинират според техния формат на запис
Незавършване на диск Режим V/VR
Завършване на диск
Редактиране на съвместимост
Изтр Вс Спис Със Загл
DVD-RW Видео
DVD-RW VRF
Захранване
Допълнителна информация
Записване
Възпроизвеждане
Дистанционно управление
Звук
Записване с таймер
Hdmi само DVD-R155
Аудиоизход 48kHz
Спецификации
PAL B/G, D/K
Mpeg
Country Customer Care Center Web Site
English Ελληνικά Български Română AK68-01273E
Manual de instrucţiuni
Avertisment
Noţiuni introductive
Observaţie Importantă
Atenţie
Utilizarea discurilor
Măsuri de precauţie
Întreţinerea carcasei
Specificaţii pentru discuri
Stocarea pe disc
Redarea şi înregistrarea unui disc DVD±R
Utilizarea discurilor CD-R/-RW
Redarea şi înregistrarea unui disc DVD±RW
Redarea şi înregistrarea unui disc DVD-RW
Redarea şi înregistrarea unui disc DVD-RAM
Protecţie
Înregistrarea programului de televiziune pe care îl
Configurarea programelor care necesită supravegherea
Cuprins
Realizarea unei înregistrări cu temporizator
Slow Motion play /Step Motion Play Redare cu
Mod de înregistrare selectabil
Caracteristici generale
Scanare progresivă de înaltă calitate
Certificare DivX
Despre utilizarea acestui DVD recorder
Înainte de a consulta manualul de utilizare
Pasul 1 Selectaţi tipul de disc
Pasul 3 Înregistrare
Pasul 4 Redarea
Instalare
Accesorii
Pasul 6 Finalizarea şi redarea pe alte suporturi DVD
Marcă Buton
Coduri TV controlabile
Afişaj panou frontal
Descriere
Panou frontal
Panoul din spate DVD-R155
Panoul din spate DVD-R150
Prezentarea generală a telecomenzii
Conexiuni suplimentare
Conectare şi configurare
Modul TV
Modul DVD
Conectaţi cablurile antenei RF ca în imaginea alăturată
Antenă + DVD recorder + decodor extern + televizor
Video, Video Component şi modurile de ieşire progresivă
Vă veţi bucura de imagini de înaltă calitate
Cazul 1 Conectarea la o mufă de ieşire video Compozit
Cazul 2 Conectarea la o mufă de ieşire S-Video
Ducere fidelă a culorii
Cazul 1 Conectarea la televizor
Cazul 3 Mufele de ieşire Video Component
Roşu alb
Ce reprezintă HDCP?
Cazul 2 Conectarea la televizor cu o mufă DVI
Descrierea conexiunii Hdmi
Cazul 2 Conectarea unei camere video la mufa de intrare DV
Conectarea la o mufă de intrare AV3, DV
Navigarea prin meniul de pe ecran
Configurare sistem
Conectare şi configurare automată
Setarea ceasului
CH Canal Reglaţi canalul cu ajutorul butoanelor
Configurarea opţiunilor de limbă
Această funcţie vă permite să configuraţi setarea de sistem
Configurarea opţiunilor de sistem
Setarea duratei în modul EP
Crearea automată a capitolelor
Meniu TV
Anynet+HDMI-CEC numai DVD-R155
Pentru utilizarea funcţiei Anynet+HDMI-CEC
Ieşirea digitală
Configurarea opţiunilor audio
Compresie dinamică
Configurarea opţiunilor video
Dimensiunile televizorului
On Modul Nicam
Anularea funcţiei de scanare progresivă
Configurarea funcţiei de scanare progresivă
Ieşirea video
Înregistrarea DivXR
Rezoluţia HDMI/DVI numai DVD-R155
Apăsaţi pe butoanele pentru a selecta Rating Level
Despre nivelul de evaluare
Despre modificarea parolei
Discuri care permit înregistrarea
Înregistrarea
DVD-RAM/-RWModul VR
Formate de înregistrare
DVD-RWModul Video/-R
Intervalul de date pen Mod
Mod de înregistrare
Conţinut video neinscriptibil
Cprm
Despre butonul Info
Informaţii referitoare la semnalele de control la copiere
Înainte de iniţializare
Înregistrarea imediată
Înregistrarea programelor vizionate pe surse externe
Pentru a întrerupe înregistrarea
Pentru a opri înregistrarea
Copierea de pe o cameră video
Realizarea unei înregistrări dintr-o singură apăsare OTR
Realizarea unei înregistrări cu temporizator
Timer
TUE Marţi MO-FR De luni până vineri WED Miercuri
TUE Marţi
Apăsaţi pe butonul OK
Finalizarea listei de înregistrări programate
Dacă se suprapun setările temporizatorului
Înainte de ora iniţială a înregistrării următoare
Ştergerea listei de înregistrări programate
Înainte de a preseta DVD recorderul
Utilizarea funcţiei ShowView
Porniţi televizorul şi DVD recorderul
Opţiunea avansată ShowView
Tipurile discurilor care pot fi redate
Redarea
Formă disc Timp maxim de
Film
Discuri care nu pot fi redate
Redarea unui disc
Utilizarea butoanelor de redare corespunzătoare
Utilizarea meniurilor pentru disc şi pentru titluri
Pentru discurile DVD-VIDEO
Pentru discuri DVD-RAM/DVD±RW/DVD±R
Step Motion Play Redare secvenţială
Slow Motion Play Redare cu încetinitorul
Saltul capitolelor sau al pistelor
Dacă apăsaţi pe butonul Skip
Repetarea derulării
Utilizarea butonului Anykey
Deplasarea directă la scena dorită
Derularea repetată
Modificarea unghiului camerei
Selectarea limbii de subtitrare
Selectarea limbii pentru dublare
Utilizarea semnelor de carte
Apropierea imaginii
Setarea semnelor de carte
Redarea unui semn de carte
Ştergerea unui semn de carte
Utilizarea marcatorilor
Setarea marcatorilor
Redarea unui marcator
Elemente ecran CD audio CD-DA
Redarea unui CD AudioCD-DA/MP3
Redarea unui CD audio CD-DA
Elemente de ecran pentru fişiere MP3
Redarea unui disc cu fişiere MP3
Redarea repetată a unui disc audio/MP3
Modul Play Option Opţiune redare
Redarea unui disc cu imagini
Pentru a programa pistele
Selectată în lista de redare
Descrierea funcţiei MPEG4
Redarea unui disc MPEG4
AVI, .DIVX, .avi, .divx
Înregistrarea pe spaţiul disponibil de pe disc
Redarea listei de titluri
Editare elemente ecran pentru listă titluri
Editarea de bază Lista de titluri
Editare
Redenumirea etichetarea unui titlu
Lista de titluri
Ştergerea unui titlu
Blocarea protejarea unui titlu
Editarea elementelor de pe ecran ale listei de titluri
Ştergerea unei secţiuni a unui titlu
Adăugarea unui capitol
Editarea unui capitol
Ştergerea unui capitol
Elemente ecran pentru editare capitole
Ascunderea unui capitol
Împărţirea unui titlu
Ştergerea tuturor capitolelor
Urmaţi paşii 1-3 de la pagina
Crearea unei liste de redare
Editare avansată Listă de redare
Redarea intrărilor din lista de redare
Play List
Editarea unei scene pentru lista de redare
Redenumirea unei intrări din lista de redare
Redarea unei scene selectate
Pentru a întrerupe redarea scenei, apăsaţi pe butonul Stop
Mutarea unei scene Modificarea poziţiei unei scene
Modificarea unei scene Înlocuirea unei scene
Ştergerea unei scene
Adăugarea unei scene
Editarea numelui discului
Copierea unei intrări în lista de redare
Ştergerea unei intrări din lista de redare
Formatarea unui disc
Protecţia discului
Definalizarea unui disc modul V/VR
Finalizarea unui disc
Editarea capitolelor compatibile
Ştergerea globală a listei de titluri
Depanare
Informaţii suplimentare
Alimentare
Înregistrare
Sunet
Alte potenţiale probleme
Înregistrarea temporizată
Telecomanda
Ieşire audio
Specificaţii
Contact Samsung World Wide
English Ελληνικά Български Română AK68-01273E