∙ STATUS INDICATORS
MODEL
Page
∙ SPECIAL FEATURES
FOR YOUR RECORDS
SAFETY PRECAUTIONS
CAUTIONS
GETTING STARTED
CONTENTS Page
SPECIAL FEATURES
STATUS INDICATORS
Conventions used in this manual
INTRODUCTION
High-speed laser copying
MAIN FEATURES
Substantial copying features such as
Optional features
Charger cleaner
PART NAMES AND FUNCTIONS
Overall layout
Power switch
Reversing single pass feeder RSPF Feeding roller cover
PART NAMES AND FUNCTIONS
Fusing unit release levers
Accessories
PAPER SIZE indicators
Operation panel
INTERRUPT key and indicator p
ZOOM indicator p.24
AUTO PAPER SELECT indicator
START key and indicator
PRESET RATIO selector keys and indicators
ORIGINAL SIZE ENTER key and indicators
Be sure to allow the required space around the machine for
COPIER INSTALLATION
Do not install your copier in areas that are
Also make certain the outlet is properly grounded
Do not touch the photoconductive drum green portion
CAUTIONS ON HANDLING
4 Push the paper tray firmly back into the copier
LOADING COPY PAPER
1 Gently lift and pull out the paper tray until it stops
Push the pressure plate down until it locks in place
When using 5-1/2 x 8-1/2 copy paper, load it into the uppermost
LOADING COPY PAPER
Squeeze the lock lever of the front guide and slide the
3 front guide to match the width of the paper
Use the ORIGINAL SIZE ENTER key to select the paper size which is set
To set the selected paper size, press the PAPER SIZE ENTER key
Use the TRAY SELECT key to select the paper tray of
9 which the paper size has been changed
Enter your account number using the numeric keys
When copying is completed, press the AUDIT CLEAR 2 key
AUDITING ACCOUNTS
NORMAL COPYING
Power on
Turn the power switch on
2 Adjust the original guides to the size of the originals
Ensure that the one-sided to one-sided copying mode is
Adjust the copy density
NORMAL COPYING
4 selected in the ORIGINAL TO COPY section of the operation panel
Ensure that no original is left on the original table
Set the number of copies using the numeric keys
Two-sided copies from one-sided originals
Press the START key
Set the number of copies and press the START key
Ensure that no original is left on the original table. Adjust
Two-sided copies from two-sided originals
Use the ORIGINAL TO COPY key to select
To set this feature, see page 22. This feature can also
One-sided copies from two-sided originals
The image of every front side can be rotated 180 using
the image rotation feature. This feature is useful when
Turn the power switch on
COPYING FROM THE ORIGINAL TABLE
Close the document feeder cover
4 Ensure that the desired paper tray is selected
Press the START key
COPYING FROM THE ORIGINAL TABLE
Adjust the copy density
Set the number of copies using the numeric keys
COPYING FROM THE ORIGINAL TABLE
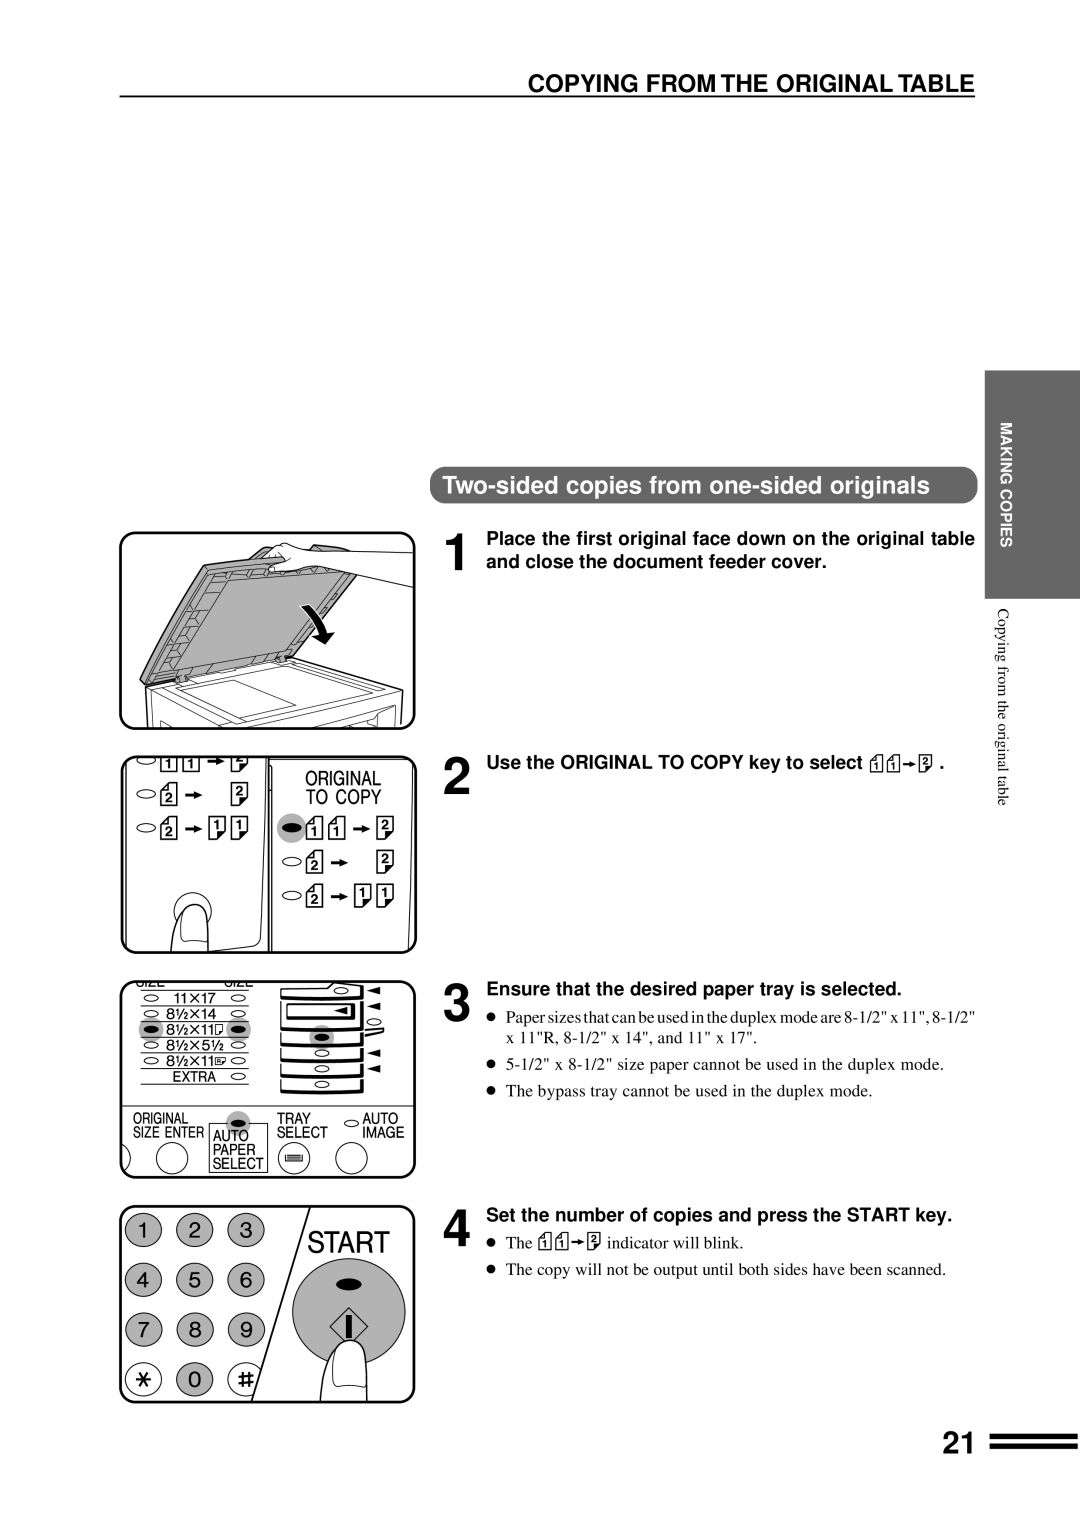
Place the first original face down on the original table
1 and close the document feeder cover
Ensure that the desired paper tray is selected
Press and hold down the ORIGINAL TO COPY key for
Setting image rotation in duplex copying
Place the second original face down on the original table
5 and press the START key again to copy onto the other side
2 the desired paper size
REDUCTION/ENLARGEMENT/ZOOM
Automatic
1 original table
Place the original in the document feeder tray or on the
1 original table Use the PRESET RATIO selector , keys and the
REDUCTION/ENLARGEMENT/ZOOM
Manual
Set the paper guides to the copy paper width
BYPASS FEED special paper
1 Unfold the bypass tray
4 Press the TRAY SELECT key to select the bypass tray
Leave the copy quantity at 0 if using special papers. Set
5 the number of copies if using standard copy paper or envelopes
BYPASS FEED special paper
The offset stack mode is enabled in the factory default setting
Sort mode
Group mode
If the offset stack mode is disabled, copies will not be offset
3 Ensure that the desired copy paper size is selected
Copying in the sort mode
2 Press the SORT/GROUP key to select the SORT mode
SORT/GROUP
2 the originals for interrupt copying
When all INTERRUPT copies are finished, press the
INTERRUPTING A COPY RUN
Press the INTERRUPT key
Press the AUTO/MANUAL/PHOTO key
AUTOMATIC EXPOSURE ADJUSTMENT
Press the AUTO/MANUAL/PHOTO key to select the PHOTO mode
MAKING COPIES Toner save mode
TONER SAVE MODE
Press the AUTO/MANUAL/PHOTO key to select the MANUAL mode
To enter the toner save mode, press the light key
3 , keys to change the copy ratio in the vertical direction
Use the PRESET RATIO selector , keys and zoom
XY ZOOM
Press the XY-ZOOM key
SPECIAL FEATURES XY zoom
XY ZOOM
Set the number of copies Press the START key
Use the PRESET RATIO selector , keys and zoom
The B/W REVERSE feature is used to reverse black and white areas
B/W REVERSE
Press the B/W REVERSE key
Make all other desired copier selections and press the START key
Place the originals on the original table with the center
DUAL PAGE COPY
Press the DUAL PAGE COPY key
Set the number of copies Press the START key
8-1/2 x 11 is performed, the image cannot be rotated
ROTATION COPYING
IMAGE mode has been selected. Even if user program No. 7 is not set
the flashing indicator to prevent image loss on the copies
2 the desired paper size
2 IN 1 OR 4 IN
Use the TRAY SELECT key to select the paper tray with
To confirm or set the layout pattern for 2 in 1 copying
Press the START key
Enter the desired pattern number using a numeric key
2 IN 1 OR 4 IN
Press the 2 IN 1 / 4 IN 1 key to complete the selection
A B
Press the ERASE key to select the desired erase mode
ERASE
AB A B
Set the number of copies Press the START key
ERASE
SPECIAL FEATURES Erase
Press the MARGIN SHIFT key
until the MARGIN SHIFT indicator will blink
MARGIN SHIFT
To confirm or set the location of the margin, press and
1 and slide the cover out until it stops
TONER CARTRIDGE REPLACEMENT
GENUINE SUPPLIES
Open the bypass tray. Lift slightly on the side cover
Toner cartridge life
TONER CARTRIDGE REPLACEMENT
handle on the cover. The indicator will go out
1 seconds until all the alarm indicators
Open the feeding roller cover and pull the original gently
i MISFEED REMOVAL
Misfeed in the RSPF
First confirm the misfeed location
Misfeed in the bypass tray
Open and close the document feeder cover to cancel the
4 misfeed location indicator
MISFEED REMOVAL
Push gently on both sides of the front cover to open the 1 cover
B. Misfeed in the fusing area
A. Misfeed in the paper feed area
Check the misfeed location. Remove the misfed paper
MISFEED REMOVAL
Carefully remove the misfed paper. Lower the fusing
C. Misfeed in the transport area
Turn the roller rotating knob in the direction of the
1 the misfed paper 2 Close the paper tray
Misfeed in the upper paper tray
Close the side cover by pressing the handle on the 3 cover
Gently lift and pull out the upper paper tray and remove
3 pull out the lower paper tray and remove the misfed paper
Misfeed in the lower paper tray
Grasp the handle of the lower side cover and gently 1 open the cover
Remove the misfed paper
Maintenance required
MAINTENANCE REQUIRED
DEVELOPER REQUIRED
INDICATORS
Program name
USER PROGRAMS
List of user programs
Program
and blink and “- -” appears in the copy quantity display
Setting the user programs
Enter a program number using the numeric keys
USER PROGRAMS
Press the START key
Select the desired parameter using the numeric keys
function will be disabled
USER PROGRAMS
1. Enter a 3-digit account number using the numeric keys
Settings for auditing accounts
Program No. 10 Auditing mode
1. Select the desired setting using the numeric keys
number to be changed
3. Enter a new account number using the numeric keys
USER PROGRAMS Program No. 12 Account number change
Program No. 13 Account number deletion
Example 1,234 copies
USER PROGRAMS Program No. 14 Number of copies per account
1. Use the copy ratio display key to select the account number
2. Press and hold down the 0 key
number to be reset
USER PROGRAMS Program No. 15 Resetting account
1. To reset an individual account, press the 0 key
To reset all accounts, press key 2. Press the START key
Auto power shut-off mode
POWER SAVE MODES
Preheat mode
Copying from the auto power shut-off mode
POWER SAVE MODES
Setting the power save modes
Copying from the preheat mode
Bypass tray paper feed roller
USER MAINTENANCE
bypass tray with a soft, clean cloth dampened with
Original table and document feeder cover
3 charger cleaner out by holding the tab
USER MAINTENANCE
Transfer charger cleaning
Turn the power switch off
COPIER TROUBLE?
Problem
Solution
Solution
COPIER TROUBLE?
COPY/FAX key
Problem
COPIER TROUBLE?
Self-diagnostic function
Problem
Solution
Types and sizes of copy paper
SUPPLIES
1. Store the supplies in a location that is
SUPPLIES
Genuine supplies statement
Proper storage
GENERAL
SPECIFICATIONS
GENERAL INFORMATION Specifications
SPECIFICATIONS
REVERSING SINGLE PASS FEEDER
EQUIPMENT
CONTENTS
OPTIONAL EQUIPMENT
250-SHEET PAPER FEED UNIT AR-DE5 2x250-SHEET PAPER FEED UNIT AR-DE6
These options are not used for the copier operation
SYSTEM CONFIGURATION
System configuration OPTIONAL
2x250-sheet paper feed unit
250-sheet paper feed unit
250-SHEET PAPER FEED UNIT AR-DE5
PART NAMES
Loading copy paper
Close the paper tray and the side cover
Misfeed removal
250-SHEET PAPER FEED UNIT AR-DE5/2x250-SHEET PAPER FEED UNIT AR-DE6
Specifications
AR-DE5
AR-DE6
INDEX
INDEX
Section 3. Ingredients
MATERIAL SAFETY DATA SHEET
Section 1. Product Identification
Section 2. Supplier’s Name and Address
Section 8. Reactivity Data
Section 6. Physical Chemical Characteristics
Section 9. Precautions for Safe Handling and Use
Section 7. Fire and Explosion Data
Ingredients
Section
Product Identification
Supplier’s Name and Address
Special Fire Fighting Procedure
Section 6. Physical Chemical Characteristics
Section 9. Precautions for Safe Handling and Use
Ignition Temperature
MEMO
NOTICE for users in the USA
For users in the USA
SHARP ELECTRONICS CORPORATION
PRINTED IN CHINA
AR-207
SHARP CORPORATION