AR-5520N
Operation Guide
Page
Contents
101
Customising Settings System Settings
103
104
Introduction
Part Names and Functions
Fusing unit paper guide
Document feeder tray when the Rspf is installed
Toner cartridge Contains toner. p.98 Roller rotating knob
Photoconductive drum
Operation Panel
Auto Image key Auto % / indicator
Clear key Preset Ratio selector keys , / indicators
Rspf indicator when the Rspf is installed
Zoom indicator
Power on
Power on and OFF
Power OFF
Power save modes
Loading Paper
Paper tray type Paper type Size Weight Capacity
Paper
Special papers
Loading the paper tray
Loading Paper
Locks in place
Load paper into the tray
Unfold the bypass tray
Important points when inserting paper in the bypass tray
Loading the bypass tray
Envelopes
Changing a Trays Paper Size Setting
Follow these steps to change a trays paper size setting
Changing bypass trays paper size setting
Press the Start key and then the Tray Setting key
Customise the bypass tray setting
Important points when using the printer mode
Operation in COPY, PRINTER, and Scanner Modes
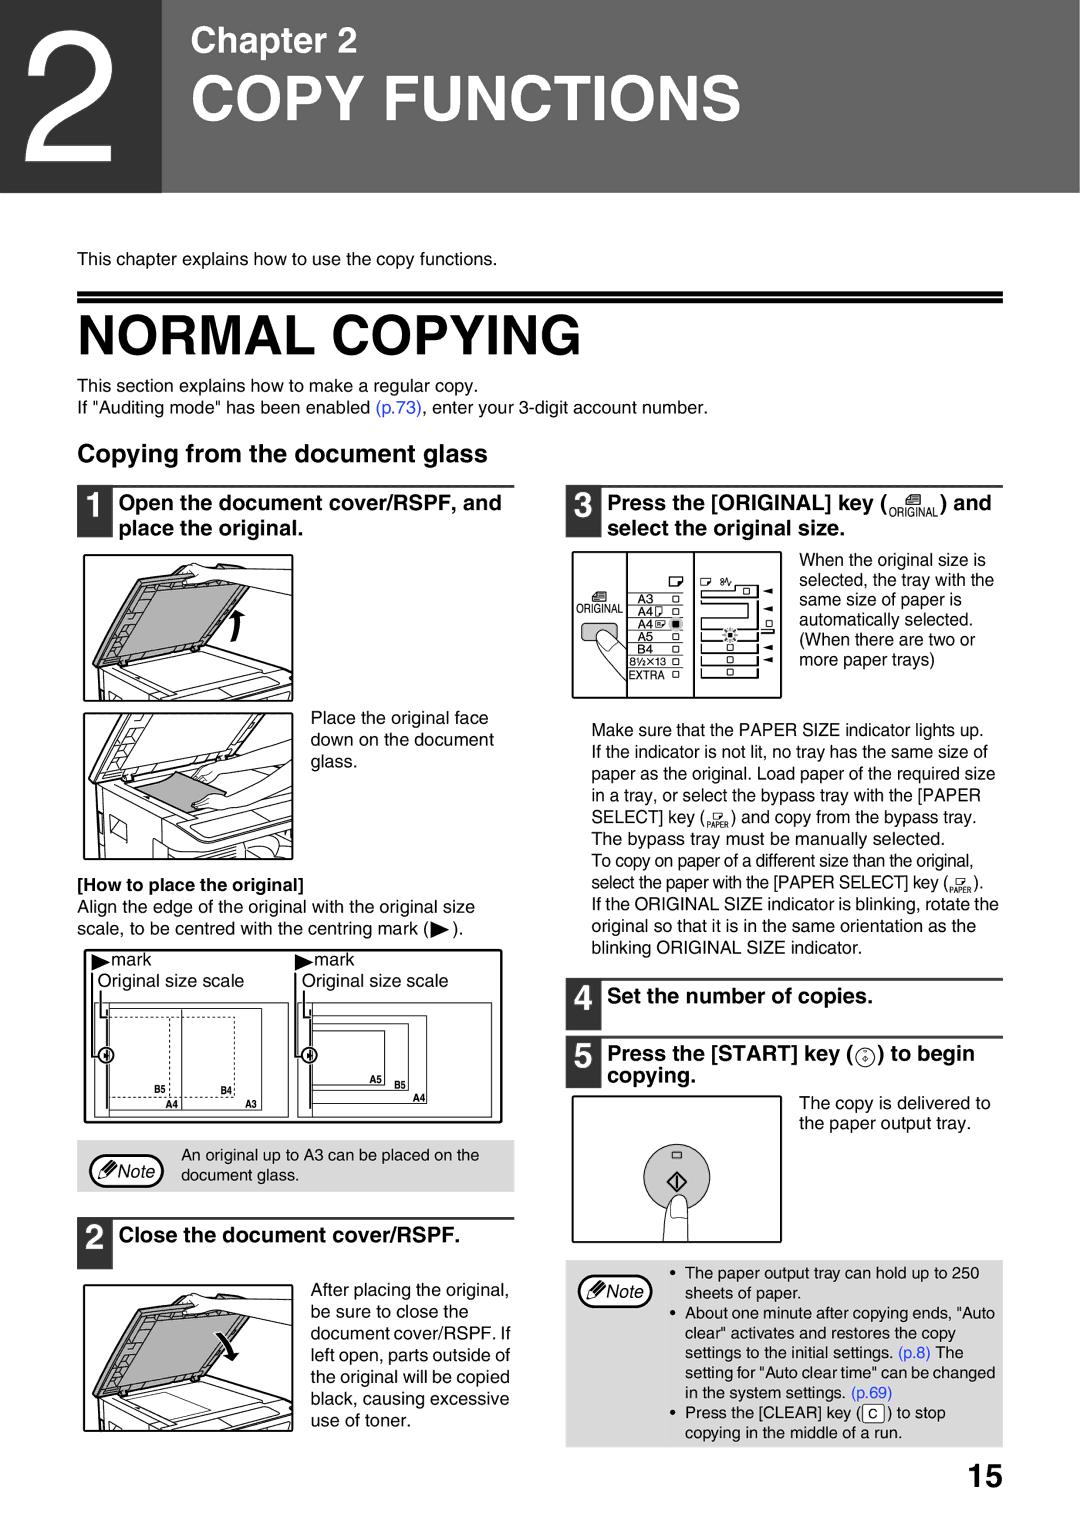
Copying from the document glass
Normal Copying
Open the document cover/RSPF, and place the original
Close the document cover/RSPF
Copying from the Rspf
Removing the document cover
Stream feeding mode
Copying books or originals with folds or creases
Originals that can be used in the Rspf
Making a Copy Darker or Lighter
Auto tray switching when there are two or more paper trays
Selecting the Tray
Original types
Important note when making a large number of copies
Setting the Number of Copies
REDUCTION/ENLARGEMENT/ZOOM
Automatic Ratio Selection
Fine adjustment of the ratio
Selecting a preset ratio
Manual Ratio Selection
Press the Auto Image key Auto %
Selected ratio for the vertical direction will be entered
Press the XY-ZOOM key
Press the Copy ratio display key
Press the Copy ratio display key
Automatic TWO-SIDED Copying
Used when making
Bypass tray can only be
One-sided copies from
Using the Rspf
Using the document glass
Press the Start key
Place originals in the RSPF. p.16
Press the Original to Copy key to exit the setting
Press a numeric key to enter Setting code
Image Rotation in Duplex Copying
Display returns to the normal number of copies display
Copy original a
TWO-SIDED Copying Using the Bypass Tray
Place original B as shown below
Vertically-oriented original
Dual page Copying
Interrupting a Copy RUN
If Auditing mode is enabled
Interrupt Copying
Press the Interrupt key to interrupt the copy run
Rotating the Image 90 Degrees Rotation Copy
Convenient Copy Functions
Sort COPY/GROUP Copy
This section explains major convenient copy functions
Place the originals. p.16
Press the SORT/GROUP key To select the desired Mode
If the memory becomes full
If the paper output tray becomes full
Using 2 in 1 / 4 in 1 copy in combination with sort copy
To select the desired mode
Mode is selected in the order 2 1 , Off
Press the 2 in 1 / 4 in 1 key
Use the 2 in 1 / 4 in 1 key / to access the setting
Setting the layout pattern
Select the setting code by pressing a numeric key
Press the 2 in 1 / 4 in 1 key To exit the setting
Select the location of the margin
Creating Margins When Copying Margin Shift
Place the originals
Press the Margin Shift key
Erasing Shadows around the Edges of a Copy
Press the Erase key Select the desired erase mode
Make sure that Sharp AR-XXXX is selected as the printer
Basic Printing
Click the Print button
Print dialog box will appear
Button
Opening the Printer Driver from the Start
Printer Driver Setting Screen
Printing Multiple Pages on ONE page N-Up Printing
Setting Advanced Print Functions
Select the order of the pages
Landscape
Rotating the Print Image 180 Degrees
Fitting the Printed Image to the Paper
Fit To Paper Size
Rotate 180 degrees
Printing Faint Text and Lines in Black
ENLARGING/REDUCING the Print Image Zoom
Text To Black/Vector To Black
Select the zoom ratio
Adjusting the Brightness and Contrast of the Image
Printing result
TWO-SIDED Printing
Sided Book Sided Tablet Vertical Horizontal
Bound at the side Bound at the top
Saving Settings AT the Time of Printing
Saving Frequently Used Print Settings
User Settings
Using saved settings
Scanning Overview
This chapter explains how to use the scanner functions
Flow chart shown below provides an overview of scanning
Device server tab Favorites tab
Favorites list window
Disconnect button
Properties button
Delete button
Scanning from the operation panel of the machine
Scanning Using the Keys on the Machine
Press the Scan key
Press the Scan Menu key to begin scanning
Click to save your settings and exit the dialog box
Scan Setup area Set the scan conditions
Outline of Button Manager
Tab
Display/Button Application that starts Manager menu
Button Manager Settings
Button Manager scan menu factory default
Scanning from a TWAIN-COMPLIANT Application
Scanning from Your Computer
Select Sharp MFP Twain U, and click the Select button
Click the Preview button
Specify the scanning area and set the scan preferences
Scanner driver settings p.52
Set-up screen
Scanner driver settings
Preview screen
Preview screen
Rotate button
Image Size button
Scan screen WIA driver will appear
Scanning from a WIA-COMPLIANT Application Windows XP/Vista
Click the Scan button
Scanner and Camera Wizard will appear
Scanning from the Scanner and Camera Wizard Windows XP
Click the Finish button
Make sure that the Rspf indicator is lit
Adjusting the Automatic Exposure Level
Exposure level indicators show the current setting
Auto indicator Auto stops blinking and lights steadily
Configuring from the Web
HOW to Access the WEB
When finished, close the Web
About the WEB
Status Information Display the printer status
Monitoring the Status of the Machine Status TAB
Printer Status window
System Status window
Network Settings window
Configuring the Network Settings Network Settings TAB
Host Name
IPv6 Default Gateway
10 IPv6
DHCPv6
Authentic Community
Snmp Configuration window
SysContact SysName
SysLocation
Filter Configuration window
IP Filter Mode
Filter Mode
IPv6 Filter Mode
MAC Address Filter Config Filter address1-10
Telnet
Port Configuration window
RAW Print
MAC Address Firmware Version
Managing the System Information System Information TAB
System Information window
Re-enter New Password Re-enter the new password
Password window
New Password
Reboot Reset to Factory Default
Reset window
System Settings
Pattern
10 mm
Left edge
300 dpi
50%
Explanation Number
Minimum
Short beep
Base settings
Selecting a Setting for a System Setting
Enter the desired setting code by pressing a numeric key
Press the Light key to complete the settings
Auditing Mode
Settings for Auditing Mode
Auditing Mode Settings
Factory default settings
For the setting codes, see Auditing Mode Settings p.73
Selecting Auditing Mode Settings
Account number entry
Auditing mode
Account number change
Account number deletion
Copying when Auditing mode is enabled
Resetting account
This chapter describes troubleshooting and misfeed removal
Troubleshooting
Any one of the alarm indicators Is lit or blinking
Any one of the alarm indicators , , , , is lit or blinking
MACHINE/COPYING Problems
Paper is not loaded properly
Problem Cause and solution Misfeed occurs
Pieces of paper inside machine
Paper misfeed Too much paper is loaded in the tray
Any other indicators are lit
Display or the Original Data indicator Data is Blinking
Original smudged or blotchy
Copies Transfer charger is dirty 102
Problem Cause and solution Machine is set to off-line mode
Printing and Scanning Problems
Printer driver has not been installed properly
Machine is not correctly connected with your Computer
Been printed completely
Printed, but the print data has not
Uneven
Printed image is dirty
Poor scanning quality
You have not specified a suitable resolution
Brightness and contrast settings are not suitable
There is not enough machine memory
Networking FAQ
Push switch next to the LAN
What can I do by using the small
Connector?
How can I configure an IP
Why does the installation
Running the configuration utility Set the IP Address
Machine
Driver software hang?
Network settings
Why does the IP address change
Factory default every time
Machine is booted
Scanner function using
Question Answer Why cant I connect to the device
How can I disable security
What is the default user name
Indicator
Indication Cause and solution Maintenance
Replacement
Required indicator Toner cartridge
Misfeed in the Rspf
Misfeed Removal
Remove the misfed original
Section a
Section C
Misfeed indicator will go out
Misfeed in the Bypass Tray
Close the front cover and side cover
Misfeed in the Machine
Misfeed in the paper feed area
Allow easier removal
Misfeed in the fusing area
Be careful not to tear the misfed paper during removal
Misfeed in the transport area
Close the side cover
Push the upper paper tray in completely
Misfeed in the Upper Paper Tray
Close the upper paper tray
Open the lower side cover
Misfeed in the Lower Paper Tray
Remove the misfed paper
Close the lower side cover
Replacing the Toner Cartridge
Required indicator
Checking the Total Output Count
Checking the Total Output Count and Toner Level
Total output count
Total copy count
Display will show
Checking the Toner Level
Press the Light key to return to the normal display
Cleaning the Document Glass and RSPF/DOCUMENT Cover
Routine Maintenance
Cleaning the Transfer Charger
Cleaning the Bypass Tray Paper Feed Roller
HOW to Manually Reset the Network Settings of the Machine
AR-5520N AR-5516N
Peripheral Devices
Reversing Single Pass Feeder
Specifications
Sheet Paper Feed UNIT/2 X 250-SHEET Paper Feed Unit
Part names
Proper Storage
Storage of Supplies
Store the supplies in a location that is
Store paper in the wrapper and lying flat
Operation Guide