AR-FX12
FAX interface cable and Line cable
Important Notice for New Zealand Users
Document
Factory default administrator password
Press the System Settings key
Touchkey. the Administrator Settings
Guide
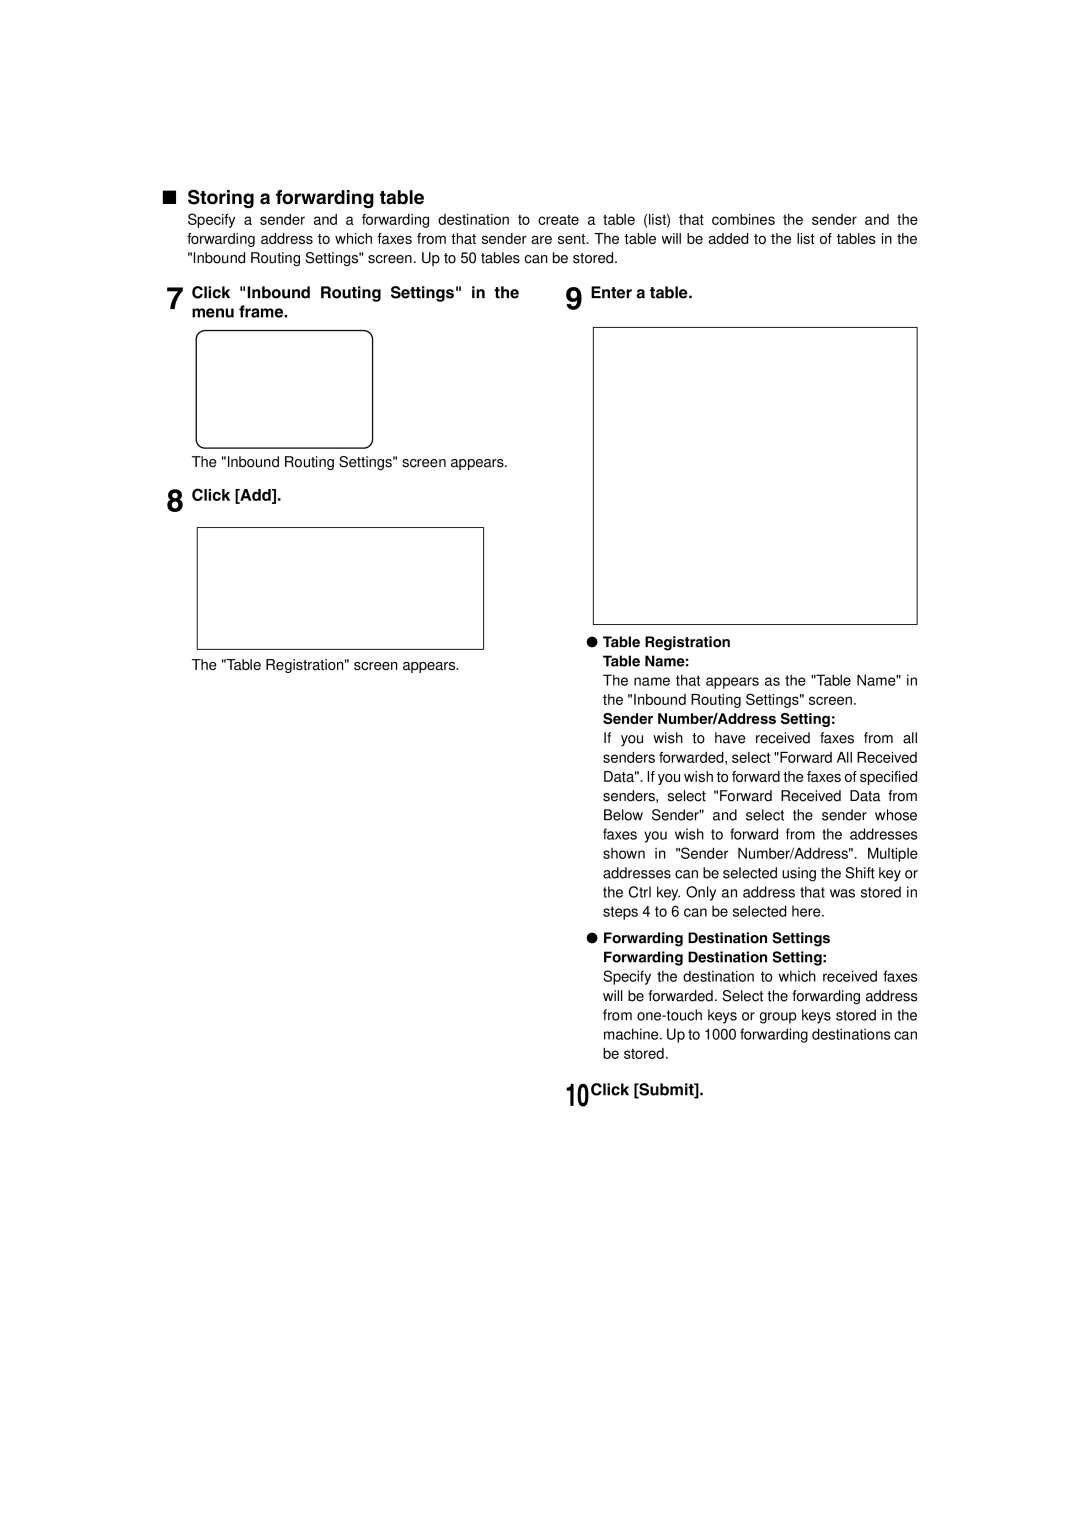
Enter a fax number and click Add to List
Enable Inbound Routing
Enabling inbound routing Store sender numbers
Click Submit
Menu frame
Click Inbound Routing Settings
Storing a forwarding table
Click Add
Configuring advanced inbound Routing settings
Activate the table
Other Changes
Introduction
Contents
Chapter Appendix
To USE this Product Correctly AS a Facsimile
Fax power switch
Lithium battery
Line connection
Important Safety Information
Important safety information
Your fax machine and the telephone system
Page
Chapter
Connecting AN Extension Phone
Points to Check and Program After Installation
Connecting AN Extension Phone
Program the senders name and senders number
Look AT the Operation Panel
FAX Mode Condition Settings Screen
Condition settings screen
Address book screen alphabetically ordered
Original sizes
Originals
Originals That can be Faxed
Automatic reduction of faxed document
Loading a Document
Using the Automatic Document Feeder
Using the Document Glass
Insert the stack into
Manually Setting the Scanning Size
Storing or Deleting AN Original Size
Resolution settings
Selecting the Resolution
Change the resolution
Touch the Resolution key
Change the exposure
Exposure settings
Selecting the Exposure
Touch the Exposure key
Convenient Dialing Methods
Basic Operations
Sending a FAX
Basic Procedure for Sending Faxes
If needed, adjust the exposure setting. Refer to
Check the original size
Press the Start key
Cancelling transmission
Dial the fax number
10After the last page is scanned, touch the READ-END key
Touch the one-touch key for the desired destination
Continue from of Basic Procedure for Sending Faxes
Sending a FAX by Speed Dialing
Enter the 3-digit Speed Dial number
Touch the desired Ldap server key
FAX Number Entry with Global Address Search
Touchkey. the Global Address Search
Enter a keyword for search
ENLARGING/REDUCING the Image Before Transmission
Touch the key under Send Size
Touch the key of the desired enlargement or reduction size
Original you loaded
Make sure the machine is in fax mode
Faxing a TWO-SIDED Original
Pages 2-2to
Storing transmission jobs memory transmission
If a transmission error occurs
Quick On-line
If the receiving party is busy
Cancelling a FAX Transmission
Cancelling ON-HOOK Dialing
If received data cannot be printed
Receiving Faxes
Receiving a FAX
Machine will ring* and reception will automatically begin
Using Convenient Functions 1 Advanced Transmission Methods
Sender
If you enter an incorrect number
Using Broadcast Transmission
Check the destinations
If you select an incorrect auto-dial key
Inkey.fax mode, touch the Special Modes
Using Edge Erase
Select the desired erase mode
Touch the Erase key Touch the outer OK key
To cancel Dual Page Scan
Selecting Dual Page Scan
Touch the Dual page Scan key
Setting UP a Timer Transmission
Touch the Timer key
To cancel 2in1
Fax mode, touch the Special Modes key Touch the OK key
Touch the 2in1 key
Using Card Shot
Touch the Card Shot key
Card shot screen
To cancel card shot
Place the original on the document glass
10Touch the READ-END key
Faxing a Large Number of Pages JOB Build Mode
Touch the JOB Build key
Repeat steps 7 and 8 until all pages have
Position of senders information
OWN Number Sending
Example of fax page printed out by the receiving machine
Outside scanned data
Touch the Transaction Report key
About the Print Original Image checkbox
Polling memory
Transmission and Reception Using the Polling Function
Polling
Your machine Other machine
Touch the Polling key and then touch the OK key
Using the Polling Function
Manual polling
Touch the Special Modes key and then touch the key
Touch the Memory BOX key and then touch the Data Store key
Using Polling Memory
To cancel scanning
Touch the Public BOX key
Deleting document data from the Public Box
Restricting polling access polling security
Printing document data in the Public Box
Touch the Memory BOX key and then touch the Print Data key
Using a Program
Fax mode, load the document
Touch the Special Modes key and then the Program key
Transferring received data
Using the Transfer Function
Program the fax number of the transfer destination
Touch the YES key
Installing the PC-FAX driver
Using the PC-FAX function
Page
Using Convenient Functions 2 Transmission Using F-CODES
SEP SUB
Transmission Between Machines Supporting F-CODES
This machine
PWD SID
Touchagain. the SUB Address key once
Creating a Memory BOX for F-CODE Transmission
Touch the SUB Address key
Use the numeric keys to enter
How F-code polling memory works
Using F-CODE Polling Memory
Code Polling Memory
Scanning a document into an F-code polling memory box
Procedure for F-CODE Polling
Cancelling a transmission
Checking and clearing document data in a memory box
Code Confidential Transmission
Code Confidential Transmission
Press the numeric keys to enter the 4-digit print PIN
Press
Start Print
Code Relay Broadcast Transmission
Relay machine your machine
Your machine is the relay machine
Using the F-CODE Relay Broadcast Function
Using the F-CODE Relay Request Function
Your machine requests a relay broadcast
Page
Using Convenient Functions 3 Convenient Methods of USE
Changing the reception mode to Manual Reception
Using AN Extension Phone
Using AN Extension Phone to Receive a FAX
Touch the Receive Mode key
Receiving a FAX After Talking Manual Reception
When the machine is in Fax mode
When the machine rings, lift the extension phone and speak
Replace the extension phone
Dial the number of the other party or touch a one-touch key
Settings
Sending a FAX After Talking Manual Transmission
Load the original. see
Programming
Touch the Direct Address
Programming
Touch the Address Control key
Program key
Storing ONE-TOUCH Dial Keys
14Touchname. the key, and then check the key
15Check the transmission settings
10Use the numeric keys to enter the fax number
13Touch the OK key
Editing and Deleting ONE-TOUCH Keys
Touch the one-touch key that you wish to edit or delete
If you cannot edit or delete a one-touch key
Touch the OK key in the screen of step
Storing a Group KEY
Touch the Address key
Check the name of the key refer to on
Touch the group key that you wish to edit or delete
Editing and Deleting Group Keys
Touch the AMEND/DELETE key
Touch the Delete key in the screen of step
Storing a Program
Touch the Settings key
Touchstore. the keys for the settings you wish to
Editing and Deleting Programs
Storing a Group Index
Enter a maximum of 6 characters for the index name
To change a user index name, re-enter the name as explained
Programming AN F-CODE Memory BOX
Touch the BOX Name key
Tokey.set a passcode, touch the Pass Code
Setting for F-CODE Polling Memory Boxes Polling Times
Touch the Print PIN key
Use the numeric keys to enter a 4-digit number
Selected End Receiving machines are
Setting for F-CODE Relay Broadcast Memory Boxes Recipient
Address selection
Displayed You Can Delete
Touch the keys as needed to edit or delete the information
Cancel
Editing and Deleting a Memory BOX
Touch the List Print key
Troubleshooting
When a Transaction Report is Printed
Information appearing in the TYPE/NOTE column
Message screen Alarm Meaning of message Action
Viewing the Communication Activity Report
Document Feeder
Problems and Solutions
Problem Check Solution
Is the volume set to low? Set the speaker volume to
Manual For Appear General Information Transmitted image
Made Off? Low, medium, or high
Page
KEY Operator Programs
KEY Operator Programs
KEY Operator Program List
Touchkey. the KEY Operator Programs
Using the KEY Operator Programs
For Factory default Setting Key Operator Code Number
Press the CA key to exit the program
Operation Settings
KEY Operator Programs
Default exposure settings
FAX Settings
Scan complete sound setting Fax own number and name set
Fax default settings
Remote reception number setting
Pause time setting
Speaker volume settings
Transaction report print select setting
Auto reduction sending setting
Fax send settings
Disable of fax number direct entry
Rotation sending setting
Recall in case of line busy
Call timer at memory sending
Recall in case of communication error
Country Differentiation Table
Duplex reception setting
Fax receive settings
Auto receive reduce setting
Print style setting
Passcode number setting
Anti junk fax setting
Polling security setting
Fax polling security
Printing OUT Settings
Page
Appendix
Specifications
MH, MR, MMR, Jbig
Index
Numerics
Programming frequently used operations
13 to
Print
15 to 3-16
15 to
Viewing the communication activity report
Page
Sharp Electronics Europe GmbH
TINSE2787GHZ2