FO-11/FO-51/FO-71/GQ-56
UX-21/UX-41/UX-61
FACSIMILE
MODEL
Introduction
Display
Important safety information
1. Installation
Table of Contents
A Look at the Operation Panel
2. Sending Faxes
10. Troubleshooting
Maintenance
Answering Machine Connection
Special Functions
VOLUME key
A Look at the Operation Panel
Rapid Dial keys
Display
8 START key
11 RESOLUTION / RECEPTION MODE key
9 STOP key
10 COPY/HELP key
Unpacking Checklist
1. Installation
Points to keep in mind when setting up
About condensation
1. Installation
Connecting the handset
Connections
Removing the packing paper
4 Flip down the front paper guide and then close the operation panel
Connecting the power cord
3 Remove the packing paper
1. Installation
Connecting the telephone line cord
Dial mode
Press FUNCTION once and 4 once
Attaching the original document support
Moving your fax and reconnecting
Extension phone optional
1 Remove the seal covering the TEL. SET socket
1. Installation
Loading the Thermal Paper
Flip up the front paper guide
Place the roll of thermal paper in the
Unwrap the roll of thermal paper and insert the paper shaft
compartment, making sure the ends of
the paper shaft fit into the notches on
Handling thermal paper
Replacing the thermal paper
1. Installation
8 Close the operation panel, making sure it clicks into place
Press FUNCTION once and
Entering Your Name and Fax Number
once
Press
5 Press
1. Installation
to enter the fax number in memory
moves the cursor backward
Press FUNCTION once and
Setting the Date and Time
once
Press
4 Enter a two-digit number for the day “01” to “31”
1. Installation
Example the 5 th
Example January
Setting the reception mode
Setting the Reception Mode
TEL/FAX mode
A.M. mode
Speaker
Volume Adjustment
1. Installation
VOLUME
1 Press VOLUME to select the desired volume
Ringer
Make sure SPEAKER has not been pressed and the handset is not lifted
2 If you selected RINGER OFF OK ?
2. Sending Faxes
Size and weight
Transmittable Documents
Sending
Other restrictions
Loading the Document
Adjust the document guides to the width of your document
Insert the document face down in the
3 Adjust the resolution and/or contrast settings as explained in
Removing a document from the feeder
Sending
Faxes
Contrast settings
Adjusting the Resolution and Contrast
Resolution settings
Sending
Adjusting the Resolution and Contrast
Faxes
Display
resolution and/or contrast
Sending a Fax by Normal Dialling
Load the documents
If desired, press RECEPTION MODE to set the
5 When you hear the fax tone, press
Sending a Fax by Automatic Dialling
Sending
Faxes
Press
Storing fax and phone numbers for automatic dialling
once
Press
Sending
Making changes
Faxes
Press
Clearing auto-dial numbers
Chain Dialling for area and access codes
once and 3 once
Press once
Sending
Sending a fax by Rapid Key Dialling
Faxes
1 If you are sending a fax, load the documents
resolution and/or contrast
Sending a fax by Speed Dialling
1 Load the documents
If desired, press
Sending
Sending a fax by Direct Keypad Dialling
Faxes
1 Load the documents
Load the documents
Searching for an auto-dial number
Press SEARCH and then
or number, press
Automatic redialling
Using the REDIAL key
when you hear the fax tone after the connection is made. Note
Sending
3. Receiving Faxes
Using TEL/FAX Mode
Using FAX Mode
Using A.M. Mode
Receiving
Using A.M. Mode
Display OPTION SETTING
Changing the number of rings
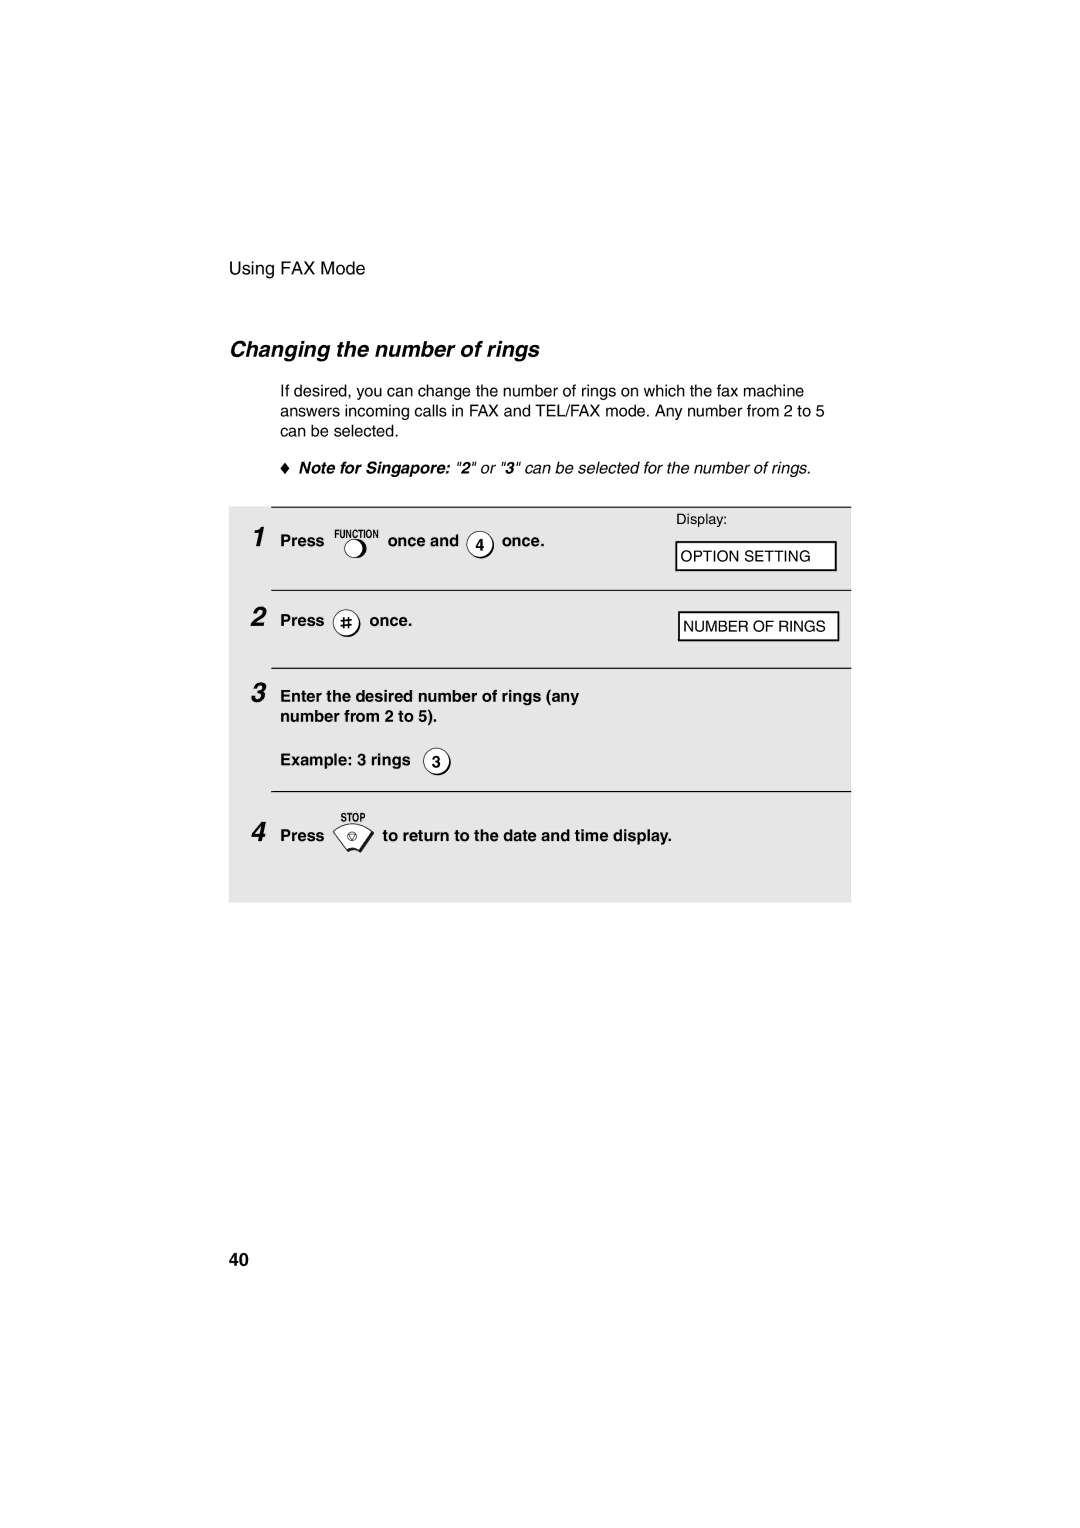
Note for Singapore 2 or 3 can be selected for the number of rings
1 Press FUNCTION once and 4 once
Answering with the fax’s handset
Using TEL Mode
1 When the fax machine rings, pick up the handset
Note If you have set the Fax Signal Receive setting
1 Answer the extension phone when it rings
Answering on an extension phone
wants to send a fax, press 5 once and
twice on the extension
Fax Signal Receive
Optional Reception Settings
FAX SIGNAL RX
Receiving
Changing the number for remote fax activation
Substitute Reception to Memory
1 Press FUNCTION once and 4 once
2 Press
4. Making Copies
4. Making Copies
2 When you are ready to begin copying, press
RESOLUTION
2 Dial the number using one of the following methods
5. Making Telephone Calls
3 Speak with the other party when they answer
1 Pick up the handset or press SPEAKER
Searching for an auto-dial number
Chain Dialling
Redial
Hold
6. Answering Machine Connection
Connecting an Answering Machine
Remove the seal covering the TEL. SET socket
Connect the answering machines
Changing the outgoing message
Using the Answering Machine Connection
Answering
Machine
How answering machine mode operates
Quiet Detect Time
Optional A.M. Mode Settings
Answering
Machine
3 Enter a number from 01 to 10, or enter 00 to turn off the function
Quiet Detect Start Time
Example 3 seconds
4 Press to return to the date and time display
Answering
On A.M. Failure
Machine
Press FUNCTION once and
7. Special Functions
Caller ID Requires Subscription to Service
This function is only available in Singapore and Malaysia
once and 4 once
Display messages
How Caller ID operates
7. Special Functions
Caller ID Requires Subscription to Service
4 Press when you have finished viewing the list
Viewing the Caller ID list
1 Press SEARCH once and 2 once
Press
Priority Call
To delete calls from the Caller ID list
7. Special Functions
Press FUNCTION once and 3 once
Blocking voice calls
7. Special Functions
Blocking Reception of Unwanted Faxes
Press
3 once
Press FUNCTION once and 4 once
Polling Requesting a Fax Transmission
Press
twice
1 Dial the fax machine you want to poll using one of the following
Requesting transmission
7. Special Functions
methods
Telephone Number List
8. Printing Lists
Anti Junk Number List
FUNCTION once and
Printing
Transaction Report
Lists
Headings in Transaction Report
1 Press FUNCTION once and 4 once
Transaction Report print condition
2 Press 3 times
3 Press a number from 1 to
Cleaning the scanning glass and rollers
9. Maintenance
9. Maintenance
1 Grasp the finger hold and pull up to open the operation panel
Maintenance
Cleaning the housing
4 Flip down the green levers on each side of the white roller
5 Flip up the front paper guide and wipe the roller under it
Problems and Solutions
10. Troubleshooting
Line error
10. Trouble- shooting
Problems and Solutions
Dialling and transmission problems
Problem
Solution
Problem
Reception and copying problems
Solution
10. Trouble- shooting
Answering machine connection
General problems
Problem
Solution
shooting
Transmittable Documents on page
Display messages
Messages and Signals
section, Clearing Paper Jams
Messages and Signals
Audible signals
10. Trouble- shooting
section, Clearing Paper Jams
Clearing a jammed document
Clearing Paper Jams
1 Grasp the finger hold and pull up to open the operation panel
2 Flip up the green levers on each side of the white roller
4 Flip down the green levers on each side of the white roller
Clearing jammed printing paper
5 Close the operation panel, making sure it clicks into place
1 Grasp the finger hold and pull up to open the operation panel
Cut off the wrinkled part of the paper Reload the paper
Remove the paper roll
Sending Faxes
Quick Reference Guide
Receiving Faxes
Refer
Index
Index
Page
PRINTED IN THAILAND TINSE4374XHTA
SHARP CORPORATION