TFT LCD Color Computer Display
Declaration of Conformity
Owner’s Record
Table of Contents
Precautions
Identifying parts and controls
Rear of the LCD display SDM-X72/X82
RGB
Setup
Remove the back cover
Setup 4Connect the power cord
Setup 3Connect the audio cord
Connecting to an IBM PC/AT or compatible computer
Connecting to a Macintosh
Setup 6 Turn on the monitor and computer
Setup 5Bundle the cords and cables
If no picture appears on your screen
Setup 7Adjusting the tilt and height
SDM-X82 only To use the monitor comfortably
SDM-X72/X82
Selecting the input signal for the audio input jack
Selecting the input signal
Input button
Press the Input button
Navigating the menu
Customizing Your Monitor
Backlight
Contrast
Automatic picture quality adjustment function
Screen analog RGB signal only
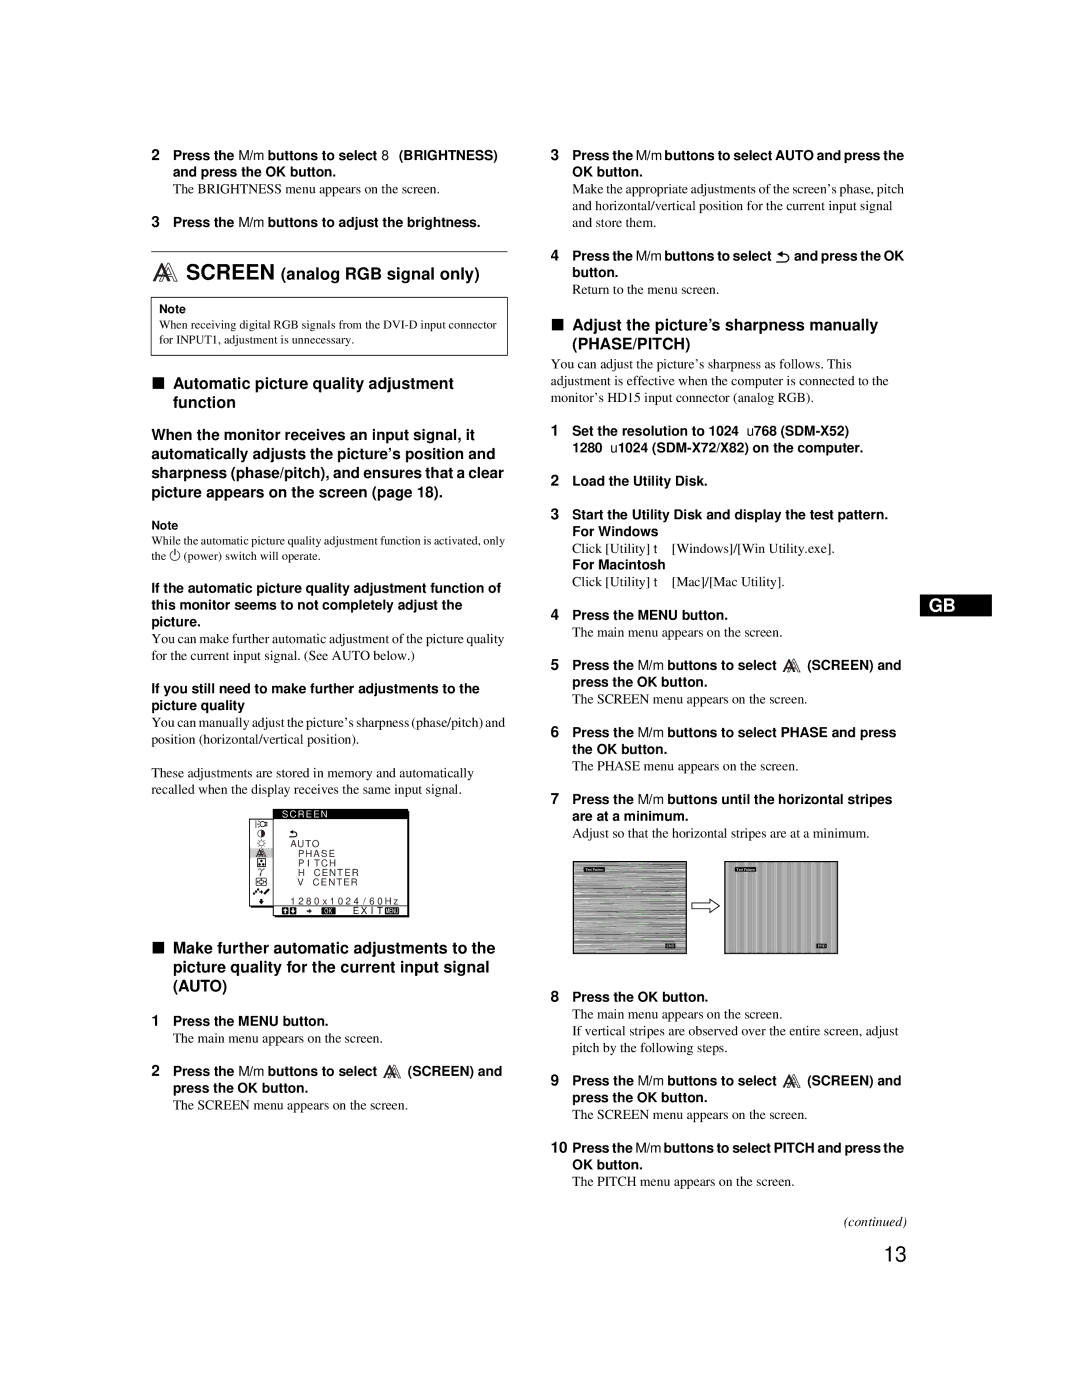
Adjust the picture’s sharpness manually PHASE/PITCH
Fine tuning the color temperature
Adjust the picture’s position manually
Color
Press the M/m buttons until the vertical stripes disappear
Gamma
Press the M/m buttons to select the desired mode
Smoothing
Zoom SDM-X72/X82 only
Additional settings
Controlling the volume
Technical Features
Power saving function
Using the headphones
Automatic picture quality adjustment function analog RGB
Reducing the power consumption
ECO mode
Signal only
If no Input Signal appears on the screen
Troubleshooting
On-screen messages
If OUT of Scan Range appears on the screen
Symptom
Trouble symptoms and remedies
No picture
Caused by the monitor
Picture is ghosting
Symptom Check these items Picture is fuzzy
Picture is too small
Picture is dark
Self-diagnosis function
If the 1 power indicator lights up in orange
Try pressing any key on the keyboard or moving the mouse
Specifications
Page
Table des matières
Installation
Précautions
Arrière du support d’écran
Identification des composants et des commandes
Arrière de l’écran à cristaux liquides SDM-X72/X82
Retirez le capot arrière
Installation
Remarque
Réglage 4 Branchez le câble d’alimentation
Réglage 3 Raccordez le cordon audio
Raccordement à un ordinateur IBM PC AT ou compatible
XRaccordement à un Macintosh
Réglage 6 Mettez le moniteur et l’ordinateur sous tension
Réglage 5 Regroupez les cordons et les câbles
Si aucune image n’apparaît sur l’écran
Réglage 7 Réglage de l’inclinaison et de la hauteur
Vous n’avez besoin d’aucun pilote pour ce moniteur
Sélection du signal d’entrée pour la prise d’entrée audio
Sélection du signal d’entrée
Touche Input
Appuyez sur la touche Input
Pilotage par menu
Personnalisation de votre moniteur
Retroéclairage
Contraste
Réglage manuel de la netteté de l’image PHASE/PITCH
Ecran signal RVB analogique Uniquement
Luminosité
Fonction de réglage automatique de la qualité de l’image
Réglage manuel de la position de l’image
Couleur
Réglage précis de la température des couleurs
Appuyez sur la touche OK
Remarques
Zoom SDM-X72/X82 uniquement
Réglages additionnels
Appuyez sur les touches M/m 2 pour contrôler le volume
Contrôle du volume
Spécifications techniques
Fonction d’économie d’énergie
Pour annuler le mode ECO
Réduction de la consommation électrique mode ECO
Analogique uniquement
Appuyez sur la touche ECO
Messages affichés
Dépannage
Si l’indication Hors Plage DE Balayage apparaît sur l’écran
Si l’indication PAS Entree Video apparaît sur l’écran
Symptôme
Symptômes de défaillance et remèdes
Pas d’image
’image scintille, sautille, oscille ou est brouillée
Apparition d’images fantômes
Symptôme Vérifiez ces éléments ’image est floue
’image n’est pas centrée
Correctement, ni du bon format
Si l’indicateur 1 alimentation s’allume en orange
Fonction d’autodiagnostic
Spécifications
Page
Einstellen des Monitors
Inhalt
Sicherheitsmaßnahmen
Lage und Funktion der Teile und Bedienelemente
Rückseite des LCD-Bildschirms SDM-X72/X82
Hinweis
Nehmen Sie die hintere Abdeckung ab
Schritt 4 Anschließen des Netzkabels
Schritt 3 Anschließen des Audiokabels
Anschließen an einen IBM PC/AT oder kompatiblen Computer
Anschließen an einen Macintosh
Schritt 6 Einschalten von Monitor und Computer
Schritt 5 Bündeln der Kabel
Drücken Sie den Netzschalter 1 vorne rechts am Monitor
Wenn auf dem Bildschirm kein Bild erscheint
Schritt 7 Einstellen von Neigung und Höhe
Spezielle Treiber werden nicht benötigt
Taste Input
Auswählen des Eingangssignals
Drücken Sie die Taste Input
Bildschirmmeldung
Navigieren in den Menüs
Einstellen des Monitors
Hintergrundbel
Kontrast
Manuelles Einstellen der Bildschärfe PHASE/PITCH
Bildschirm nur analoges RGB Signal
Automatische Einstellung der Bildqualität
Manuelles Einstellen der Bildposition
Farbe
Feineinstellen der Farbtemperatur
Korrigieren Sie mit den Tasten M/m die vertikalen Streifen
Wählen Sie mit den Tasten M/m den gewünschten Modus aus
Zoom nur SDM-X72/X82
Hinweise
Weitere Einstellungen
Einstellen der Lautstärke
Technische Merkmale
Die Energiesparfunktion
Wiedergabe über Kopfhörer
Wenn Sie Phase, Pitch und Bildposition manuell einstellen
Bildqualität nur analoges RGB-Signal
Verringern der Leistungsaufnahme
Automatische Einstellung der
Störungsbehebung
Wenn Kein Eing Signal auf dem Bildschirm erscheint
Bildschirmmeldungen
Wenn Nicht IM Abtastbereich auf dem Bildschirm erscheint
Durch den Monitor verursachte Probleme
Fehlersymptome und Abhilfemaßnahmen
Symptom Überprüfen Sie bitte folgendes
Es wird kein Bild angezeigt
Überprüfen Sie bitte folgendes Das Bild flimmert, springt
Bei analogem RGB-Signal
Oszilliert oder ist gestört
Das Bild ist verschwommen
Wenn die Netzanzeige 1 orange leuchtet
Selbstdiagnosefunktion
Technische Daten
Page
Índice
Configuración
Precauciones
Identificación de componentes y controles
Parte posterior de la pantalla LCD SDM-X72/X82
Equipado con conector de Salida HD15 RGB Analógica
Configuración
Paso 2 Conexión de un ordenador
Extraiga la cubierta posterior
Paso 4 Conexión del cable de alimentación
Paso 3 Conexión del cable de audio
Conexión a un ordenador IBM PC/AT o compatible
Conexión a un Macintosh
Paso 6 Encendido del monitor y el ordenador
Paso 5 Agrupación de los cables
Si no aparece ninguna imagen en pantalla
Paso 7 Ajuste de la inclinación y la altura
Sólo SDM-X82 Para utilizar el monitor cómodamente
No es necesario instalar controladores específicos
Botón Input
Selección de la señal de entrada
Pulse el botón Input
Audio
Navegación por el menú
Personalización del monitor
Retroilumin
Brillo
Función de ajuste automático de la calidad de imagen
Pantalla sólo para la señal RGB analógica
Ajuste manual de la nitidez de la imagen FASE/ANCHO
Ajuste más preciso de la temperatura de color
Ajuste manual de la posición de la imagen
Pulse los botones M/m para seleccionar el modo deseado
Suavizado
Notas
Ajustes adicionales
Características técnicas
Control del volumen
Función de ahorro de energía
Uso de auriculares
Función de ajuste automático de la calidad de imagen
Reducción del consumo de energía
Modo ECO
RGB analógica
Mensajes en pantalla
Solución de problemas
Si Fuera Alcance EXPLOR. aparece en pantalla
Si Cable Desconectado aparece en pantalla
Problema Compruebe lo siguiente No aparece la imagen
Problemas y soluciones
La imagen es borrosa
Oscila o aparece codificada
Aparecen imágenes fantasma
La imagen no está centrada o su
Si el indicador 1 alimentación se ilumina en naranja
Función de autodiagnóstico
Especificaciones
Page
Indice
Installazione
Precauzioni
Identificazione delle parti e dei comandi
Parte posteriore del display LCD SDM-X72/X82
Rimuovere il coperchio posteriore
Installazione
Punto 4Collegamento del cavo di alimentazione
Punto 3Collegamento del cavo audio
Collegamento ad un computer IBM PC/AT o compatibile
Collegamento ad un Macintosh
Punto 6Accensione del monitor e del computer
Punto 5Raggruppamento di cavi e fili
Il segnale di ingresso desiderato
Se sullo schermo non appare alcuna immagine
Punto 7Regolazione dell’inclinazione e dell’altezza
Solo SDM-X82 Utilizzo ottimale del monitor
Non sono richiesti driver specifici
Tasto Input
Selezione del segnale di ingresso
Premere il tasto Input
Come spostarsi all’interno del menu
Personalizzazione del monitor
Retroilluminaz
Contrasto
Regolare manualmente la nitidezza dell’immagine FASE/PIXEL
Schermo solo segnale RGB Analogico
Premere i tasti M/m per regolare la luminosità
Per Macintosh
Sintonia fine della temperatura del colore
Colore
Premere i tasti M/m per selezionare il modo desiderato
Zoom solo SDM-X72/X82
Impostazioni aggiuntive
Premere i tasti M/m 2 per controllare il volume
Controllo del volume
Funzioni
Funzione di risparmio energetico
Funzione di regolazione automatica della qualità
Riduzione del consumo energetico
Dell’immagine solo segnale RGB analogico
Per disattivare il modo ECO
Messaggi a schermo
Guida alla soluzione dei problemi
Se sullo schermo appare il messaggio Fuori Gamma Scansione
Se sullo schermo appare il messaggio Cavo Scollegato
Scollegato
Sintomi e soluzioni dei problemi
Oscilla o non è chiara
Non è delle dimensioni corrette
’immagine è sfocata
’immagine è sdoppiata
Se l’indicatore 1 alimentazione si illumina in arancione
Funzione di autodiagnostica
Caratteristiche tecniche
Page
Подготовка к работе
Содержание
Меры предосторожности
Идентификация деталей и органов управления
Вид сзади на дисплей ЖКД SDM-X72/X82
Снимите заднюю крышку
Перед подключением монитор и компьютер должны быть выключены
Подготовка к работе 4 Подключите кабель питания
Подготовка к работе 3 Подключение аудиокабеля
XПодключение IBM PC/AT или совместимый компьютер
XПодключение к Macintosh
Подготовка к работе 6 Включите монитор и компьютер
Подготовка к работе 5 Уложите пучок кабелей
Включите компьютер
Нажимая кнопку INPUT, выберите нужный входной
Если на экране отсутствует изображение
Подготовка к работе 7 Регулировка наклона и высоты
Только модель SDM-X82 Для удобства использования монитора
SDM-X72/X82
Кнопка Input
Выбор входного сигнала
Нажмите кнопку Input
Перед выполнением регулировок
Перемещение по экранному меню
Восстановление значений по умолчанию Для параметров
Вручную отрегулируйте резкость Изображения ФАЗА/ШАГ
Экран только аналоговый сигнал RGB
Нажмите кнопки M/m для выбора элемента и нажмите кнопку OK
Для Macintosh
Ручная регулировка положения изображения Гориз ЦЕНТР/ВЕРТИК
Цвет
Точная настройка цветовой температуры
Zoom только модель SDM-X72/X82
Gamma
Дополнительные настройки
Функция экономии энергии
Регулировка громкости
Использование наушников
Функция автоматической регулировки качества
Снижение потребления энергии
Режим ECO
Изображения только аналоговый сигнал RGB
Если на экране появляется сообщение
Экранные сообщения
Если на экране появляется сообщение НЕТ Сигнала
Если на экране отображается сообщение
Симптом Проверьте следующее Нет изображения
Симптомы неполадок и действия по их устранению
XНеполадка, связанная с подключением компьютера или другого
Оборудования, а не с монитором
Волнообразные колебания
Симптом Проверьте следующее Скачки, дрожание или
Изображения
Нечеткое изображение
Если индикатор 1 питание горит оранжевым
Функция самодиагностики
Технические Характеристики
Page
Anpassa bildskärmen
Innehållsförteckning
Viktigt
Identifiera delar och reglage
LCD-skärmen bakifrån SDM-X72/X82
Obs
Ta av den bakre panelen
Inställning 4 Anslut nätsladden
Inställning 3 Anslut ljudsladden
Ansluta till en IBM PC/AT- eller kompatibel dator
Ansluta till en Macintosh
Inställning 6 Sätt på bildskärmen och starta datorn
Inställning 5 Bunta ihop sladdarna och kablarna
Om det inte visas någon bild på skärmen
Inställning 7 Justera lutning och höjd
Endast SDM-X82 Använd bildskärmen på ett bekvämt sätt
Du behöver inga speciella drivrutiner
Välja insignalen för uttaget för ljudingång
Välja insignal INPUT-knapp
Tryck på INPUT-knappen
Ingångsindikatorn
Navigera i menyn
Anpassa bildskärmen
Bakgrundsljus
Ljusstyrka
Funktion för automatisk justering av bildkvaliteten
Bild Endast analog RGB-signal
Justera bildens skärpa manuellt FAS
Färg
Finjustering av färgtemperaturen
Justera bildens position manuellt
Tryck på M/m-knapparna tills de vertikala banden försvinner
Zoom endast SDM-X72/X82
Utjämning
Tryck på M/m-knapparna för att välja önskat läge
Ytterligare inställningar
Styra volymen
Tekniska funktioner
Energisparfunktion
Använda hörlurarna
Reducera energiförbrukningen
Analog RGB-signal
Funktionen för automatisk justering av bildkvalitet Endast
ECO-läget
Felsökning
Om Ingen Signal visas på skärmen
Meddelanden på skärmen
Om Utanför Frekvensomfång visas på skärmen
Symtom Kontrollera dessa punkter Ingen bild
Symtom och åtgärdande för problem
Inte orsakas av bildskärmen
Eller är förvrängd
Signal
Bilden är inte skarp
Bilden spökar
Om 1 strömindikatorn visas med orange
Självdiagnostisk funktion
Tekniska data
Page
Opstelling
Inhoudsopgave
Voorzorgsmaatregelen
Onderdelen en bedieningselementen
Achterkant van het LCD-scherm SDM-X72/X82
Verwijder het achterdeksel
Opstelling
Opmerking
Instelling 4 Sluit het netsnoer aan
Instelling 3 Sluit de audiokabel aan
Aansluiting op een IBM PC/AT of compatibele computer
Aansluiting op een Macintosh computer
Instelling 6 Zet de monitor en de computer aan
Instelling 5 Bundel snoeren en Kabels
Als er geen beeld verschijnt op het scherm
Instelling 7 Hellingshoek en hoogte regelen
Alleen SDM-X82 Comfortabel gebruik van de monitor
Geen specifieke drivers vereist
Input toets
Het ingangssignaal selecteren
Druk op de Input toets
Neem het LCD-scherm onderaan vast en regel de hoogte
Het menu gebruiken
De monitor instellen
Helderheid
Standaardinstellingen herstellen
De beeldkwaliteit automatisch regelen
Scherm alleen analoog RGB-signaal
De beeldscherpte handmatig regelen Fase
De beeldpositie handmatig regelen
Kleuren
De kleurtemperatuur nauwkeurig regelen
Druk op de M/m toetsen tot de verticale strepen verdwijnen
Druk op de M/m toetsen om de gewenste stand te kiezen
Zoom alleen SDM-X72/X82
Opmerkingen
Positie Menu
Extra instellingen
ZZ... Stroomspaar
Toetsen Slot
Technische kenmerken
Het volume regelen
Stroomspaarfunctie
Gebruik van een hoofdtelefoon
De beeldkwaliteit automatisch
Het stroomverbruik verminderen
ECO stand
Regelen alleen analoog RGB-signaal
Schermberichten
Verhelpen van storingen
Als Buiten Scanbereik verschijnt op het scherm
Indien Geen Input Signaal op het scherm verschijnt
Probleem Controleer deze punten Geen beeld
Foutsymptomen en oplossingen
Door de monitor
Oscilleert of is vervormd
Probleem Controleer deze punten Het beeld flikkert, springt
Het beeld is wazig
Echobeeld ghosting
Zelfdiagnosefunctie
De 1 stroom indicator licht oranje op
Technische gegevens
Page
Congratulations
Why do we have environmentally labelled com Puters?
What does labelling involve?
Environmental requirements
TCO’95 Eco-document for the black model
Why do we have environmentally labelled comput Ers?
Conglatulations
Brominated flame retardants