Bengal Brute Assemblies
To the Owner / Operator / Dealer
Forward
Page
Table of Contents
Page
Assembly Section
Tractor Preparation
Assembly
Crankshaft Adapter
Parts Required to Purchase from John Deere
Assembly Front Crankshaft Pulley
Adjusting Rear Wheels
Assembly Driveshaft & Front Pump Mounting
Installing O-RING Fittings
Assembly WEATHER-PACK/METRI-PACK Assembly
Assembly Polycarbonate Safety Window
Valve Mounting Plate
Assembly Main Frame Installation
Husco Valve Danfoss
Assembly Cable Control Lever Stand
Switch BOX Wiring Cable
Assembly Wire Access for Switch BOX Cable
Assembly Husco Control Valves Identification
Assembly Switch BOX Wiring Joystick
Assembly Switch BOX Mounting Joystick
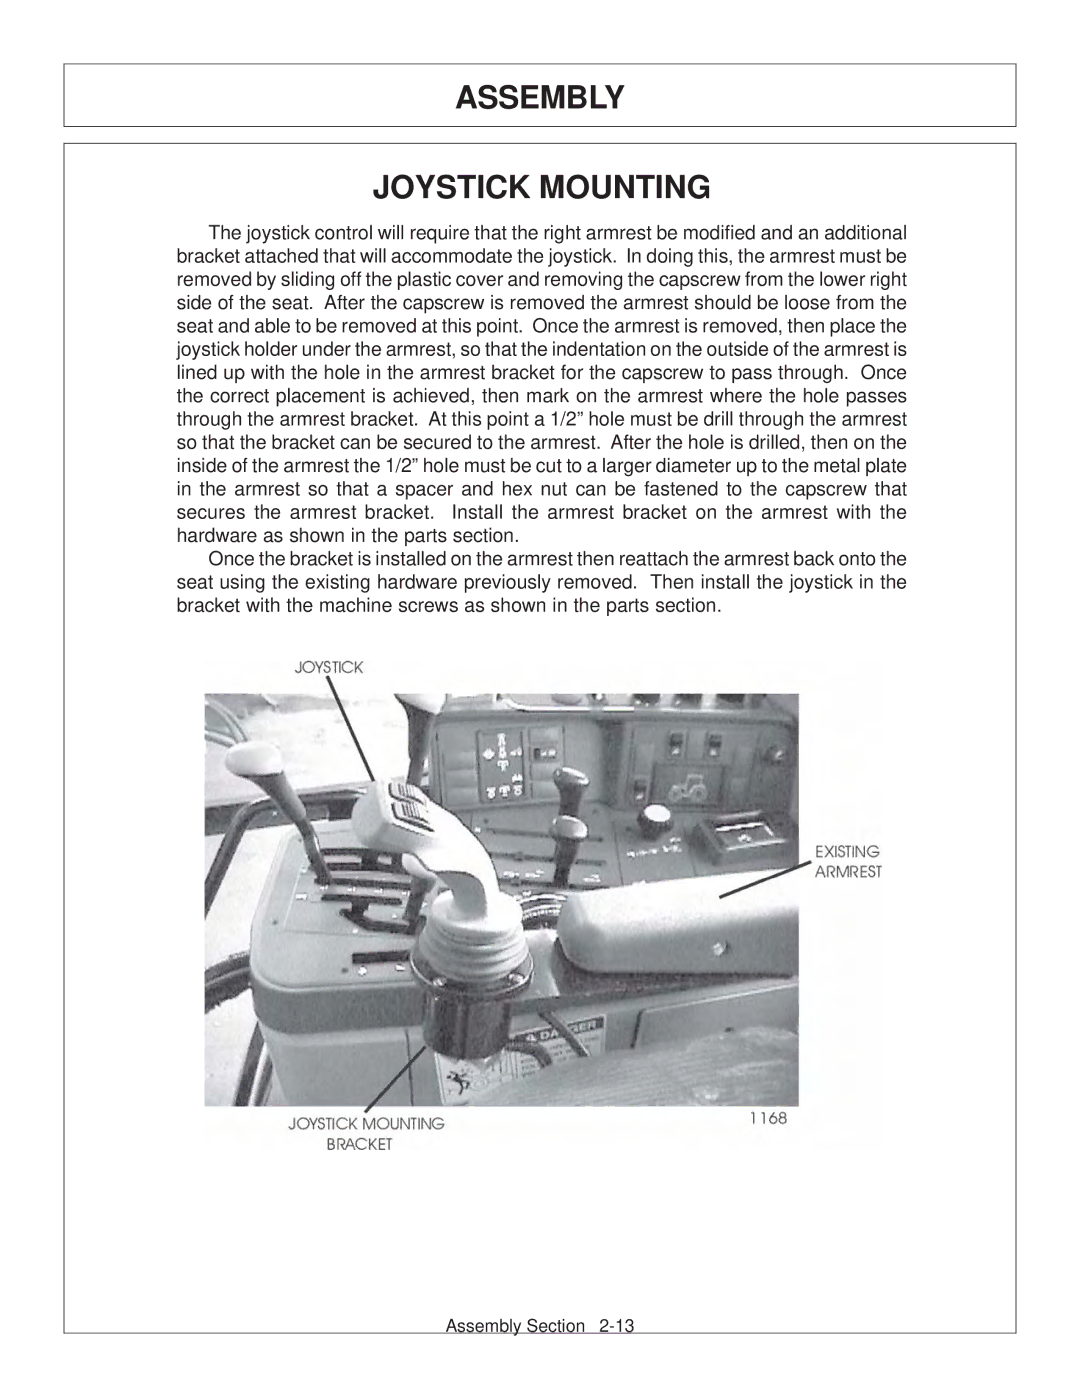
Assembly Joystick Mounting
Return Line Installation
Assembly Pressure Line Installation
Selector Valve Installation
Assembly Danfoss Load Sense Line Installation
Husco Load Sense Line Installation
Accumulator Installation / Plumbing
General Hose Installation
Assembly Filling Hydraulic Reservoir
Hydraulic Tank Installation
Temperature Gauge Mounting
Assembly Bengal Brute Hose Routing
Assembly
Assembly
Assembly Greaseless Bearing Installation
Boom Rest Mounting
Assembly Axle Brace Mounting
Preformed Tube Installation
Assembly Boom Mounting Bracket
Swivel Bracket Mounting
Solenoid Brake Valve
Assembly Main Boom Installation
Switching Side Mount to Boom ARM
Deck Attachment
Wheel Weight Mounting
Assembly Hose Covering
Extending Zerk on Flail Head
SUB-D
Assembly Boom Joystick Control Calibration
Set the dead band compensation potentiometer first
Secondary
Assembly
Mower Testing
Assembly Final Preparation for Operation
Assembly
Safety Section
Safety
LEA EL Instructivo
SG-10
Sure you abide by the following rules
SG-20
Items discontinue mowing
Foreign objects are to be avoided. SGM-7
Stop Mowing if Passersby are Within 100 Yards UN- Less
Work on the Implement. Place the Mower Head on the ground or
See Your Dealer
Location Hydraulic Tank
Location
Mower Deck Hydraulic Tank Outside of CAB Inside of CAB
Location Inside of CAB Mower Deck
Location Inside of CAB Hydraulic Tank Mower Deck
Location Hydraulic Tank Inside of CAB Mower Deck Main Boom
Inside of CAB
Reflective Tape Mower Deck
Safety
Safety
Location 6T3237 Inside of CAB
Mower Deck Hydraulic Tank
Avail Manual Canister Complete
QTY Description
This Act Seeks
Safety Federal Laws and Regulations
Safety
Operation Section
Operation
Operation Starting Tractor and Mower
Operation Cable Controlled Mowers
Lever # Boom Shield
Lever #4 With Button Pressed Boom Knuckle Indicator Light on
Operation Switchbox
Operation Mower Operation
Operation
Operation Danfoss Joystick Controlled Mowers
Main Control Switch BOX
Operation Danfoss Joystick Control Switch BOX
Right Joystick Roller With Button Pressed Moves Boom Knuckle
Shield Switch Operates Safety
Heavy Duty Rotary
Boom Flail
Unstowing Boom
Operation Boom Flail
Transporting unit by flatbed trailer
Operation
Maintenance Section
Maintenance Precautions
Maintenance
Break in Period
Or even death. SG-14
Daily or Every 8 Hours
Maintenance Regular Maintenance
Troubleshooting
Maintenance Weekly or Every 50 Hours
Mower will not start
Maintenance
Maintenance Torque Specifications
Maintenance Lubrication Recommendations
Replaceing IN-TANK Hydraulic Filter
Detailed Maintenance
Replaceing High Pressure Hydraulic Filter Element
Maintenance Detailed Maintenance
Greasing Ground Roller Shaft Flail
Maintenance Greasing Cutter Shaft Flail Mowers
Drive Shaft YOKE, U-JOINT & Stub Shaft
Maintenance Greasing Pump Drive Shaft Coupler
Maintenance Visual MAP of Grease Points
Greasing Boom Cylinders
Maintenance Greaseless Bearings on the Boom
Greasing Spindle
Deck Stop Adjustment
Maintenance Adjusting / Checking Belt Tension
Tightening Spindle Bolts
Maintenance Tightening Knife Bolts and Disk Bolts
Maintenance Ball Valves
Rotary Knife Replacement
Maintenance Inspection of Rotary Knife
Flail Knife Blade Replacement
Maintenance Replacement of Rotary Disk
Old style cutter shaft
Maintenance Boom Flail Knife Replacement
Spindle Assembly
Maintenance Bearing Installation
Maintenance Bearing Adjustment
Maintenance Section
Maintenance Daily Maintenance Schedule
Maintenance
JD 62-6420 Bengal Brute
Parts Section
Parts Ordering Guide
Parts Section Table of Contents
Tractor Mount KIT Main Frame
Main Frame
Tractor Mount KIT HYDRAULICS, 2WD, 4WD
Split Hose not Shown
Hydraulic Tank Refer to Main Frame Parts
Main Frame Refer to Main Frame Parts
Pump Refer to Main Frame Parts
Hydraulics Universal Cable Control
Husco Valve see Lift Valve
Lift Valve Flail BOOM, 4 SPOOL, CAB
Spool Valve
Lift Valve Rotary BOOM, 5 SPOOL, CAB
Adapter MOUNT, 2ND ROW Control BOX
Lift Valve Joystick and Switch BOX
Joystick Holder
Lift Valve JOYSTICK, 5 SPOOL, Boom
Electronic Lift Valve 5 Spool
AVA Spacer
END Cover
AVA DRIVESHAFT,U-JOINT
Pump Driveshaft Assembly
Trim Seal
Boom Wheel Weight
Front Pump & Grill Guard Optional
Safety Light Installation
Safety Light Assembly
Avail Switch BOX ASY Boomkat Complete
Solenoid Valve Switch and Wiring
Joystick and Switch BOX Wiring / Boomkat
Switch BOX Schematic
Selector Valve Schematic
Joystick Troubleshooting
Hydraulic inspection
Hydraulic Troubleshooting Guide
Electrical Troubleshooting Guide
Parts Section
Bengal Brute Common Section
Common Parts Section
Section Specific Parts
Parts Ordering Guide
Boom Hoses Routing LRS, 3OS & 3PS Booms
Intensionally Left Blank
Bengal Brute ARM
Knuckle Boom ARM Assy
Main Boom ARM Assy
Secondary Boom ARM Assy
Bengal Brute ARM / Preformed Tubes
Preformed Tube #8
Boomrest Bengal Brute
Flail Head
Amounts Vary Depending on the Mower Head
Rotary Head
Bengal Brute Rotary Pivot Assy
Pivot Assembly
Bengal Brute Flail Pivot Assy
Clamp KIT, TBF 50 Used on the 50 Flail
Bengal Brute Flail Pivot / Head Assy
Boom Rotary Mower Assy
DECK,WLDMNT,50 Rtry
Rotary Mower Assembly
DECK,WLDMNT,RTRY60
Grass Knife Optional
Rotary Knives and Disk
Avail Bolt KIT Include Items 6, 7 & Loctite
Avail
Rotary Blade BAR and Knives
Avail Knife KIT Includes Item 2,4
Avail Bolt KIT Includes Items 7
Spindle
Boom Flail Drive Assy
Belt Guard
Boom Flail Cutter Assy
Avail FLAIL, BOOM,50, GRASS,CMPLT Assy
Avail FLAIL, BOOM,50, BRUSH,CPLT Assy
Boom Flail Drive Assy
Upper Sheave
Boom Flail Cutter Assy
Cutter Shaft / Knife ASY Standard Grass
Avail Hydraulic Cylinder Complete
10 Welded Cylinder Parts
18 Welded Cylinder Parts
2 x 20 Welded Cylinder Parts
9 Welded Cylinder Parts
20 Welded Cylinder Parts
Intensionally Left Blank
Rotary Mower Spindle Assy
Avail Spindle Rebuild KIT Include Items 2 Thru 8 and 12 Thru
Avail Spindle Assembly Complete
Mower Spindle Assembly
QTY Description
Reservoir Tank Filter Assembly
Avail Filter Assy SAE 10 Micron
Spool Danfoss Valve
VLV,5SP,32PVG,OPEN STOW, 3OS
5SP Husco Valve Load Sense
Part NO. QTY Description
4SP Husco Valve Load Sense
Metered Remove Shuttle Disc
Hydro Pump & TSR Motor Front Pump
TSR Motor
Hydro Pump & TSR Motor Front Hydraulic Pump
50 & 60 Rotary Mower Motor
Avail Motor Assembly 2 1/4 Complete TRB60
Avail Motor Assembly TRB50
Flail Mower Motor
Avail Motor Assembly 350 TBF50, TBF63
Manual Controls Switchbox
Boom Travel Lock
Travel Lock Switch
Joystick and Switch BOX Wiring
Joystick Switchbox Service Parts
Joystick Switchbox Schematics
Selector Valve Schematic
Brake Valve Assembly W/ Metri PAK
Corrective Steps
Failure Mode Check Steps
Hydraulic Troubleshooting Guide
Electrical Troubleshooting Guide
Troubleshooting
Hydraulic inspection
Clean Cutter Boom
Clean Cutter Section
Clean Cutter Blade Mounting
Assembly Clean Cutter
Operating Instructions
Operation Clean Cutter
SBM-7
Maintenance Clean Cutter Maintenance Instructions
Clean Cutter Blade and Teeth Parts
TIP Replacement Procedure Carbide TIP Replacement
Bengal Brute Common
Fire Supression System
Fire System Section
Fire Supression System Parts
QTY Description
Fire Supression System Wiring
Warranty Section
Page
Warranty Information
ONE Last Word
Owner Requirements
To the Owner / Operator / Dealer
Tiger Corporation