R3 |
|
| End | Locking |
|
End Bracket Removal |
| Bracket | Pliers |
| |
|
|
| |||
|
|
|
|
| |
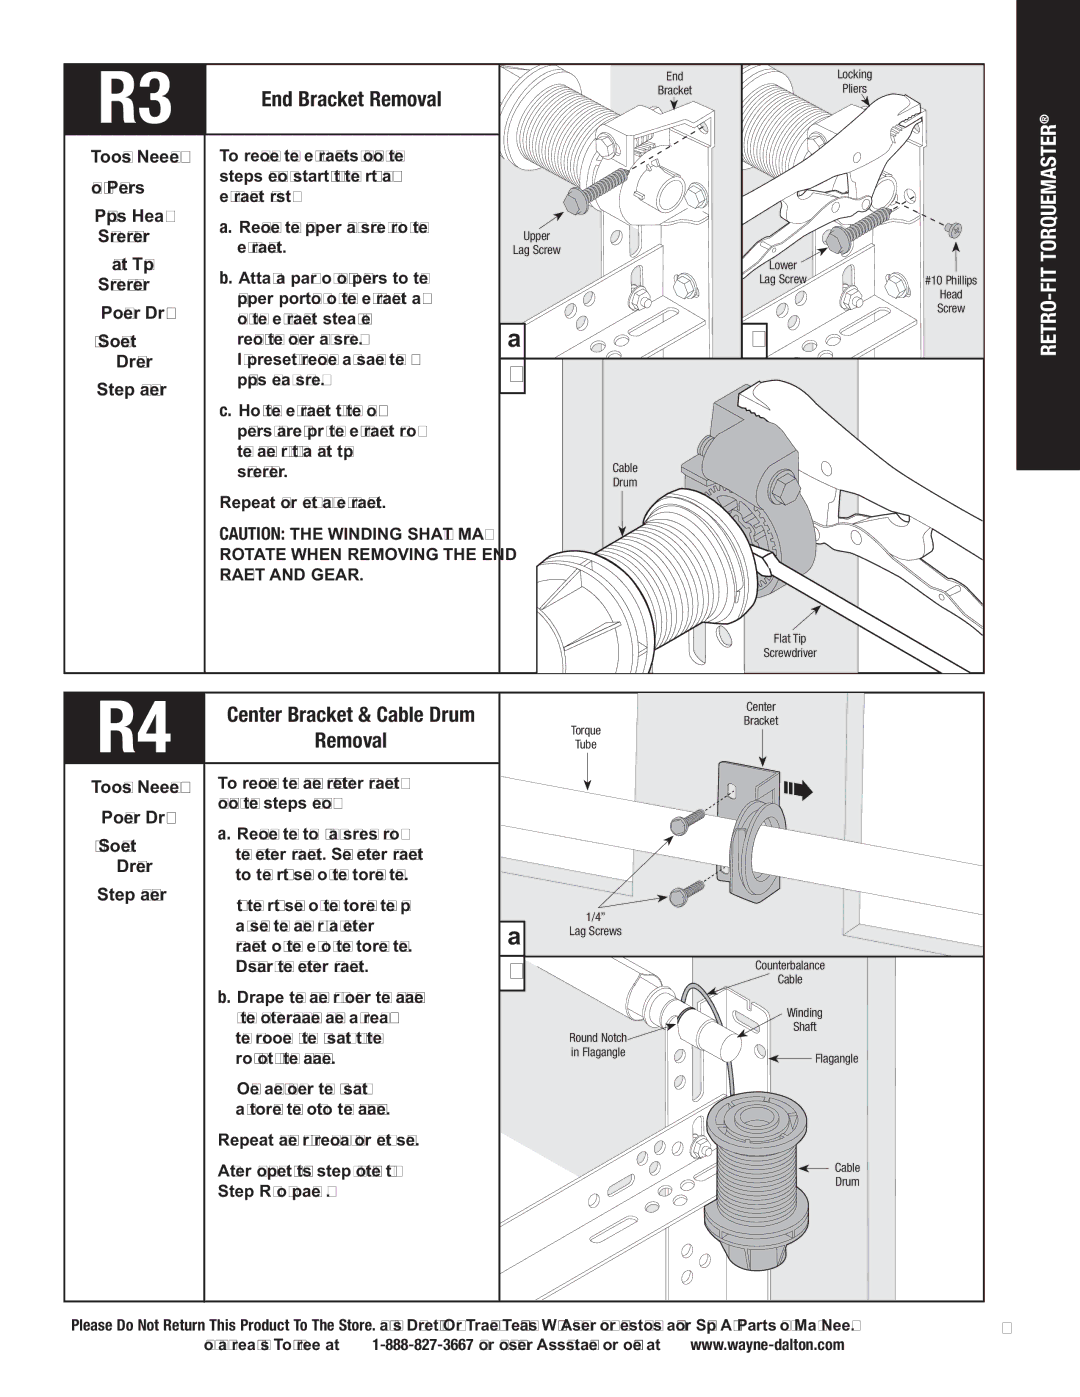
Tools Needed: | To remove the end brackets, follow the |
|
|
|
|
Locking Pliers | steps below starting with the right hand |
|
|
|
|
end bracket first: |
|
|
|
| |
|
|
|
|
| |
Phillips Head | a. Remove the upper lag screw from the |
|
|
|
|
Screwdriver | Upper |
|
|
| |
end bracket. |
|
|
| ||
Flat Tip | Lag Screw |
|
|
| |
b. Attach a pair of locking pliers to the |
|
| Lower |
| |
Screwdriver |
|
| Lag Screw | #10 Phillips | |
upper portion of the end bracket and |
|
|
| Head | |
|
|
|
| ||
Power Drill | hold the end bracket steady while |
|
|
| Screw |
|
|
|
| ||
| a |
| b |
| |
7/16” Socket | removing the lower lag screw. |
|
| ||
Driver | If present, remove and save the #10 | c |
|
|
|
Step Ladder | phillips head screw. |
|
|
| |
|
|
|
|
| |
| c. Holding the end bracket with the locking |
|
|
|
|
| pliers, carefully pry the end bracket from |
|
|
|
|
| the cable drum with a flat tip |
|
|
|
|
| screwdriver. |
| Cable |
|
|
|
|
| Drum |
|
|
| Repeat for left hand end bracket. |
|
|
|
|
| CAUTION: THE WINDING SHAFT MAY |
|
|
|
|
| ROTATE WHEN REMOVING THE END |
|
|
|
|
| BRACKET AND GEAR. |
|
|
|
|
|
|
|
| Flat Tip |
|
R4 |
|
|
| Screwdriver |
|
Center Bracket & Cable Drum |
|
| Center |
| |
|
|
|
| ||
|
| Torque | Bracket |
| |
| Removal |
|
|
| |
|
| Tube |
|
| |
Tools Needed: | To remove the cable drum/center bracket, |
|
|
|
|
Power Drill | follow the steps below: |
|
|
|
|
a. Remove the two 1/4" lag screws from |
|
|
|
| |
7/16" Socket |
|
|
|
| |
the center bracket. Slide center bracket |
|
|
|
| |
Driver |
|
|
|
| |
to the right side of the torque tube. |
|
|
|
| |
|
|
|
|
| |
Step Ladder | Lift the right side of the torque tube up |
|
|
|
|
|
| 1/4” |
|
| |
| and slide the cable drum and center | a |
|
| |
| Lag Screws |
|
| ||
| bracket off the end of the torque tube. |
|
|
| |
|
|
|
|
| |
| Discard the center bracket. | b |
| Counterbalance |
|
|
|
| Cable |
| |
| b. Drape the cable drum over the flagangle |
|
| Winding |
|
| by the counterbalance cable and |
|
|
| |
|
|
| Shaft |
| |
| the groove in the winding shaft with the |
| Round Notch |
| |
|
|
|
| ||
| round notch in the flagangle. |
| in Flagangle | Flagangle |
|
|
|
|
| ||
| Once aligned, lower the winding shaft |
|
|
|
|
| and torque tube onto the flagangle. |
|
|
|
|
| Repeat cable drum removal for left side. |
|
|
|
|
| After completing this step, continue with |
|
| Cable |
|
| Step R5 on page 5. |
|
| Drum |
|
|
|
|
|
|
RETRO-FIT TORQUEMASTER®
Please Do Not Return This Product To The Store. Call Us Directly! Our Trained Technicians Will Answer Your Questions and/or Ship Any Parts You May Need. 4 You can reach us Toll Free at
