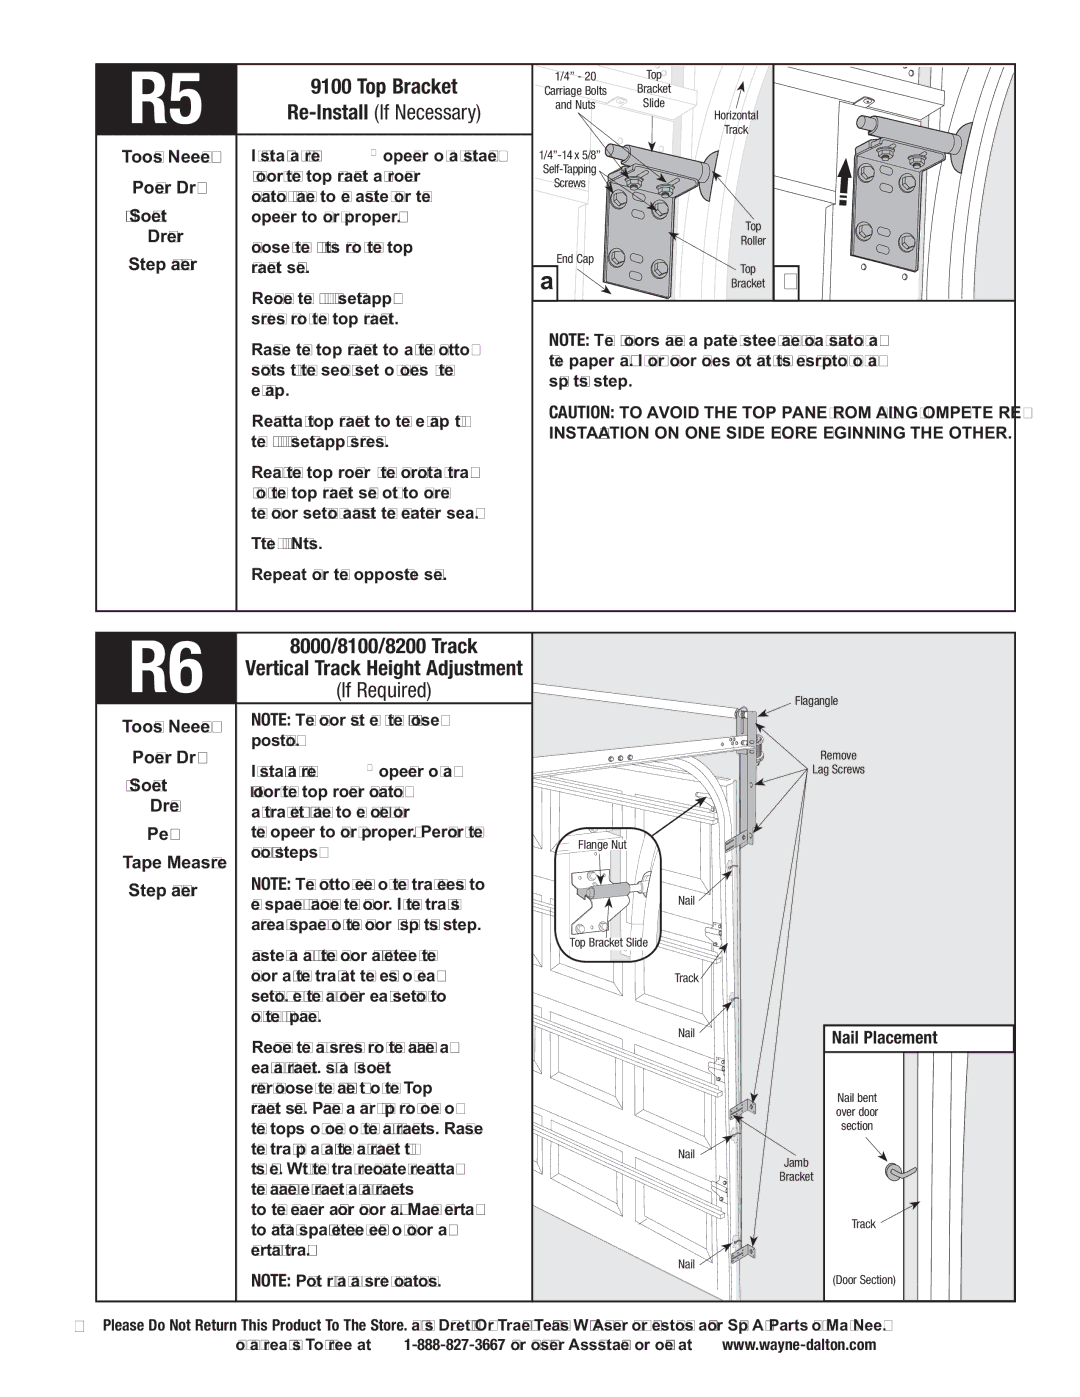
R5 | 9100 Top Bracket | |
| ||
|
| |
| If installing an idrive® opener on an installed | |
Tools Needed: | ||
Power Drill | 9100 door, the top bracket and roller | |
location will have to be adjusted for the | ||
| ||
7/16" Socket | opener to work properly. | |
Driver | Loosen the (2) | |
Step Ladder | ||
bracket slide. | ||
| Remove the (4) | |
| screws from the top bracket. | |
| Raise the top bracket to align the bottom | |
| slots with the second set of holes in the | |
| end cap. | |
| ||
| the (4) | |
| ||
| by moving the top bracket slide out to force | |
| the door section against the weather seal. | |
| Tighten (2) | |
| Repeat for the opposite side. | |
|
|
1/4” - 20 | Top |
| |
Carriage Bolts | Bracket |
| |
and Nuts | Slide |
| |
| Horizontal |
| |
| Track |
| |
1/4”- 14 x 5/8” |
|
| |
|
| ||
Screws |
|
| |
| Top |
| |
| Roller |
| |
End Cap | Top |
| |
a | b | ||
Bracket |
NOTE: The 9100 doors have a painted steel face, foam insulation and white paper backing. If your door does not match this description you may skip this step.
CAUTION: TO AVOID THE TOP PANEL FROM FALLING, COMPLETE RE- INSTALLATION ON ONE SIDE BEFORE BEGINNING THE OTHER.
R6 | 8000/8100/8200 Track | |
Vertical Track Height Adjustment | ||
(If Required) | ||
Tools Needed: | NOTE: The door must be in the fully closed | |
position. | ||
Power Drill | ||
If installing an idrive® opener on an | ||
7/16" Socket | ||
8000/8100/8200 door, the top roller location | ||
Drive | ||
and track height will have to be modified for | ||
| ||
Pencil | the opener to work properly. Perform the | |
Tape Measure | following steps: | |
| ||
Step Ladder | NOTE: The bottom edge of the track needs to | |
be spaced 1” above the floor. If the track is | ||
| ||
| already spaced off the floor 1”, skip this step. | |
| Fasten a nail in the door jamb, between the |
Flagangle
Remove |
Lag Screws |
Flange Nut
Nail ![]()
Top Bracket Slide
door and the track at the ends of each |
section. Bend the nail over each section to |
hold them in place. |
Remove the lag screws from the flagangle and |
each jamb bracket. Using a 7/16" socket |
driver, loosen the flange nut on the Top |
bracket slide. Place a mark 1" up from one of |
the tops of one of the jamb brackets. Raise |
the track up and align the jamb bracket with |
this line. With the track relocated, |
the flagangle, end bracket, and jamb brackets |
to the header and/or door jamb. Make certain |
to maintain spacing between edge of door and |
vertical track. |
NOTE: Pilot drill all lag screw locations. |
Track
Nail ![]()
Nail ![]()
Jamb
Bracket
Nail ![]()
Nail Placement
Nail bent over door section
Track
(Door Section)
5Please Do Not Return This Product To The Store. Call Us Directly! Our Trained Technicians Will Answer Your Questions and/or Ship Any Parts You May Need.
You can reach us Toll Free at
