July 602p35412
Xerox Document Centre 220/230/332/340 Setup Guide
AL7 1HE England
Table of Contents
Copy Setups
FAX Setups
Auditron Setups
Access Rights
Page-vi
Related Documentation
About This Guide
Introduction
Xerox Welcome Center Telephone Number
Orientation
Conventions
LEF Orientation / Portrait SEF Orientation / Landscape
Quick Pathway
Italic typeface
Hints
About Setups
For further information refer to Machine Setups on
Setup Procedures
For further information refer to Fault Override on
Key Operator Tools
Auditron Administrator Tools
System Administrator Tools
Refer to Copy Setups on Page 4-1 for further information
Refer to Fax Setups on Page 5-1 for further information
Owner Tools
Refer to Access Rights on Page 7-1 for further information
Access the Setup Tools
Changing the Settings
Switch On
Refer to the appropriate chapter for further instructions
Access the Machine Setups
Machine Setups
Machine Setup
Paper Tray Setups
Date
Date/Time Setup
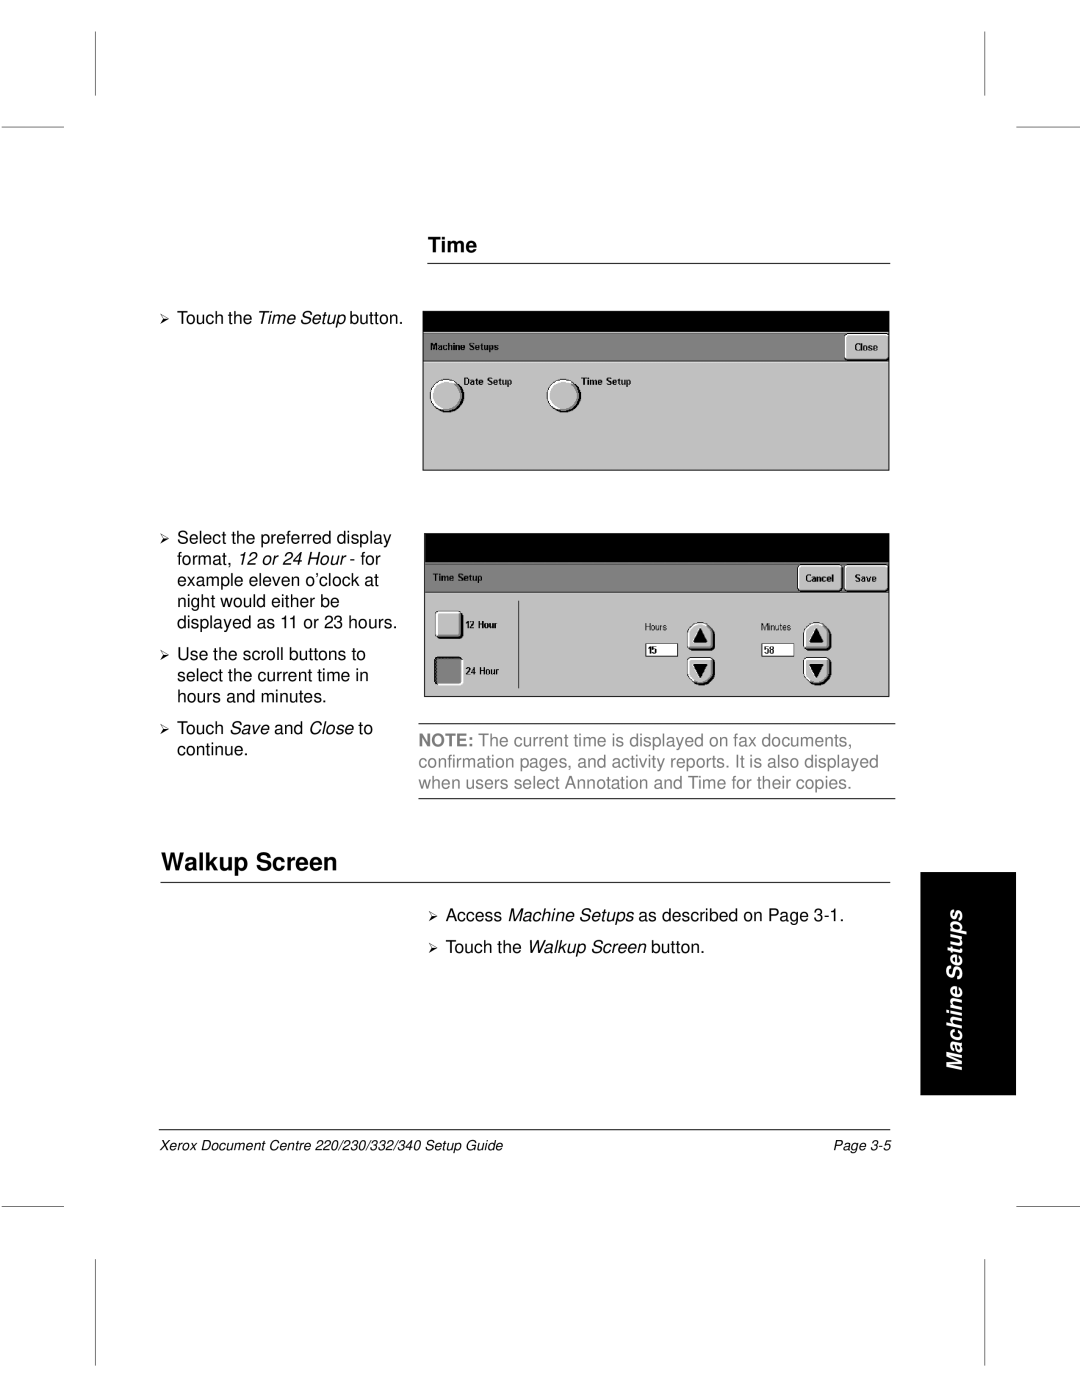
Time
Walkup Screen
Auto Clear
Timers
Low Power
Power Save or Auto Off
Contention
Touch the Auto Off or Power
Interrupt Button
¿ Touch Interrupt Button. Select Enabled or Disabled
Priority or Print Queue Priority
Touch the Priority or Print Queue Priority button
¿ Inches or Millimeters. Touch Save to continue
Localization
Access Machine Setups as
Additional Setups
Report Languages
Customer Support Number
Touch Screen Contrast
Touch the Report Languages button
Touch the Touch Screen ¿ Contrast button
Machine Serial Number
Paper Sizes
Touch the Customer Support ¿ Number button
¿ number
Touch the Machine Serial ¿ Number button
Xerox Supplies Number / Supplies Tel. Number
Fault Override
Accessing Fault Override
Disabled Service Component Feature Feature/Result
Unavailable Features
Setups, Fax
Copy Setups
Setups
Setups, Job
Setups, Tray Finisher is Settings
Setups, Fax Finisher is Printing
Output Stapled Selection Left, Stapled
Output Tray Selection Left Tray
Output
Copy
Stapled Stapler is
Output button
Output Left Tray Uncollated
Collated Left Finisher is Tray
Foreign
Interface Device
Interface Internal Auditron Device Control
Auditron Foreign Setups Interface Device External
Device Foreign Per-Page Interface Device Control, or
Monitor with External Control Or without Device is Limits
Before Send
Paper Supply button
Proof Before Send job
Default Tray
Setups, Tray Mailbox is Settings
Tray, Tower Mailbox, Bins
Machine
Machine
Machine Setup
Enter Key Operator PIN ¿ see Note Touch Copy Setups
Copy Setups
Touch the Copy Setups button
Access the Copy Setups
Reduce/Enlarge
Defaults
¿ Touch the Reduce/Enlarge button
Custom
Normal
¿ of each
Image Quality
Output
Sided Head to Head Head to Toe Portrait or Landscape
Sides Imaged
Portrait Images Landscape Images Head to Head
Expert Image Quality
Touch the Expert Image Quality button
Erase DC332/340
Margin Shift DC332/340
Touch the Border Erase
Border Erase DC332/340
Edge Erase DC332/340
Copy Setups
Enter Key Operator PIN See Note Touch Fax Setups
Fax Setups
Access the Fax Setups
Access Fax Terminal Setups
Fax Terminal Setups
Access Fax Setups as
Touch the Fax Terminal Setups button
Local ID
Fax Terminal Options
¿ Touch the Local Name button
Local Name
¿ Touch the Company Logo button
Company Logo
¿ Touch the Delayed Start Time button
Delayed Start Time
Dialing Digits Reporting DC332/340
Long Document DC332/340
Touch the Long Document
Receive Reduction
Fax Printing Options
¿ Touch the Dialing Digits Reporting button
Touch the Receive Reduction
Margin
Touch the Page Margin
Paper Attributes
Duplex Printing
Touch the Duplex Printing
All 1 Sided All 2 Sided
Touch the Paper Attributes
Output Selection
Touch the Output Selection
Touch the A3 ∪ 11 x
A3 ∪ 11 x
Activity Report
Fax Report Options
Broadcast and Multi-Poll Reports
Touch the Activity Report
Touch the Broadcast ¿ Multi-Poll Reports button
Transmission Report
Touch the Transmission ¿ Report button
Resolution
Fax Panel Defaults
Mailbox Report
Touch the Mailbox Report button
Original Type
Lighter/Darker
Touch the Lighter/Darker
Touch the Original Type
Forced 4800 Document Centre 220/230
Communication Mode DC332/340
Touch the Forced 4800 button
Touch the Communications
Fax Mailboxes
To Add or Edit a Mailbox
To Delete a Mailbox
Touch the Delete Mailbox
Touch the Edit Mailbox button
Fax File Management
Touch the Mailbox Password
Touch the Mailbox Name
Files for Polling / Files Stored for Polling
Mailbox Files / Failed Fax Files
Touch the Mailbox Files or ¿ Failed Fax Files button
Delete in 24 hours DC220/230 Keep
Touch the Files Stored for ¿ Polling button
Access Fax Communication¿ Setups
Fax Communication Setups
Dialing Type
Outgoing Fax Options
Touch the Dialing Type button
Redial Management
Pause Time
Touch the Redial Count
Line Monitor
Touch the Redial Interval
Touch the Line Monitor
Resend Count
Batch Send
Touch the Resend Count
Touch the Auto Answer Delay
Auto Answer Delay
Incoming Fax Options
Touch the Ring Volume
Ring Volume
Select High, Normal or Low as the default ring volume
Junk Fax Prevention
Receive Header Print DC332/340
Line Use Restriction DC332/340
Secure Fax Receive DC332/340
Touch the Receive Header
Select Receive only to reserve this line for incoming
Auditron Setups
Touch the Auditron Setups
Access¿ Auditron Setups
¿ see Note
Internal Auditron DC332/340
Auditron Enable Setups DC332/340
Touch the Auditron Enable ¿ Setups button
Account Setups DC332/340
Copy Fax Scan Print Reports
To add an account
Add/Modify Accounts
¿To modify an account
Touch the Delete Account button
Delete Account
Reset All Limits
Reset All Counters
Delete All Accounts
¿ Touch Confirm
Account Summary DC332/340
Job Limit Policy DC332/340
Touch the Job Limit Policy
Terminate Immediately Terminate on Job Boundary
Touch the Account Summary
Access Auditron Setups as
Service Access Setup DC220/230
Internal Auditron DC220/230
Touch the Service Access ¿ Setup button
Account Setup DC220/230
Add Accounts
Touch the Internal Auditron button Touch the Account Setup
Job Completion Setup DC220/230
Terminate Job Delete Pending Jobs
Touch the Internal Auditron button Touch the Job Completion
Off Per-Page Control Monitor
Foreign Interface Device
Auditron Setups
Touch Additional
Access Rights
DC220 230
Key System Auditron Owner Operator Administrator
DC332 340
PIN
¿ see Note below
Assign¿ Privileges
Add Pin
¿ Touch the Access Rights button
Set User Privileges
¿ Touch Add Pin
¿ Touch Delete PIN. Touch Confirm
Delete¿ PIN
Numerics
Index
Index
Secure Fax Receive DC332/340 5-31serial number
Index