MGS3700-12C
Page
Intended Audience
About This Users Guide
Need More Help?
Syntax Conventions
Document Conventions
Dslam
Icons Used in Figures
Safety Warnings
Safety Warnings MGS3700-12C User’s Guide
Contents Overview
IP Application 335
Table of Contents
Chapter Initial Setup Example
115
Chapter Static MAC Forward Setup 137
173
Chapter Classifier 211
255
Chapter Loop Guard 295
335
357
413
Part VII Appendices and Index
Part
Page
Backbone Application
Getting to Know Your Switch
Introduction
Backbone Application
Bridging Example
Tag-based Vlan Example
High Performance Switching Example
Ieee 802.1Q Vlan Application Examples
IPv6 Support
Ways to Manage the Switch
Good Habits for Managing the Switch
Getting to Know Your Switch MGS3700-12C User’s Guide
Desktop Installation Procedure
Hardware Installation and Connection
Installation Scenarios
Precautions
Mounting the Switch on a Rack
Rack-mounted Installation Requirements
Attaching the Mounting Brackets
Attaching the Mounting Brackets to the Switch
Mounting the Switch on a Rack
Mounting the Switch on a Rack
Label Description
Hardware Overview
Front Panel
Front Panel Connections
Gigabit Ethernet Ports
Console Port
Auto-crossover
Default Ethernet Negotiation Settings
Mini-GBIC Slots
Transceiver Removal
Transceiver Installation
Management Port
Power Connector
DC Power Connection
AC Power Connection
Connect a Sensor to the Signal Slot
Signal Slot
Output
LED Color Statu Description
Rear Panel
LEDs
LED Descriptions
Configuring the Switch
Hardware Overview
Hardware Overview MGS3700-12C User’s Guide
System Login
Web Configurator
Web Configurator Login
Web Configurator Layout
Navigation Panel Sub-links Overview
Basic Setting Advanced Application IP Application Management
Vlan
Navigation Panel Links
Link Description
Dhcp
AAA
Change Your Password
Saving Your Configuration
Reload the Configuration File
Switch Lockout
Resetting the Switch
Resetting the Switch Via the Console Port
Help
Logging Out of the Web Configurator
Web Configurator MGS3700-12C User’s Guide
Creating a Vlan
Initial Setup Example
Overview
Setting Port VID
Initial Setup Network Example Port VID
Initial Setup Example Management IP Address
Configuring Switch Management IP Address
Click Basic Setting IP Setup in the navigation panel
Initial Setup Example MGS3700-12C User’s Guide
Tutorials
How to Use Dhcp Snooping on the Switch
Host Port Vlan Pvid Dhcp Snooping Connected Port Trusted
Tutorial Settings in this Tutorial
Tutorial Tag Untagged Frames
Tutorial Set the Dhcp Server Port to Trusted
Dhcp Relay Tutorial Introduction
How to Use Dhcp Relay on the Switch
Vlan
Tutorial Set Vlan Type to 802.1Q
Tutorial Create a Static Vlan
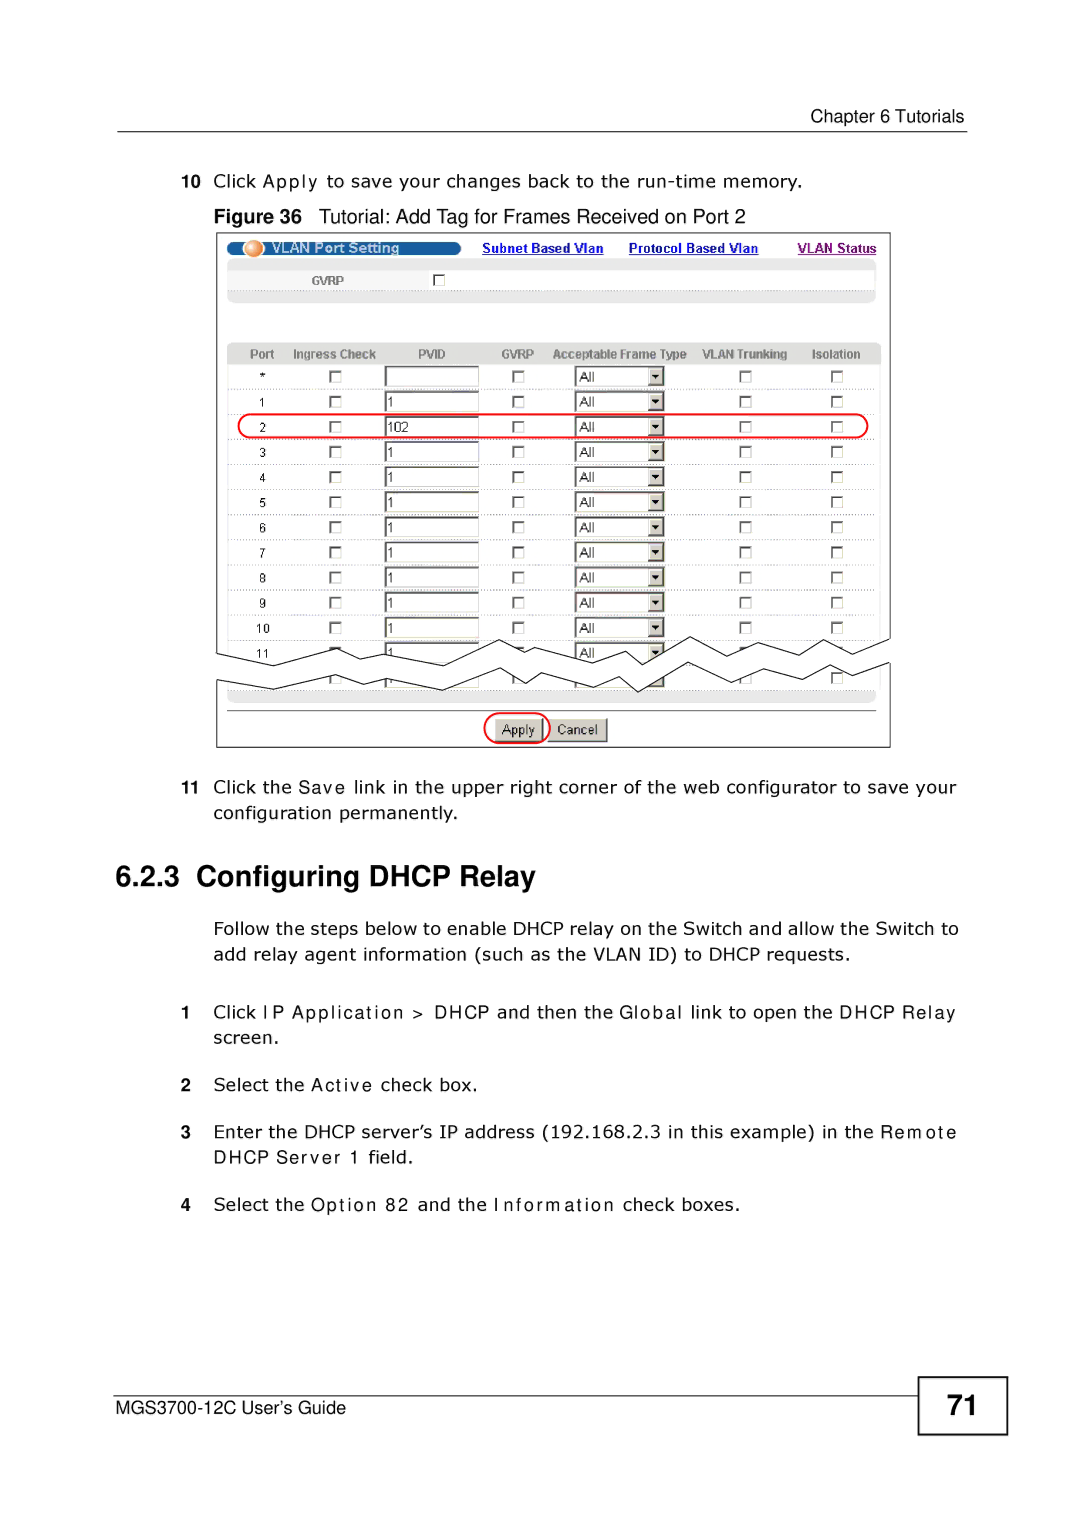
Tutorial Add Tag for Frames Received on Port
Configuring Dhcp Relay
Troubleshooting
How to Use PPPoE IA on the Switch
Settings in This Tutorial
Configuring Switch a
Tutorials
Configuring Switch B
Tutorials
Tutorials
How to Use Error Disable and Recovery on the Switch
Tutorials
How to Set Up a Guest Vlan
Creating a Guest Vlan
Tutorials
Enabling Ieee 802.1x Port Authentication
Enabling Guest Vlan
How to Do Port Isolation in a Vlan
Internet
Tutorials
Tutorials
Click Advanced Application Private Vlan
Creating a Private Vlan Rule
Tutorials MGS3700-12C User’s Guide
Basic Configuration
Page
System Status and Port Statistics
Lacp
Port Status Summary
Status
Up Time
Status Port Details
Status Port Details
HOL
RX CRC
Basic Setting
100
System Information
RPM
101
MAX
MIN
102
General Setup
103
Select First , Sunday , November
Introduction to VLANs
104
105
Smart Isolation
106
Switch Setup Screen
Port Setup screen
Based Vlan
Switch. Smart isolation does not work with Mstp and/or port
107
Vlan port isolation or private Vlan and Mrstp on
108
IP Setup
Management IP Addresses
109
Basic Setting IP Setup
VID
110
In-band IP Addresses
111
Make them
Port Setup
Some web configurator screens
112
Bpdu
113
Half Duplex, 100M/Full Duplex and 1000M/Full Duplex
Queue tag. See Priority Queue Assignment in on page 106 for
114
115
Part
116
CFI Vlan ID
Introduction to Ieee 802.1Q Tagged VLANs
117
Tpid
Gvrp
Automatic Vlan Registration
Forwarding Tagged and Untagged Frames
Garp
Vlan Term Description Parameter
Port Vlan Trunking
119
Ieee 802.1Q Vlan Terminology
120
Select the Vlan Type
Static Vlan
121
Static Vlan Status
122
Configure a Static Vlan
Vlan Details
Active
123
124
Gvrp
Configure Vlan Port Settings
125
Untag Only
Subnet Based VLANs
126
Pvid
127
Configuring Subnet Based Vlan
128
Advanced Application Vlan Vlan Port Setting Subnet Based
129
Protocol Based VLANs
130
Configuring Protocol Based Vlan
Are not allowed to be used for protocol based VLANs
131
132
Port-based Vlan Setup
Create an IP-based Vlan Example
133
134
Configure a Port-based Vlan
Choose All connected or Port isolation
Port Based Vlan Setup
135
136
137
Static MAC Forward Setup
Configuring Static MAC Forwarding
Advanced Application Static MAC Forwarding
138
139
140
141
Static Multicast Forward Setup
Static Multicast Forwarding Overview
142
Configuring Static Multicast Forwarding
Advanced Application Static Multicast Forwarding
143
144
145
Configure a Filtering Rule
Filtering
MAC
146
147
Spanning Tree Protocol
13.1 STP/RSTP Overview
STP Terminology
Link Recommended Allowed Speed Value Range
How STP Works
148
STP Path Costs
STP Port States
STP Port States
Multiple Rstp
149
Mstp Network Example
Multiple STP
150
MST Region
151
Common and Internal Spanning Tree Cist
152
MST Instance
153
Spanning Tree Protocol Status Screen
154
Spanning Tree Configuration
Rstp
Configure Rapid Spanning Tree Protocol
Configuration screen to enable Rstp on the Switch
155
Bridge Protocol Data Unit Bpdu
156
157
Rapid Spanning Tree Protocol Status
158
159
Configure Multiple Rapid Spanning Tree Protocol
Configuration screen to enable Mrstp on the Switch
160
161
Multiple Rapid Spanning Tree Protocol Status
162
163
Configure Multiple Spanning Tree Protocol
164
Configuration screen to enable Mstp on the Switch
Bridge Priority
165
166
Multiple Spanning Tree Protocol Status
Msti
167
CST
168
169
Bandwidth Control
Bandwidth Control Overview
CIR and PIR
170
Bandwidth Control Setup
171
172
173
Broadcast Storm Control Setup
Broadcast Storm Control
174
175
Port Mirroring Setup
Mirroring
176
177
RMirror
RMirror Overview
178
RMirror Configuration
179
Source
Advanced Application Mirroring RMirror Source
180
181
Destination
Advanced Application Mirroring RMirror Destination
182
183
Connected Port
184
185
Link Aggregation
Link Aggregation Overview
Dynamic Link Aggregation
186
Link Aggregation ID Local Switch
Link Aggregation ID Peer Switch
Link Aggregation ID
187
Link Aggregation Status
188
189
Link Aggregation Setting
Port in an active trunk group
190
Dynamic link aggregation
Link Aggregation Control Protocol
191
192
Static Trunking Example
Trunking Example Physical Connections
193
194
195
Port Authentication
Port Authentication Overview
Ieee 802.1x Authentication
196
MAC Authentication
197
Port Authentication Configuration
198
Before configuring it on each port
Activate Ieee 802.1x Security
199
Guest Vlan
Guest Vlan Example
200
201
202
Activate MAC Authentication
203
Lower value, then it supersedes this setting. See Section
204
205
Port Security
About Port Security
Forwarding screen
Port Security Setup
206
207
208
Vlan MAC Address Limit
209
210
211
Configuring the Classifier
Classifier
About the Classifier and QoS
Untagged , Ethernet II tagged and Ethernet II untagged
212
Dscp
213
214
Viewing and Editing Classifier Configuration
You configure the socket numbers
Common IP Protocol Types and Protocol Numbers
215
Classifier Summary Table
Common Ethernet Types and Protocol Numbers
Protocol Name TCP/UDP Port Number
Classifier Example
216
Common TCP and UDP Port Numbers
Classifier Example
217
218
Dscp and Per-Hop Behavior
Policy Rule
Policy Rules Overview
DiffServ
220
Configuring Policy Rules
Advanced Application Policy Rule
221
Select Send the packet to priority queue to put the packets
222
TOS
Select Do not drop the matching frame previously marked for
223
Viewing and Editing Policy Configuration
224
225
Policy Example
226
Strictly Priority Queuing
Weighted Fair Queuing
Queuing Method
Queuing Method Overview
228
Weighted Round Robin Scheduling WRR
229
Configuring Queuing
230
231
Vlan Stacking
Vlan Stacking Overview
Vlan Stacking Example
232
Vlan Stacking Port Roles
Vlan Tag Format
Vlan Tag Format
Frame Format
233
VID Vlan ID FCS
Configuring Vlan Stacking
234
802.1Q Frame
This screen at a time
Port-based Q-in-Q
235
Them
Spvid
236
Cvid
Selective Q-in-Q
237
238
Igmp Filtering
Multicast
Multicast Overview
IP Multicast Addresses
240
Multicast Status
Igmp Snooping
Igmp Snooping and VLANs
241
Multicast Setting
You make them
242
Join multicast groups
243
Setting Igmp Filtering Profile screen
244
Igmp Snooping Vlan
Screen
Setting screen first
245
Start Address and End Address fields
Igmp Filtering Profile
246
Profile
MVR Overview
247
248
Types of MVR Ports
MVR Modes
How MVR Works
249
General MVR Configuration
Compatible
250
251
MVR Group Configuration
Mvlan
252
253
MVR Configuration Example
254
MVR Group Configuration Example
255
Authentication, Authorization and Accounting AAA
256
AAA Screens
Local User Accounts
Radius and TACACS+
257
Radius Server Setup
Shared Secret
258
259
TACACS+ Server Setup
260
261
AAA Setup
Method 2 and Method 3 fields
262
263
Function Attribute
Vendor Specific Attribute
264
Supported VSAs
Tunnel Protocol Attribute
Supported Radius Attributes
265
Attributes Used by the Ieee 802.1x Authentication
Attributes Used for Authentication
Attributes Used for Authenticating Privilege Access
Attributes Used to Login Users
Attributes Used for Accounting Exec Events
Attributes Used for Accounting
267
Attributes Used for Accounting System Events
Radius Attributes Exec Events via
268
Attributes Used for Accounting Ieee 802.1x Events
269
IP Source Guard
IP Source Guard Overview
Dhcp Snooping Database
Dhcp Snooping Overview
270
Trusted vs. Untrusted Ports
Dhcp Relay Option 82 Information
Configuring Dhcp Snooping
271
ARP Inspection and MAC Address Filters
ARP Inspection Overview
272
Syslog
Configuring ARP Inspection
IP Source Guard
273
274
IP Source Guard Static Binding
IP Source Guard Static Binding
275
276
277
Dhcp Snooping
278
Configure screen. See .5 on
279
280
Dhcp Snooping Configure
Vlan too
281
Dhcp requests will not succeed
282
Dhcp Snooping Port Configure
283
Dhcp Snooping Vlan Configure
284
Dhcp Snooping Configure screen. See .5 on
Delete
ARP Inspection Status
285
286
ARP Inspection Vlan Status
287
ARP Inspection Log Status
288
ARP Inspection Configure
ARP Inspection Vlan Configure screen, you can
Syslog rate and Log interval
289
Interval
ARP Inspection Port Configure
290
291
ARP Inspection Port Configure
292
ARP Inspection Vlan Configure
293
294
STP
Loop Guard
Loop Guard Overview
295
296
Switch in Loop State
297
Loop Guard Setup
298
299
Vlan Mapping
Vlan Mapping Overview
Vlan Mapping Example
300
Enabling Vlan Mapping
Translated VID field
Configuring Vlan Mapping
301
302
303
Layer 2 Protocol Tunneling
Layer 2 Protocol Tunneling Overview
304
Layer 2 Protocol Tunneling Mode
305
Configuring Layer 2 Protocol Tunneling
306
UDLD, and Pagp on the access ports only
307
SFlow
SFlow Overview
308
SFlow Configuration
309
SFlow Collector Configuration
310
311
Error Diable
Error-Disable Recovery Overview
CPU Protection Overview
312
Error Disable Screen
CPU Protection Configuration
313
Error-Disable Detect Configuration
314
Errdisable CPU protection screen
315
Error-Disable Recovery Configuration
316
317
PPPoE
PPPoE Intermediate Agent Overview
PPPoE Intermediate Agent Tag Format
PPPoE IA Remote ID Sub-option Format
Sub-Option Format
318
PPPoE IA Circuit ID Sub-option Format User-defined String
PPPoE IA Circuit ID Sub-option Format Defined in WT-101
32.2.1.2 WT-101 Default Circuit ID Syntax
Port State
319
320
PPPoE
PPPoE Intermediate Agent
Application PPPoE Intermediate Agent Port screen or for a
PPPoE IA Per-Port
321
Advanced Application PPPoE Intermediate Agent Port
322
Advanced Application PPPoE Intermediate Agent Port
323
Untrusted
324
PPPoE IA Per-Port Per-VLAN
325
PPPoE IA for Vlan
326
327
Private Vlan
Private Vlan Overview
328
Configuring Private Vlan
329
330
331
Green Ethernet
Green Ethernet Overview
332
Configuring Green Ethernet
333
334
335
IP Application
336
337
Static Route
Static Routing Overview
338
Configuring Static Routing
339
340
341
Differentiated Services
DiffServ Overview
342
Two Rate Three Color Marker Traffic Policing
DiffServ Network Example
343
TRTCM-Color-blind Mode
PIR?
TRTCM-Color-aware Mode
Activating DiffServ
344
IP Application DiffServ
345
346
Configuring 2-Rate 3 Color Marker Settings
Dscp Value
DSCP-to-IEEE 802.1p Priority Settings
Default DSCP-IEEE 802.1p Mapping
347
348
Configuring Dscp Settings
349
Dhcp Configuration Options
Dhcp Overview
Dhcp Modes
350
Dhcp Status
Dhcp Relay
Dhcp Relay Agent Information
Relay Agent Information
Configuring Dhcp Global Relay
General Setup
351
VLAN1VLAN2
Global Dhcp Relay Configuration Example
352
353
Configuring Dhcp Vlan Settings
354
General Setup screen
Example Dhcp Relay for Two VLANs
Dhcp Relay for Two VLANs
Dhcp Relay for Two VLANs Configuration Example
356
357
Management
358
359
Maintenance
Maintenance Screen
360
Load Factory Default
Save Configuration
Settings to the current configuration on the Switch
361
Reboot System
Firmware Upgrade
362
Restore a Configuration File
363
Backup a Configuration File
FTP Command Line
Filename Conventions
Filename Conventions
FTP Command Line Procedure
Example FTP Commands
364
365
Command Description
GUI-based FTP Clients
FTP Restrictions
366
Access Control Overview
Access Control
Access Control Overview
Access Control Main Screen
368
About Snmp
369
Snmp Commands
Snmp v3 and Security
Supported MIBs
Option Object Label Object ID Description
Snmp Traps
370
Snmp System Traps
Snmp InterfaceTraps
371
AAA Traps
372
Snmp IP Traps
Snmp Switch Traps
373
CFM
Configuring Snmp
374
Manager
375
Version
Specify in this section to create accounts on the Snmp
376
Security level or higher than the security level settings on
377
Configuring Snmp Trap Group
378
Setting Up Login Accounts
379
SSH Overview
380
How SSH works
381
SSH Implementation on the Switch
Requirements for Using SSH
Introduction to Https
382
Https Example
Internet Explorer Warning Messages
383
Netscape Navigator Warning Messages
Security Certificate 2 Netscape
Security Certificate 1 Netscape
385
Service Port Access Control
Main Screen
386
Remote Management
SNMP/SSH Https
387
HTTP/ICMP
388
389
Diagnostic
Diagnostic
390
Syslog Severity Levels
Syslog
Syslog Overview
391
392
Syslog Setup
393
Syslog Server Setup
394
395
ZyXEL Clustering Management Specifications
Cluster Management
Cluster Management Status Overview
396
Cluster Management Status
Manager
Cluster Member Switch Management
397
398
Uploading Firmware to a Cluster Member Switch
FTP Parameter Description
399
FTP Upload to Cluster Member Example
400
Clustering Management Configuration
Candidate list
401
Based Vlan
402
403
MAC Table
MAC Table Overview
404
Viewing the MAC Table
405
406
407
ARP Table
ARP Table Overview
How ARP Works
408
Viewing the ARP Table
409
Configure Clone
Configure Clone
410
411
412
413
Troubleshooting Product Specifications
414
415
Troubleshooting
Power, Hardware Connections, and LEDs
416
Switch Access and Login
Advanced Suggestions
417
418
Switch Configuration
419
Product Specifications
Hardware Specifications
Specification Description
420
Firmware Specifications
Feature Description
Queuing
421
422
423
Feature Specifications
MVR
424
Standard Description
425
Standards Supported
EMC
426
BRIDGE-MIB, Q-BRIDGE-MIB
427
Fan Module Removal and Installation
428
429
Appendices Index
430
Name Protocol Ports Description
Commonly Used Services
431
432
433
434
435
Copyright
Certifications
FCC Warning CE Mark Warning
436
437
ZyXEL Limited Warranty
438
ARP
Index
439
Numbers
440
441
442
Mrstp
443
MIB
444
SPQ
445
Trtcm
446
Vlan 104
447
448