VESA MONITOR INSTALLATION
X4
6
6 | 6 |
|
|
| EN |
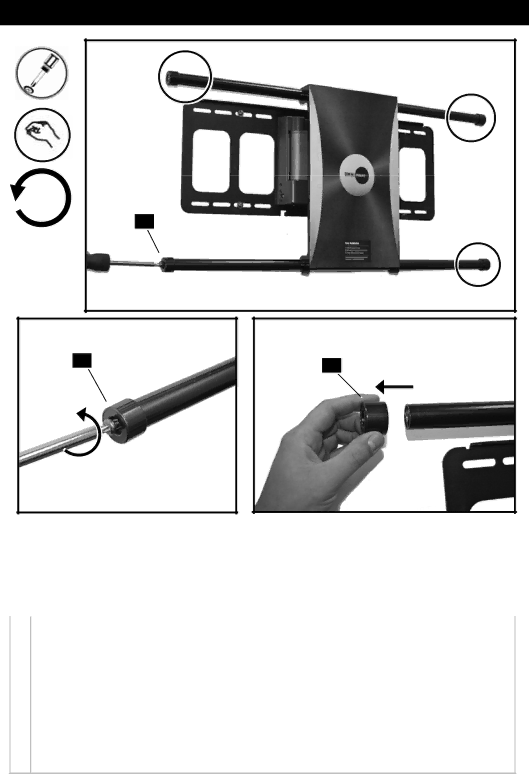
| Loosen Fastener |
| EN | Remove |
|
|
| ES |
| Afloje el sujetador |
| ES | Retire |
|
|
| FR |
| Desserrez l'attache |
| FR | Retirez |
|
|
| DE |
| Lösen Sie die Befestigung |
| DE | Entfernen Sie |
|
|
| NL |
| Draai de bevestiging los |
| NL | Verwijder |
|
|
| IT |
| Allentare il dispositivo di fissaggio |
| IT | Rimuovere |
|
|
| RU |
| Ослабьте крепление |
| RU | Удалите |
|
|
|
|
|
|
|
|
|
|
EN | Remove the End Caps (6) from Horizontal Rails (5). The End Cap Sticker must be peeled back to access the screws. Discard | |||||||
End Cap Stickers. |
|
|
| |||||
|
|
|
| |||||
ES | Quite los topes (6) de los raíles horizontales (5). La etiqueta adhesiva de los topes debe ser retirada para poder acceder a los tornillos. | |||||||
Deseche las etiquetas. |
|
|
| |||||
FR | Retirez les capuchons (6) des rails horizontaux (5). La vignette de capuchon doit être enlevée afin d'accéder aux vis. Jetez les vignettes | |||||||
de capuchon. |
|
|
| |||||
DE | Entfernen Sie die Endstücke (6) von den horizontalen Schienen (5). Entfernen Sie das Endstückklebeschild, um Zugriff auf die Schrauben | |||||||
zu erhalten. Entsorgen Sie die Endstückklebeschilder. |
|
|
| |||||
NL | Verwijder de einddoppen (6) van de horizontale stangen (5). De einddopsticker moet worden losgemaakt om bij de schroeven te komen. | |||||||
Gooi de einddopstickers weg. |
|
|
| |||||
IT | Rimuovere le calotte terminali (6) dalle guide orizzontali (5). Per accedere alle viti, è necessario staccare l'adesivo delle calotte terminali. | |||||||
Gettare l'adesivo. |
|
|
| |||||
RU | Снимите наконечники (6) с горизонтальных направляющих (5). Для доступа к винтам необходимо снять наклейку | |||||||
колпачка. | Утилизируйте наклейки колпачков. |
|
|
| ||||
P27