Maytag W10222378A installation instructions

Page 10

1.Loosen or remove center silver-colored terminal block screw.

2.Place the hooked end of the neutral wire (white or center wire) of direct wire cable under the center screw of terminal block (hook facing right). Squeeze hooked end together. Tighten screw.

C

B

D

AE

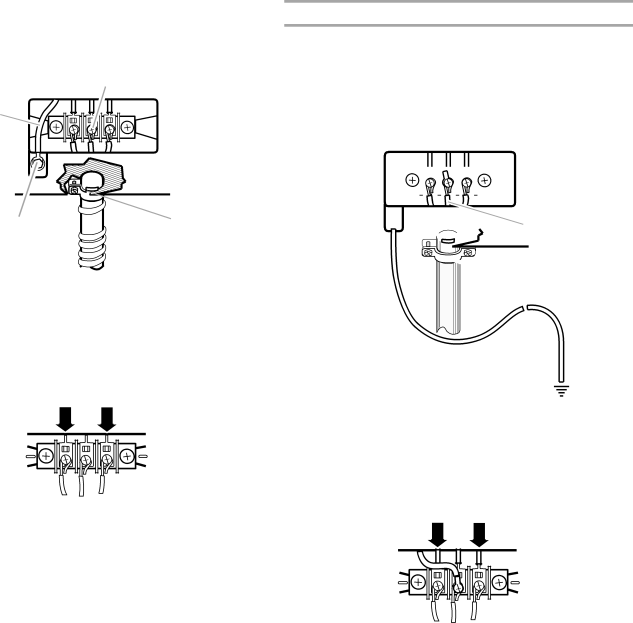
A.External ground conductor screw

B.Neutral ground wire

C.Center silver-colored terminal block screw

D.Neutral wire (white or center wire)

E.34 " (19 mm) UL listed strain relief

3.Place the hooked ends of the other power supply cable wires under the outer terminal block screws (hooks facing right). Squeeze hooked ends together. Tighten screws.

4.Tighten strain relief screw.

5.Insert tab of terminal block cover into slot of dryer rear panel. Secure cover with hold-down screw.

6.You have completed your electrical connection. Now go to “Venting Requirements.”

Optional 3-wire connection

Use for direct wire or power supply cord where local codes do not permit connecting cabinet-ground conductor to neutral wire.

1.Remove center silver-colored terminal block screw.

2.Remove neutral ground wire from external ground conductor screw. Connect neutral ground wire and the neutral wire (white or center wire) of power supply cord/cable under center, silver-colored terminal block screw. Tighten screw.

B

A C

E

D

A. External ground conductor screw B. Neutral ground wire

C. Neutral wire (white or center wire)

D. Grounding path determined by a qualified electrician E. 34" (19 mm) UL listed strain relief

3.Connect the other wires to outer terminal block screws. Tighten screws.

4.Tighten strain relief screws.

5.Insert tab of terminal block cover into slot of dryer rear panel. Secure cover with hold-down screw.

6.Connect a separate copper ground wire from the external ground conductor screw to an adequate ground.

10

Image 10
Contents LAVEUSE/SÉCHEUSE Électrique DE 27 69 CM ToolsandParts AlternatePartsWasher/Dryer Dimensions Installation ClearancesMobile Home Additional Installation Requirements Location RequirementsDrainSystem ElectricalRequirements- U.S.AElectricalRequirements-Canada If connecting by direct wireIf your outlet looks like this Sections into the hole below the terminal block opening so Electrical Connection -U.S.A. OnlyUL marking on strain relief. Put the tabs of the two clamp Hold in place. Tighten strain relief screw enough to holdStyle 2 Direct wire strain relief Wire connection Power supply cordWire connection Direct Wire Remove center silver-colored terminal block screwConnect neutral wire white or center wire of power supply Block. Tighten screwPage VentingRequirements Vent materialRemoveShippingStrap Install LevelingLegsInstall the front leveling feet ConnecttheDrainHoseConnect the Inlet Hoses Alternate installations for close clearances Recommended exhaust installationsOptional exhaust installations SecuretheDrainHoseVent system chart InstallVentSystemSpecial provisions for mobile home installations Level Washer/DryerCheck that you have all of your tools Complete InstallationIf the dryer will not start, check the following Sécurité DE LA LAVEUSE/SÉCHEUSE Pièces nécessaires pour la laveuse non fournies OutillageetpiècesPièces fournies Outillage requisIl vous faudra Exigences d’emplacementAutres pièces Si vous avez Vous devrez acheter’installation dans une maison mobile exige Installation dans une maison mobile autres exigencesDimensions de la laveuse/sécheuse Système devidangeSystème de vidange par le plancher illustration D Spécifications électriques CanadaSystème de vidange avec évier de buanderie illustration C ’est à l’utilisateur qu’incombe la responsabilité deExigences concernant l’évacuation Matériel pour l’évacuationÉvacuation Les styles de clapets recommandés sont illustrés ci-dessousEnlever la sangle d’expédition Le clapet incliné illustré ici est acceptableRaccordement du tuyaude vidange Installation des pieds de nivellementRaccordement des tuyaux d’alimentation Connecter les tuyaux d’alimentation à la laveuse Immobilisationdu tuyau de vidangeNettoyer les conduites d’eau Pour un placard ou un endroit exiguAutres installations où le dégagement est réduit Installations d’évacuation recommandéesInstallations d’évacuation facultatives Planification du système d’évacuationTableau des systèmes d’évacuation Installation du système d’évacuationNivellement de la laveuse/sécheuse Déterminer l’itinéraire d’acheminement du conduitRaccordement du conduit d’évacuation Acheverl’installationSi la sécheuse ne démarre pas, vérifier ce qui suit Page Page Page W10222378A Tous droits réservés