Teledyne powerpod 400 Setting Limit Alarms, Setting a Single Channel’s High Limit

Page 24

10.6. SETTING LIMIT ALARMS

Each channel of the POWERPOD- 400 has one high limit alarm and one low limit alarm. Each alarm is provided by an open-collector, opto-isolated signal at a corresponding pin on the rear panel, connector J8. Use the provided diagram when referring to the text below.

From

SETUP/CAL

Menu

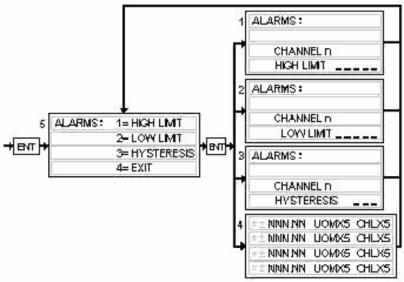
10.6.1. Setting a Single Channel’s High Limit

After selecting a channel in the SETUP/CAL menu, choose ALARMS by pressing the number 5 key followed by the ENTER key. The ALARMS menu will be displayed. Pressing the number “1” key selects the HIGH LIMIT display. Using the number keys, enter the desired high limit level and then press ENTER. EXIT the loop by pressing the number “4” + ENTER key while the ALARMS menu is displayed.

10.6.2. Setting a Single Channel’s Low Limit

After selecting a channel in the SETUP/CAL menu, choose ALARMS by pressing the number 5 key. The ALARMS menu will be displayed. Pressing the number 2 key selects the LOW LIMIT display. Using the number keys, enter the desired high limit level and then press ENTER. EXIT the loop by pressing the number 4 key while the ALARMS menu is displayed, followed by ENTER.

10.6.3. Setting a Single Channel’s Hysteresis

After selecting a channel in the SETUP/CAL menu, choose ALARMS by pressing the number 5 key. The ALARMS menu will be displayed. Pressing the number 3 key selects the HYSTERESIS display. Using the number keys, enter the desired degree of Hysteresis followed by the ENTER key. EXIT the loop by pressing the number 4 key while the ALARMS menu is displayed, followed by ENTER.

164-122012 PowerPOD 400

Page 24 of 42

Image 24
Contents Teledyne Hastings Manual Print History Table of Contents Four to Twenty Milliamp Operation Power Quick Start InstructionsSafety Features Front Panel LockoutPower Selection Specifications PowerPod-400 Specifications TableFront Panel Channel Number Select KeysRear Panel Wiring PowerCommunications Alarms Transducer ConnectionsAnalog Signal Followers Power ON/OFF Changing the Command SET PointManual Operation Override OpenSetting a Channel to Auto Control Setting a Channel to Directly Meter Incoming SignalsSetting a Channel to Display the Totalizer Function Mode Reset Value External/Remote Operation Choosing RS-232 CommunicationChoosing RS-485 Communication Setup/Cal Mode Entering the SETUP/CAL ModeDisplay Setup Blanking a Display Line/ChannelSetting A/D Conversion Rate Filter Selecting Unit-of-MeasureSelecting Gas ID Totalizer Setup Front Panel Lock OutCount Up to a Set Point External Communication Setup RS-232 SettingsRS-485 Settings Count Down from a Set PointSelecting the Analog Signal Level Zero to Five Volt OperationZero to Ten Volt Operation Four to Twenty Milliamp OperationSetting Limit Alarms Setting a Single Channel’s High LimitSetting a Single Channel’s Low Limit Setting a Single Channel’s HysteresisSetting Ratio Control Parameters Enabling Ratio ControlCalibrating a Channel to ITS Incoming Signals Resetting the Zero OnlyResetting the Span Only Resetting Zero and Span Setting a Multiplication FactorCommands Alarm/Flag QueriesSerial Communication Set Point QueriesPowerPOD PowerPod-400 Serial Commands Appendix aPowerPod-400 Serial Commands Contd Appendix a Notes ApppendixCB Name Rate TotalGas ID Table Page 1 Gas ID Table Page 2 Setting the Zero & Span PowerPod-400 Power Supply/Totalizer Appendix DZeroing Unit 4 to 20 mA Range Spanning Unit Transducer POWERPOD-400 PowerPOD Drawings Warranty Warranty Repair Policy