Mio Modero R-4
AMX Limited Warranty and Disclaimer
Table of Contents
Programming the Mio R-4
Getting The Most From Your Mio Modero R-4
Table of Contents Mio R-4
Overview
Mio Modero R-4 Remote
Mio R-4 FG148-04 Specifications
Specifications
Touch And Tilt Sensor
Device Navigation
Features
FCC Compliance
Mio Modero R-4 Remote
Mio R-4 Setup
Installing Supported Language Keypads
Battery Low Indicator
Mio R-4 Setup
Mio R-4 Setup Mio Modero R-4
Accessing the Setup Pages
Device Setup Pages
Viewing Project Information
Project Information
Project Information
Remote & Display Settings
Remote & Display Settings
Sleep on Display Timeout enabled
Changing the remote timeout
Raising and lowering the LCD brightness
Setting the Home Hold Time
Raising and lowering the charge LED brightness
Changing the remote inactivity page flip
Checking remote display settings
Setting the time format
Date/Time Settings
Date/Time Settings
Getting time and date from your NetLinx Master
Setting the date
Setting the date format
Setting the time
Setting the volume
Sound Settings
Testing the sound settings
Sound Settings
Battery Settings
Battery Settings
Checking Dock Status
Toggling Brightness Limit
Protected Settings Menu
Protected Settings Menu
Entering a numeric password
Password Entry
Entering an alphanumeric password
Password Confirmation
Options & Recovery
Options & Recovery
Checking the device number
Toggling the Function Show option
Toggling the Page Tracking option
Resetting System Settings
Removing User Pages
Protection
Protection
Changing the device password
Edit Passwords
Calibrating the touch screen area
Calibrate
Checking connection status
System Settings
Status
Master Connection
Checking the gateway IP address
Checking the master IP address
Checking the gateway EUI address
Checking the PAN ID
Changing the Master Connection Type
Select System Settings in the Protected Settings Menu
Site Survey
Joining a wireless network
Site Survey
Rebooting the device
Reboot
Test Pages
Programming the Mio R-4
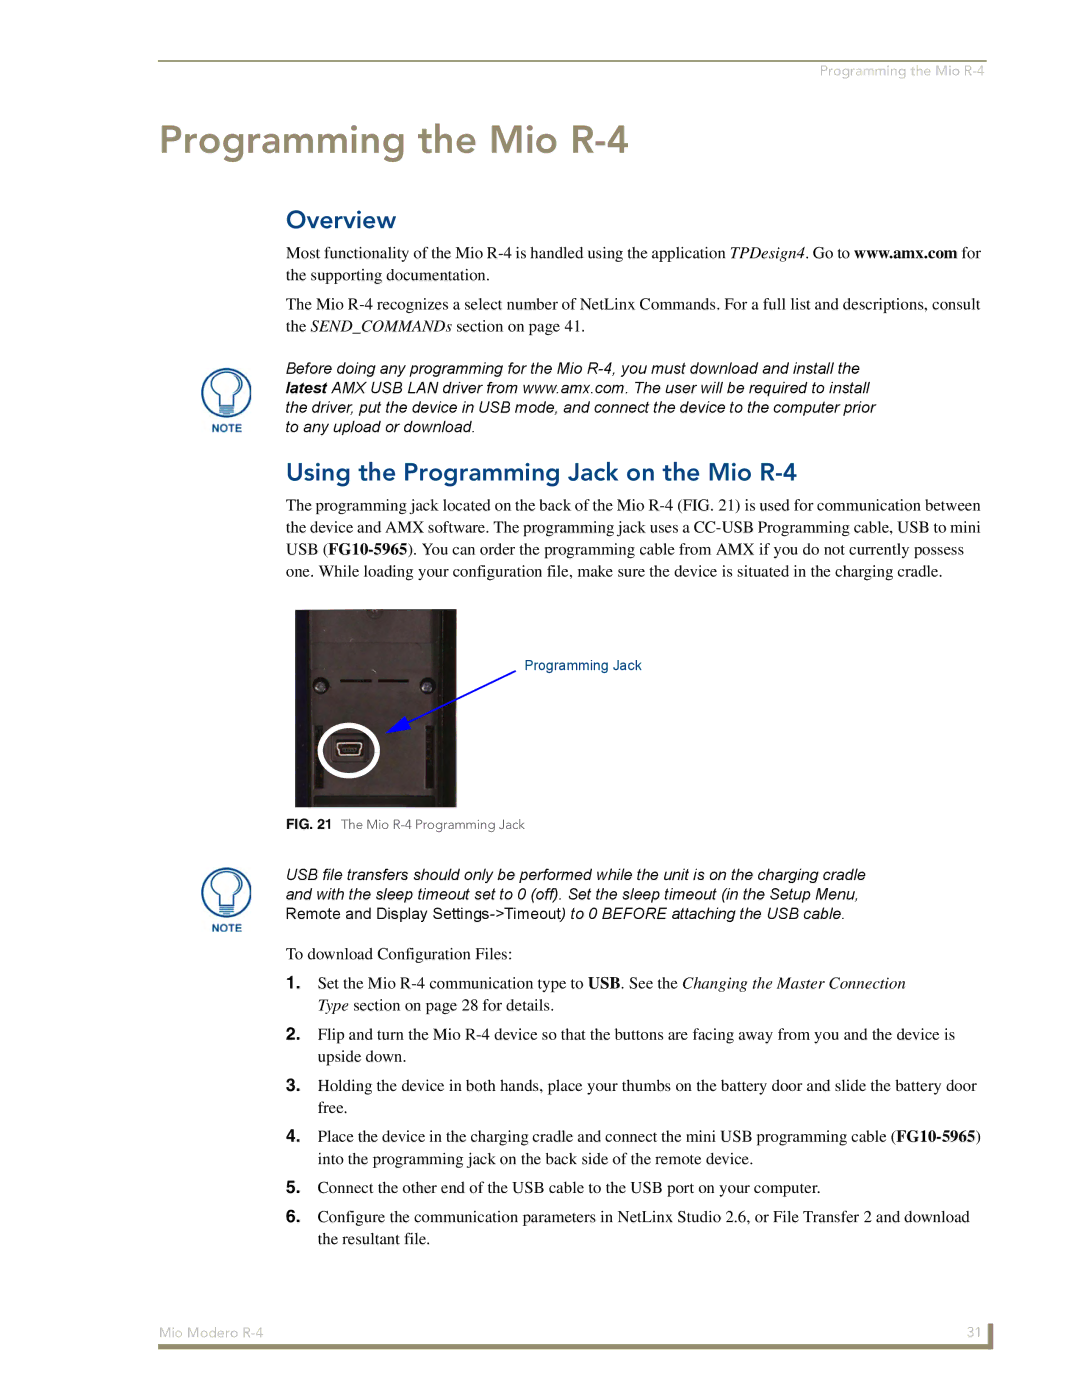
Using the Programming Jack on the Mio R-4
Updating Firmware
Downloading Configuration Files through TPDesign4
Updating Mio R-4 Firmware Through USB
USB
Programming the Mio R-4
RGB triplets and names for basic 88 colors
Programming Numbers
RGB Values for all 88 Basic Colors
RGB Values for all 88 Basic Colors
Fixed Fonts and ID Numbers
Fixed Fonts and ID numbers
Border Styles by Numbers
Slider/Cursor Names
Slider/Cursor Names
Border Styles by Numbers
TPD4 Border Styles by Name
Text Effects
Text Effects Names
Commands
SENDCOMMANDs
Commands
@APG
@PDR
@DPG
@PHE
@PHP
@PPA
@PHT
@PPF
@PPG
@PPM
@PPK
@PPN
@PPX
@PPT
@PSE
@PSP
Ppog
Ppof
Ppon
Button Commands with Embedded Codes
Button Commands with Embedded Codes
BMF
BMF-vt addr range,button states range,data
Cont
Button Commands
Button Commands
ANI
APF
BAU
BAT
BCB
BCF
Sendcommand Device,BCT-500.504&510,1,12
BCT
BFB
BDO
BIM
BMC
Sendcommand Device,BMC-150,1,1,315,1,%BR%FT%TX%BM%IC%CF%CT
Zero can be used for an absolute position
Sendcommand Device,BMI-530,1&2,newMac.png
Sendcommand Device,BMF-500,1,%B10%CFRed%CB Blue
CTBlack%Ptest.png
BMI
BOR
BMP
BPP
BSF
BRD
BSM
BSP
CPF
BWW
DPF
ENA
GDI
FON
GIV
GLH
GRD
GLL
GRU
GSC
GSN
Sendcommand Device,ICO-500.504&510.515,1&2,1
GSN-vt addr range,bargraph slider name
ICO
JSI
JSB
SHO
JST
TEC
TXT
TEF
UNI
Field Description
Button Query Commands
Send Command Device,?BCB-529,1
?Button Query Commands
Send Command Device,?BCF-529,1
?BCB
Send Command Device,?BCT-529,1
? Button Query Commands
Send Command Device,?BMP-529,1
?BCT
Send Command Device,?BRD-529,1
Send Command Device,?BOP-529,1
?BOP
?BRD
Send Command Device,?FON-529,1
Send Command Device,?BWW-529,1
?BWW
?FON
Send Command Device,?JSB-529,1
Send Command Device,?ICO-529,1
?ICO
?JSB
Send Command Device,?JST-529,1
Send Command Device,?JSI-529,1
?JSI
?JST
Send Command Device,?TEF-529,1
Send Command Device,?TEC-529,1
?TEC
?TEF
?TXT
Send Command Device,?TXT-529,1
Panel Run Time Commands
Panel Run Time Commands
@AKP
Akeyr
@AKR
Beep
Dbeep
Setup
@EKP
Pkeyp
@TKP
Sleep
Tpageon
Tpageoff
Remote Runtime Commands
Remote Runtime Commands
Panel Setup Commands
Input Commands
Input Commands
Panel Setup Commands
Remote Setup Commands
Remote Setup Commands
List Box Commands
List Box Commands
Sendcommand Device, LDN-5,1,4,my songs
Listboxes
Sendcommand Device,LDA-1,0,Entry5,Meatloaf,Best
Sendcommand DEV,LDA-list
Sendcommand Device,LDA
Sendcommand DEV,LDR-list
Sendcommand DEV,LDT-list
Sendcommand Device, LDD-1
Sendcommand Device,LDT-1,1,0,0,0
Sendcommand DEV,LDL-list
Sendcommand Device,LVC-3,5,2,1
Sendcommand DEV,LVC-view
Sendcommand DEV,LVF-view
Sendcommand Device,LVF-1,0,2,Smith
Sendcommand Device,LVM-2,-4
Sendcommand DEV,LVM-view address,offset
Sendcommand DEV,LVO-view address,sort
Sendcommand Device,LVO-1,7
Sendcommand Device,LVP-5,3
Sendcommand DEV,LVP-view address,index
Sendcommand DEV,LVS-view
Sendcommand Device,LVS-3,5,2,1
Track Artist Album Title Channel Number
List Box Command My Music
’LDR-1,0,4’
List Box Command My Music with Changes
Getting the Most From the Mio R-4
Getting The Most From Your Mio Modero R-4
Getting The Most From Your Mio Modero R-4
ZigBee Network Calculator
ZigBee Network Calculator
Mio Modero R-4 Return Button
Mio Remote Charging Base
Specifications
Charging The Mio Remote with Charging Base
Mio-RCC Remote Charging Base FG147-02 Specifications
Mio Remote Charging Base Mio Modero R-4
It’s Your World Take Control

