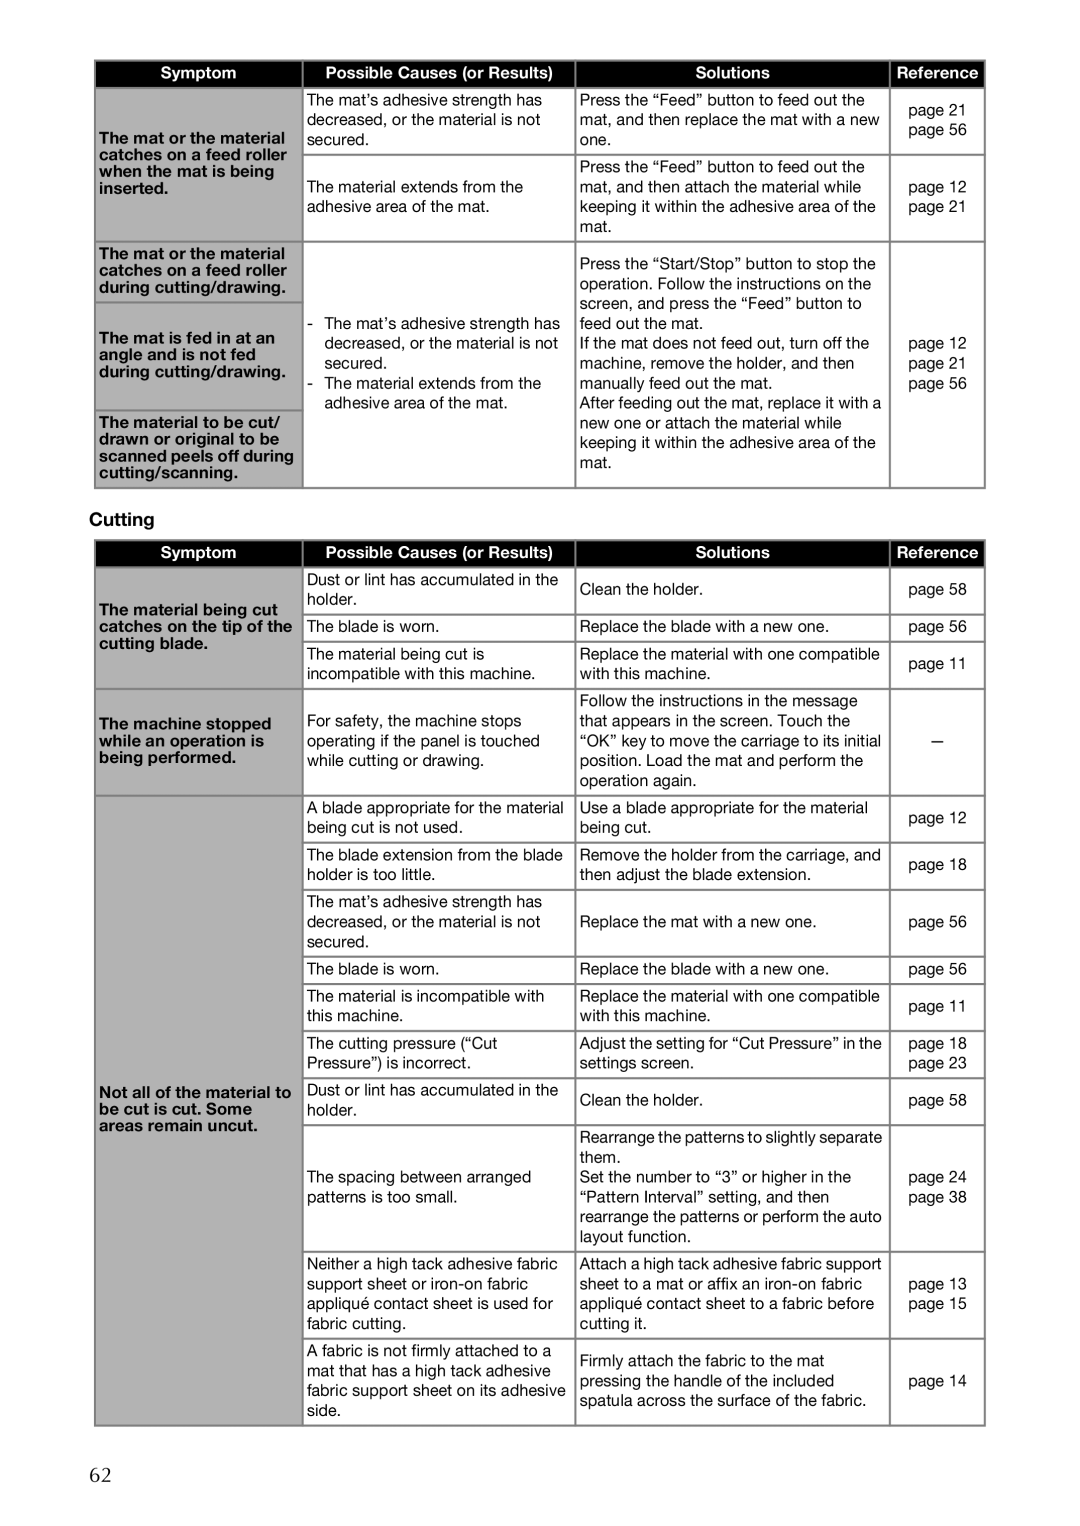
Symptom | Possible Causes (or Results) | Solutions | Reference | |
| The mat’s adhesive strength has | Press the “Feed” button to feed out the | page 21 | |
| decreased, or the material is not | mat, and then replace the mat with a new | ||
The mat or the material | page 56 | |||
secured. | one. | |||
| ||||
catches on a feed roller |
|
|
| |
| Press the “Feed” button to feed out the |
| ||
when the mat is being | The material extends from the | page 12 | ||
inserted. | mat, and then attach the material while | |||
| adhesive area of the mat. | keeping it within the adhesive area of the | page 21 | |
|
| mat. |
| |
The mat or the material |
| Press the “Start/Stop” button to stop the |
| |
catches on a feed roller |
|
| ||
| operation. Follow the instructions on the |
| ||
during cutting/drawing. |
|
| ||
| - The mat’s adhesive strength has | screen, and press the “Feed” button to |
| |
|
| |||
The mat is fed in at an | feed out the mat. | page 12 | ||
decreased, or the material is not | If the mat does not feed out, turn off the | |||
angle and is not fed | ||||
secured. | machine, remove the holder, and then | page 21 | ||
during cutting/drawing. | ||||
- The material extends from the | manually feed out the mat. | page 56 | ||
| ||||
| adhesive area of the mat. | After feeding out the mat, replace it with a |
| |
The material to be cut/ |
| new one or attach the material while |
| |
drawn or original to be |
| keeping it within the adhesive area of the |
| |
scanned peels off during |
| mat. |
| |
cutting/scanning. |
|
| ||
|
|
| ||
|
|
|
|
Cutting
Symptom | Possible Causes (or Results) | Solutions | Reference | |
|
|
|
| |
| Dust or lint has accumulated in the | Clean the holder. | page 58 | |
| holder. | |||
The material being cut |
|
| ||
catches on the tip of the | The blade is worn. | Replace the blade with a new one. | page 56 | |
cutting blade. |
|
|
| |
The material being cut is | Replace the material with one compatible | page 11 | ||
| ||||
| incompatible with this machine. | with this machine. | ||
|
| |||
| For safety, the machine stops | Follow the instructions in the message |
| |
The machine stopped | that appears in the screen. Touch the |
| ||
while an operation is | operating if the panel is touched | “OK” key to move the carriage to its initial | — | |
being performed. | while cutting or drawing. | position. Load the mat and perform the |
| |
|
| operation again. |
| |
| A blade appropriate for the material | Use a blade appropriate for the material | page 12 | |
| being cut is not used. | being cut. | ||
|
| |||
| The blade extension from the blade | Remove the holder from the carriage, and | page 18 | |
| holder is too little. | then adjust the blade extension. | ||
|
| |||
| The mat’s adhesive strength has | Replace the mat with a new one. | page 56 | |
| decreased, or the material is not | |||
| secured. |
|
| |
| The blade is worn. | Replace the blade with a new one. | page 56 | |
| The material is incompatible with | Replace the material with one compatible | page 11 | |
| this machine. | with this machine. | ||
|
| |||
| The cutting pressure (“Cut | Adjust the setting for “Cut Pressure” in the | page 18 | |
| Pressure”) is incorrect. | settings screen. | page 23 | |
|
|
|
| |
Not all of the material to | Dust or lint has accumulated in the | Clean the holder. | page 58 | |
be cut is cut. Some | holder. | |||
|
| |||
areas remain uncut. |
|
|
| |
| Rearrange the patterns to slightly separate |
| ||
|
|
| ||
| The spacing between arranged | them. | page 24 | |
| Set the number to “3” or higher in the | |||
| patterns is too small. | “Pattern Interval” setting, and then | page 38 | |
|
| rearrange the patterns or perform the auto |
| |
|
| layout function. |
| |
| Neither a high tack adhesive fabric | Attach a high tack adhesive fabric support | page 13 | |
| support sheet or | sheet to a mat or affix an | ||
| appliqué contact sheet is used for | appliqué contact sheet to a fabric before | page 15 | |
| fabric cutting. | cutting it. |
| |
| A fabric is not firmly attached to a | Firmly attach the fabric to the mat |
| |
| mat that has a high tack adhesive |
| ||
| pressing the handle of the included | page 14 | ||
| fabric support sheet on its adhesive | |||
| side. | spatula across the surface of the fabric. |
| |
|
|
| ||
|
|
|
|
62