Cutting Machine
Read Before DOWNLOADING, COPYING, Installing or Using
Trademarks
Important Safety Instructions
Symbols Used in This Document
Introduction
Important Notice
Power Supply and AC Adapter
Important Safety Instructions
Installation Location
For Safe Operation
Unlawful Use of Scanning Equipment
Industry Canada Compliance Statement For Canada Only
Precautions for Scanning
Regulation
Contents
Getting Started
Features
Patterns Pattern mode
Scanning Scan mode
Scan an image
Getting Started
Parts and Functions
Unit Descriptions Front Unit Descriptions Rear
Unit Descriptions Operation Panel
Adjusting the Angle of the Operation Panel
First Steps
Removing the Transport Packing Materials
Turning On/Off the Machine
Preparation of Craft Paper/Fabric
Operation of LCD Panel
CPress in the operation panel
Lightweight Paper
Mat and Cutting Blade Combinations
BTest attaching the material
CAttach the material to the mat’s adhesive side
Lightweight Fabric for Quilt Piecing
Medium Weight Paper
Attaching the Material Lightweight Fabric for Quilt Piecing
DTest attaching the material
CPeel off the backing from the top of the support sheet
Backing light blue Adhesive
Lightweight Fabric for Any Use Other Than Quilt Piecing
Glossy side of contact sheet Wrong side of fabric
EPeel off the backing from the contact sheet
Contact sheet Backing
Attaching Fabrics With the Double-Sided Adhesive
Medium Weight Fabric for Any Use Other Than Quilt Piecing
Pattern that was cut out Contact sheet
Adjusting the Blade Extension
Adjusting the Cutting Blade
Cutting Settings
Appropriate Blade Extension
Installing and Uninstalling the Holder
Setting the Holder
Trial Cutting
Turning On the Machine
Selecting the Test Pattern
Loading the Mat
AAttach the material that will be cut to the mat
Guides Feed rollers
Cutting
Unloading the Mat
Checking the Trial Cutting Results
With a Blade Extension That Needs to be Adjusted
With an Appropriate Blade Extension
Machine Settings
Settings Screen
Auto Shutdown
Seam Allowance
Pattern Interval
Opening Screen
DEdit the pattern using the pattern editing screen
Basic Operations
Pattern Cutting
Tutorial 1 Cutting Patterns
Selecting and Editing the Second Pattern
ATouch the Add key in the pattern layout screen
BSelect the category for the pattern to be cut out
CSelect the second pattern to be used DEdit the pattern
Tutorial 2 Cutting Advanced Patterns
Selecting and Editing the First Pattern Piece
BPress the Start/Stop button to start cutting
Cutting the First Pattern
BPeel from the mat the pattern piece that was cut out
Editing and Cutting the Second Pattern Piece
Pattern Selection
Selecting a Single Pattern
Selecting Multiple Patterns
Selecting Desired Patterns
Specifying the Selection Area
Advanced Operations
Cutting and Editing Functions
Pattern Editing Functions
Available in the following screen
Pattern Sizing
Pattern Editing Functions Advanced Patterns
Editing the Pattern Piece
Pattern Layout Screen
Layout Editing Functions
Welding Merging the Outlines of Multiple Patterns
Editing Individual Patterns
Unifying Grouping Multiple Patterns
Welding Merging the Outlines of Multiple Patterns
ESelect , and then touch the OK key
DTouch in the layout editing screen
Touch GCheck the preview, and then touch the OK key
Auto Layout Functions
Scanning a Background Image
CPress the Start/Stop button to start scanning
Touch
EUse the layout editing functions to move the patterns
Material with a cutout displayed as background
CType in the characters
Character Input Functions
ECheck the character arrangement
Memory Functions
Saving
Recalling
CTouch the OK key to finish saving the data
Recall from the machine’s memory
Recall from a USB flash drive
Drawing Functions
Drawing
Preparation
Preparing the Pen Holder
EAdjust the drawing speed and pressure
ATouch the pattern to be drawn BAdjust the seam allowance
Cutting Around Drawings
Specifying the Seam Allowance
Loading the Material
CApply the seam allowance
DTouch the Set key to finish editing the pattern Memo
ATouch the Draw key
BAdjust the pen pressure
BRemove the pen holder, and then install the blade holder
CPress the Start/Stop button to start drawing
ATouch the Cut key
Tutorial 3 Scanning and Cutting
Scanning Functions
Scanning
EPress the Start/Stop button to start scanning
Editing Cutting Lines
FCheck the scanned image, and then touch the OK key
Outline Distance
Advanced Cutting Functions
Outlining and Framing
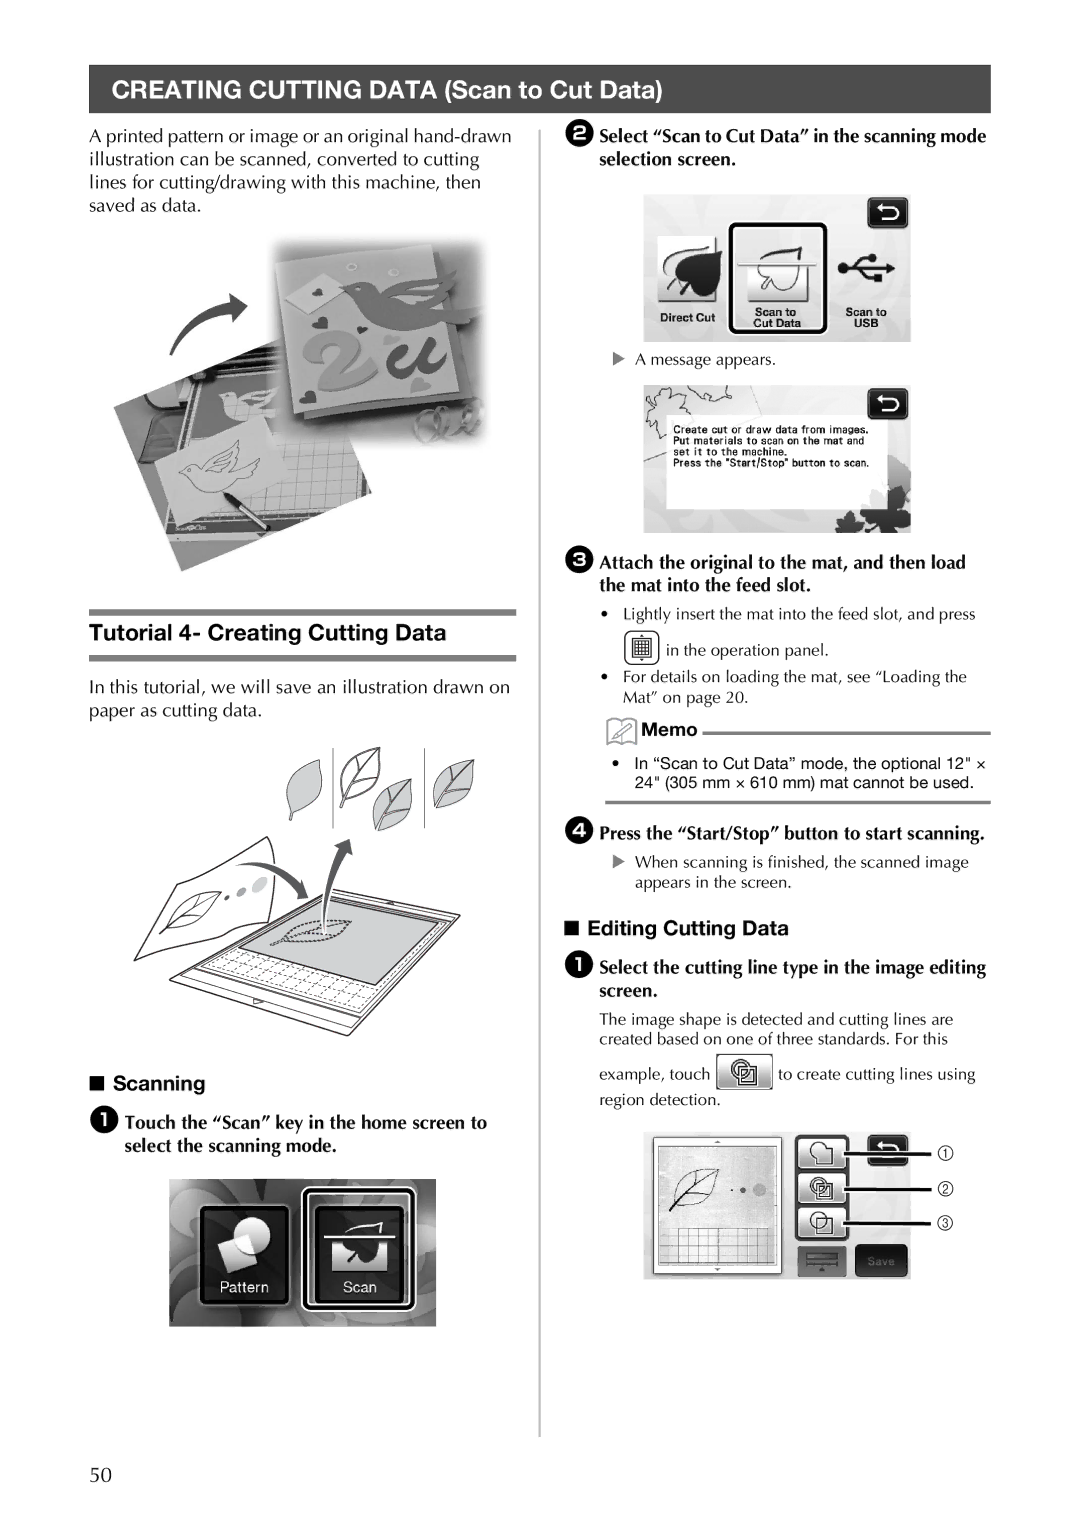
Tutorial 4- Creating Cutting Data
Editing Cutting Data
DPress the Start/Stop button to start scanning
ASelect the cutting line type in the image editing screen
ASelect the destination where the data will be saved
Saving Data
Recalling Cutting Data
BTouch the OK key to finish saving the data
Editing Pictures
Specifying Delete Size
CEdit the cutting data as necessary, and then cut or draw
Image editing screen
Setting Image Detection Level
Cutting line created No cutting line created
Scanning Specifications
Scan Settings
DTouch to display the scanning settings screen
Tutorial 5- Scanning to USB
Check the settings, and then touch the OK key
Scanning and Saving
FSelect the size of the scanning area
AAttach the original that will be scanned to the mat
Replacement Criteria
Consumables
Replacing the Blade
Removing
CPull up the holder to leave the blade in the rubber area
Installing
BTwist on the holder cap to attach it to the holder
Care and Maintenance
Cleaning
Cleaning the Mat
Cleaning the Holder
Cleaning the Scanner Glass
Cleaning Inside the Machine
Adjusting the Screen
FAfter cleaning, perform a test scan
CTurn the main power to off, then turn it back to on
Notch
Power Supply
Troubleshooting
Paper/Fabric Jam
Cutting
Drawing
Scanning
Error Messages
When the seam allowance setting for a pattern becomes
Be an alternative editing method depending on your Project
Turn the machine off Operation again Data cannot be deleted
OK to continue?
Optional Accessories
CTouch the Update key to start the upgrade
Upgrading the Software
10.11.12 13.14.15 Part Name Part Code
Index
Page
Page
English 891-Z01 XF5251-001