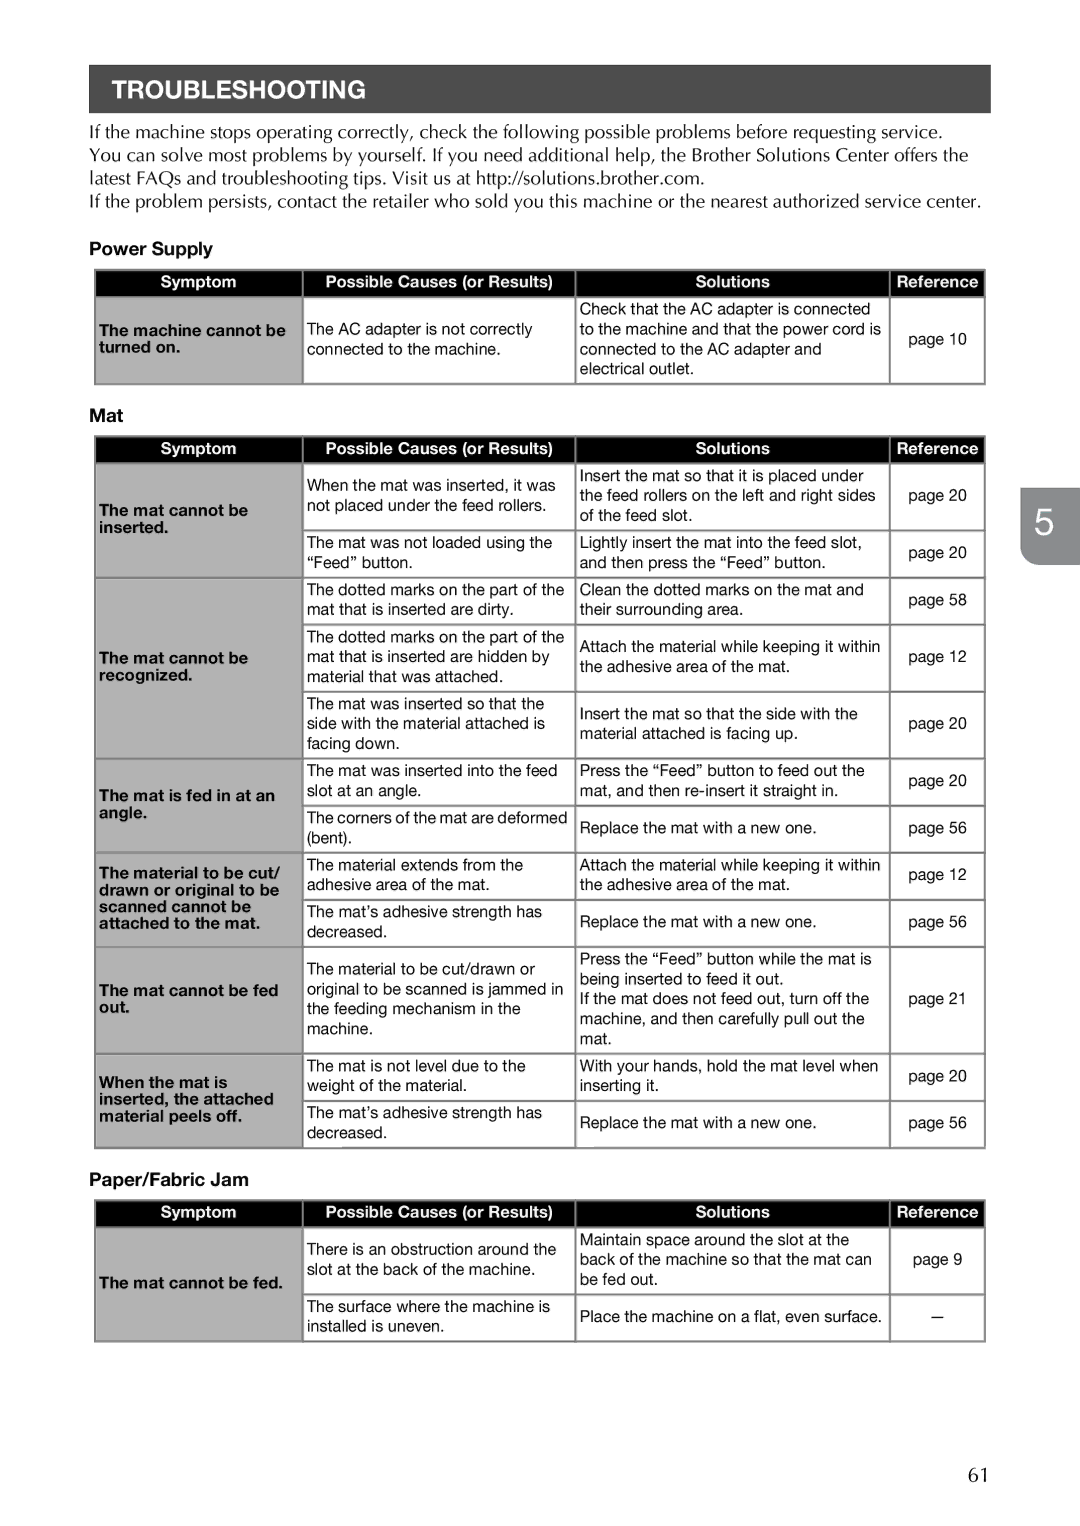
TROUBLESHOOTING
If the machine stops operating correctly, check the following possible problems before requesting service. You can solve most problems by yourself. If you need additional help, the Brother Solutions Center offers the latest FAQs and troubleshooting tips. Visit us at http://solutions.brother.com.
If the problem persists, contact the retailer who sold you this machine or the nearest authorized service center.
Power Supply
Symptom | Possible Causes (or Results) | Solutions | Reference | |
|
|
|
| |
| The AC adapter is not correctly | Check that the AC adapter is connected |
| |
The machine cannot be | to the machine and that the power cord is | page 10 | ||
turned on. | connected to the machine. | connected to the AC adapter and | ||
| ||||
|
| electrical outlet. |
| |
|
|
|
|
Mat
Symptom | Possible Causes (or Results) | Solutions | Reference | |
| When the mat was inserted, it was | Insert the mat so that it is placed under | page 20 | |
| the feed rollers on the left and right sides | |||
The mat cannot be | not placed under the feed rollers. | |||
of the feed slot. |
| |||
|
| |||
inserted. |
|
|
| |
The mat was not loaded using the | Lightly insert the mat into the feed slot, | page 20 | ||
| ||||
| “Feed” button. | and then press the “Feed” button. | ||
|
| |||
| The dotted marks on the part of the | Clean the dotted marks on the mat and | page 58 | |
| mat that is inserted are dirty. | their surrounding area. | ||
|
| |||
The mat cannot be | The dotted marks on the part of the | Attach the material while keeping it within | page 12 | |
mat that is inserted are hidden by | the adhesive area of the mat. | |||
recognized. | material that was attached. |
| ||
|
| |||
| The mat was inserted so that the | Insert the mat so that the side with the | page 20 | |
| side with the material attached is | |||
| material attached is facing up. | |||
| facing down. |
| ||
|
|
| ||
| The mat was inserted into the feed | Press the “Feed” button to feed out the | page 20 | |
The mat is fed in at an | slot at an angle. | mat, and then | ||
| ||||
angle. | The corners of the mat are deformed | Replace the mat with a new one. | page 56 | |
| ||||
| (bent). |
|
| |
The material to be cut/ | The material extends from the | Attach the material while keeping it within | page 12 | |
adhesive area of the mat. | the adhesive area of the mat. | |||
drawn or original to be |
| |||
scanned cannot be | The mat’s adhesive strength has | Replace the mat with a new one. | page 56 | |
attached to the mat. | ||||
decreased. | ||||
|
|
| ||
| The material to be cut/drawn or | Press the “Feed” button while the mat is |
| |
| being inserted to feed it out. |
| ||
The mat cannot be fed | original to be scanned is jammed in | page 21 | ||
If the mat does not feed out, turn off the | ||||
out. | the feeding mechanism in the | machine, and then carefully pull out the |
| |
| machine. |
| ||
| mat. |
| ||
|
|
| ||
When the mat is | The mat is not level due to the | With your hands, hold the mat level when | page 20 | |
weight of the material. | inserting it. | |||
| ||||
inserted, the attached |
|
|
| |
The mat’s adhesive strength has |
|
| ||
material peels off. | Replace the mat with a new one. | page 56 | ||
| decreased. | |||
|
|
|
5
Paper/Fabric Jam
Symptom | Possible Causes (or Results) | Solutions | Reference |
|
|
|
|
| There is an obstruction around the | Maintain space around the slot at the | page 9 |
| back of the machine so that the mat can | ||
| slot at the back of the machine. | ||
The mat cannot be fed. | be fed out. |
| |
|
| ||
| The surface where the machine is | Place the machine on a flat, even surface. | — |
| installed is uneven. | ||
|
|
| |
|
|
|
|
61
