Product Code
Page
Important Safety Instructions
Introduction
For repair or adjustment
For Users in the UK, EIRE, Malta and Cyprus only
Page
Contents
Troubleshooting
Using the Memory Function
Care and Maintenance
Embroidering
Machine Features
USB port
Accessories
Included accessories
Optional accessories
Following are available as optional accessories
Names of Machine Parts and Their Functions
Front view
Needle and embroidery foot section
Right-side/rear view
Operation buttons
Start/stop button
Operation panel
LCD liquid crystal display touch panel
Page
Getting Ready
Basic Steps for Embroidering
Power supply precautions
Turning the Machine On/Off
Turning on the machine
CUnplug the power supply cord from the electrical outlet
DUnplugjack. the power cord from the power supply
Turning off the machine
Attaching the embroidery unit
Embroidery unit precautions
Attaching the Embroidery Unit
AMake sure that the machine is turned off
Confirmation message is displayed
CTurn on the machine
Carriage moves to its initial position
BPress , and then press
Removing the embroidery unit
ARemove the embroidery frame
CTurn off the machine
Pattern type selection
LCD Liquid Crystal Display Operation
Viewing the LCD
Moves the embroidery unit carriage to its storage position
Changing the machine settings
ATurn on the machine
BPresspanel. Settings key on the operation
DWhen settings are complete, press Back key
CPress the item to be set
BPresspanel. Help key on the operation
Checking machine operating procedures
DPressnext page. Next page key to switch to
CPress the item to be displayed
Preparing Items for Embroidering
Preparing the Needle
Needle precautions
Checking the needle
Replacing the needle
DLower the presser foot lever
Winding the bobbin
Winding/Installing the Bobbin
Bobbin precautions
This model Other model
Start/stop button lights up in orange
Use the embroidery bobbin thread for embroidering
Make sure that the thread passes under the pretension disk
Start/stop button immediately to stop the bobbin winding
LPress Start/stop button once
Bobbin winding will stop
When the thread became tangled under the bobbin winder seat
Actual size
Installing the bobbin
Install the bobbin wound with thread
This model
Be sure to insert the bobbin correctly
Bobbin cover opens
Be careful not to drop the bobbin
Cutter cuts the thread
Reattach the bobbin cover
About the spool of thread
Upper Threading
Information about the spools of thread is described below
ATurn on the machine BRaise the presser foot lever
Threading the upper thread
Embroidery foot is raised
Hand as shown below
Thread take-up lever
Such a case, start from m again
Upper threading is finished
Getting Ready
Attaching a stabilizer
Preparing the Fabric
Material to the fabric
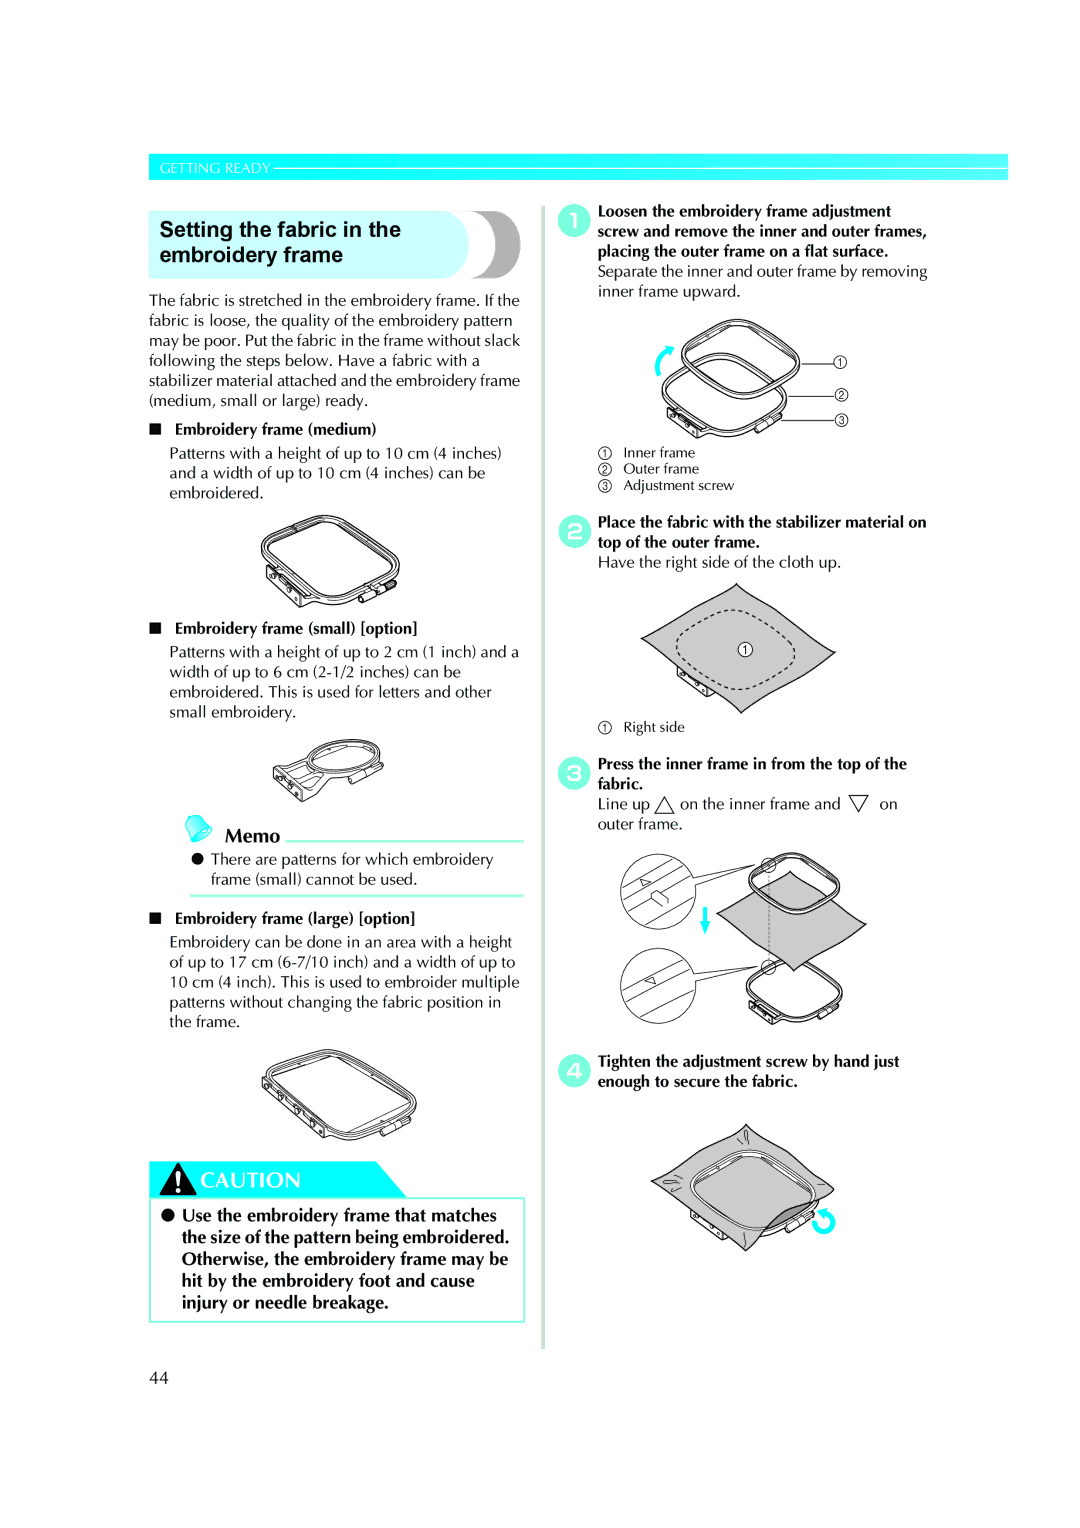
Embroidery frame small option
Setting the fabric in the embroidery frame
Embroidery frame medium
Embroidery frame large option
Embroidery sheet
Medium Option Embroidery sheet large option
BPlace the embroidery sheet on the inner frame
For details, refer to
Attaching the embroidery frame
Attaching the Embroidery Frame
Abobbin and set it into the bobbin case
Removing the embroidery frame
ARaise the presser foot lever
Embroidery
Copyright information
Selecting Embroidery Patterns
Embroidery pattern types
Setting for embroidering
† Setting the display while embroidering
LCD button Example Selecting alphanumeric characters
Example Selecting an embroidery pattern
Selecting alphanumeric characters
Specify the characters for embroidery
APress
Selecting an embroidery pattern
Select the pattern
Select the frame shape
Using an embroidery card
Selecting a frame pattern
Select the stitch
ESelect a pattern
CTurn on the machine DPress On the screen
Operation is the same as in Selecting an embroidery pattern
Prepareon the screen.embroidery thread of the color shown c
Embroidering
Embroidering a pattern
BSet the embroidery thread, and thread the needle
Press Thread cutter button once
EPress Start/stop button
HPress Start/stop button again
Needle is raised and the threads are cut
MCut the excess thread
Appliquéing
KRemove the upper thread
ASelect an appliqué pattern
Position for the appliqué is stitched, and the machine stops
Adjusting the layout and the size
Editing and Saving Patterns
Layout key
Size key
Change position keys
Rotation key
Adjusting the upper thread tension
Bobbin thread is too loose
Adjusting the bobbin thread tension
Bobbin thread is too tight
Bobbin thread appears slightly on the right side of fabric
Stitching starting point is set to lower left of the design
Connecting character patterns
Enter DEF and press Press KPress to turn it to
Resewing
APressmachine. Start/stop button to stop
ASet the upper thread or bobbin thread Press
Thread runs out partway through a design
Stopping while embroidering
Forward one stitch increases the stitch number
FTurnpattern.on the machine, and then select
Always remove the embroidery unit when you move the machine
ETurn off the machine
KRestart the embroidery
Precautions on Using the Computer to Create and Save Data
Using the Memory Function
Embroidery data precautions
Tajima .dst Embroidery Data
Selected pattern is shown in reverse highlighting
Switch screens using Previous page key
Saving patterns
CPress
Retrieving embroidery patterns from the computer
ESelect the pattern you wish to retrieve
Switch screens using
GAdjust the pattern as desired, and then begin embroidering
FPress
Appendix
Cleaning the race
Care and Maintenance
Cleaning the machine surface
FRemove the bobbin case
Do not apply oil to the bobbin case
Attaching the embroidery foot
This section describes how to attach the embroidery foot Q
Attaching the Embroidery Foot
DHold the embroidery foot Q with your right hand, as shown
Set the embroidery foot perpendicular
Burr on it Service center Area around the hole
Troubleshooting
Correctly install the needle
Embroidery foot is scratched, or
On it
Remove the tangled thread. If
Bobbin-winding thread guide Correctly
Thread is tangled
Bobbin thread
Correctly install the needle Thread tension is incorrect
Thread tension is incorrect
Needle is bent or blunt Replace the needle Skipped
No pattern selected Select a pattern
Error messages
Be sure to rethread the machine. If you press
Error Message Probable Cause
Pressing Retrieve key
Refer to
When the embroidery unit is attached
Embroidery key was pressed when the embroidery unit is not
An Embroidery Memory Card that may not compatible with your
Adjusting the LCD
Operation beep
Upgrading Your Machines Software
When the following screen appears, upgrading is completed
Then start the procedure again from step
Following screen appears
Index
Air vent
10, 31
Page
885-V51 English XE5427-001