Manual de instrucciones Manuale distruzione
Important Safety Instructions
Conserve Este Manual DE Instrucciones
Importanti Istruzioni DI Sicurezza
For Users in UK, EIRE, Malta and Cyprus only
Connecting Plugs and Main Power / Sewing Light Switch
Please Read Before Using this Machine
LEA Este Manual Antes DE Usar Esta Máquina
Leggere Prima DELL’USO DI Questa Macchina
Table of Contents
Contenido
Interruttore principale/luce area di lavoro
Bottoni di forma strana che non si adattano nella
Principal Parts
Balance Wheel
Rueda MANUAL/POLEA
Volantino
Optional Accessories
DA Cucirede Cosermachine
Accessori opzionali
Accesorios opcionales
Nota
Nota
Connecting Plugs
Operating Your Sewing Machine
Precaución
Conexión de los enchufes
Attenzione
Interruptor principal/luz de cosido
Main Power/Sewing Light Switch
Interruttore principale/luce area di Lavoro
Foot Controller
Pedal
Reostato a pedale
Reostato a pedale
Checking the Needle
Replacing the Needle
Verificación de la aguja
Controllo dell’ago
Cambio de la aguja
Sostituzione dell’ago
Changing the Presser Foot
Cambio del prensatelas
Sostituzione del piedino premistoffa
SNAP-ON Type
Flat Bed Attachment
Plataforma
Scomparto piano
Various Controls
Pattern Selection Dial
Selettore dei punti
Selector de puntadas
Manopola della lunghezza del punto
Pattern Stitch Name Preset Width Recommended Instruction
Manual
Rampart Stitch Triple Stretch Stitch
Slant Overlock Stitch
Puntada Nombre
Página DEL
Modelo XL-6050, XL-6051, XL-6052, XL-6053
Estrecha
Punto Nome Punto
Lunghezza Pagina
Modello XL-6050, XL-6051, XL-6052, XL-6053
Inclinato
Stitch Length Dial
Stitch length dial Length Fine → SS Coarse
Selector de largo de puntada
Selettore della lunghezza del punto
Pulsador de retroceso
Reverse Sewing Lever
Tasto di cucitura di ritorno
Conversión en modalidad de brazo Libre
Converting to Free-arm Style
Cucitura a braccio libero
Bobinado de la canilla
Avvolgimento del rocchetto
Wound evenly Wound poorly
Avvolgimento regolare Avvolgimento scadente
Lower Threading
Enhebrado inferior
Infilatura inferiore
Usare spoline create per l’uso con questa macchina
Fino a far scattare in posizione lo sportello
Upper Threading
Enhebrado superior
Infilatura superiore
Levantar el hilo inferior
Drawing Up Lower Thread
Tiraggio del filo inferiore
Costura con aguja doble
Twin Needle Sewing
Cucitura con ago gemello
Applicazione DEL Portaspoletta Ausiliario
Inserimento DELL’AGO Gemello
Infilatura DELL’AGO Gemello
Tensión de los hilos
Thread Tension
Tensione del filo
FABRIC/THREAD/NEEDLE Combinations
75/11 90/14
65/9 75/11
90/14 100/16
Ago con punta a sfera colore dorato
Please Read Before Sewing
Puntadas rectas
Straight Stitching
Punto diritto
Starting Sewing
Changing Sewing Direction
Finishing Sewing
Cambio DI Direzione
Come Terminare UNA Cucitura
Removing the Material from the Machine
TOP Stitching and Stretch Materials
Come Estrarre IL Tessuto Dalla Macchina
Punto Diritto E Tessuti Elastici
Zigzag Stitching
Puntadas zigzag
Punto zigzag
Punto Zigzag
Blind Hem Stitching
Puntadas invisibles
Punto orlo invisibile
Ampiezza punto Punto orlo invisibile
Puntada ondas
Shell Tuck Stitching
Punto conchiglia
Ampiezza punto
Elastic Stitching
Puntada elástica
Punto elastico
Puntada de acción doble
Double Action Stitching
Punto doppio
Punto doppio Punto a ponte
Puntada festón
Scallop Stitching
Punto smerlo
Punto smerlo
Puntadas decorativas
Decorative Stitching
Punto decorativo
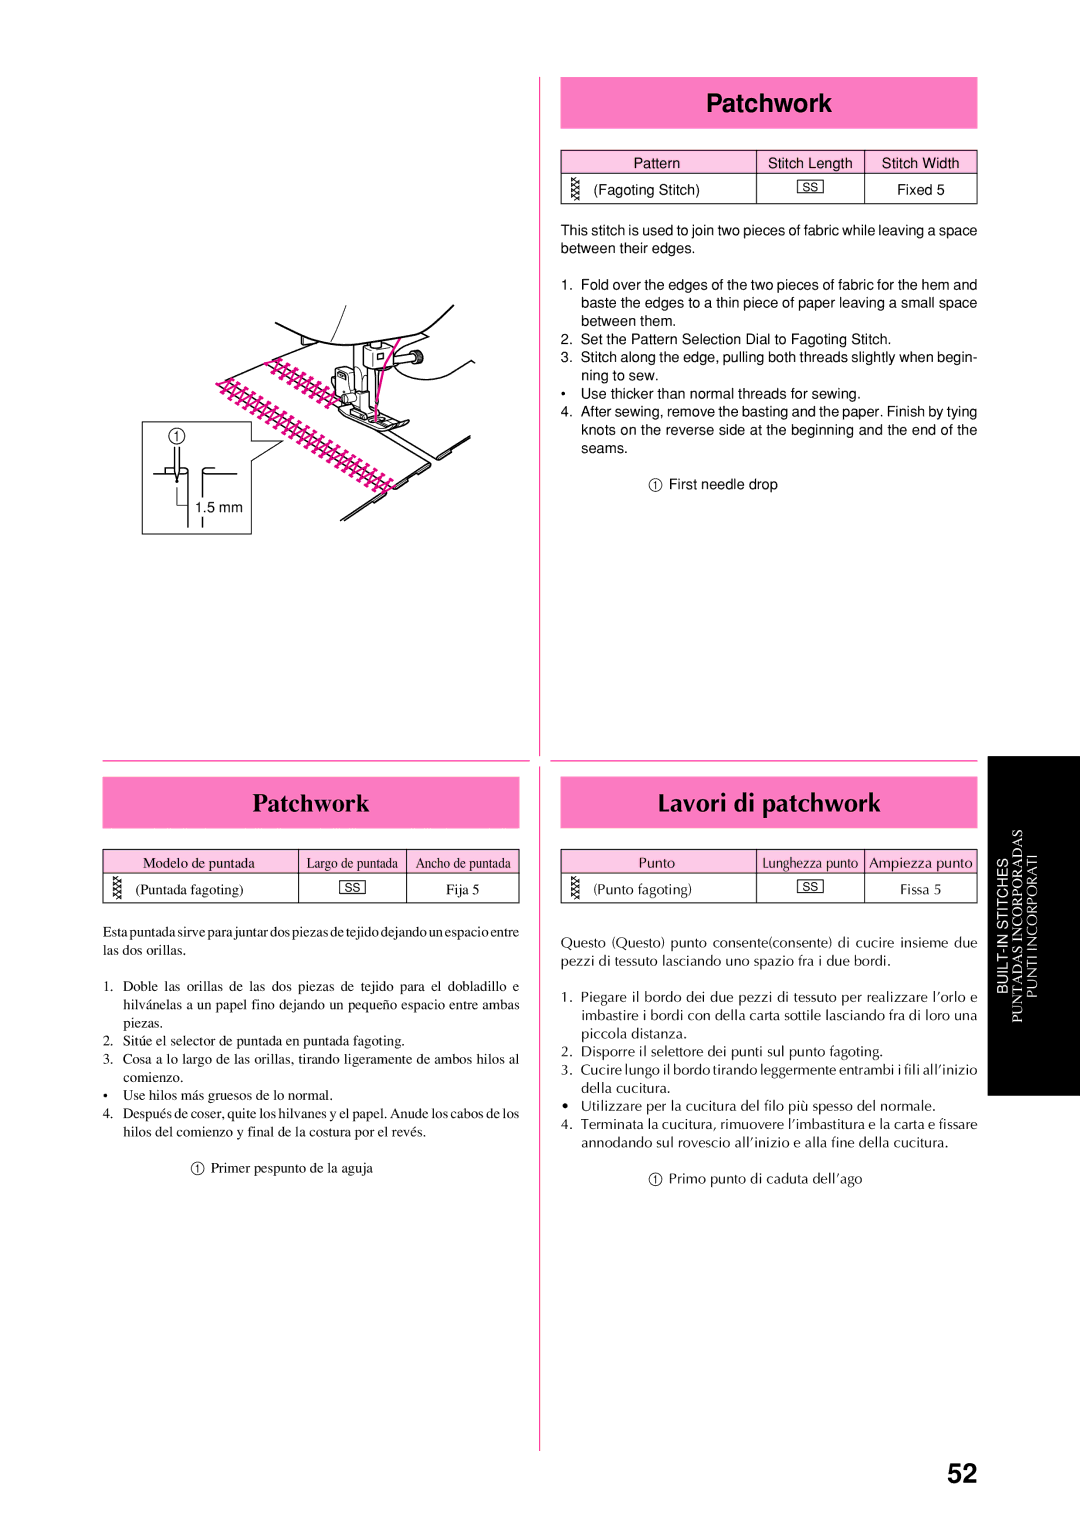
Patchwork
Patchwork
Lavori di patchwork
Punto fagoting
Overedge Stitching
Puntada por encima de la orilla
Rifinitura a sopraggitto
Punto pettine
Feather Stitching
Triple Zigzag Stretch Stitching
Punto piuma
Punto zigzag triplo
Making a Buttonhole For 1-step BH Type
Making a Buttonhole
Para coser ojales Para tipo BH en una operación
Esecuzione di un occhiello Per il tipo BH a 1 operazione
Para Coser Ojales
Esecuzione DI UN Occhiello
Example
Para coser ojales Para tipo BH en cuatro operaciones
Making a Buttonhole For 4-step BH Type
Esecuzione di un occhiello Per il tipo BH a 4 operazioni
Piedino per
Fase Disporre il selettore dei punti su d
Dal tessuto
Lato destro Fase
Securing the Stitching and Cutting the BUTTON- Hole
Para Completar LAS Puntadas Y Cortar EL Ojal
Fissaggio Della Cucitura E Apertura DELL’OCCHIELLO
Buttonhole Fine Adjustment
Ajuste fino de los ojales
Regolazione della densità dei punti Dell’occhiello
Procedimiento de corrección 2 véase fig. B
Button Sewing
Costura de botones
Cucitura di bottoni
Dei punti sul Punto Zigzag 1,5 mm, 3,5 mm o 5 mm regoland
Zipper Insertion
Gathering
Inserción de cremalleras
Fruncido
Applicazione di cerniere
Arricciature
Darning
Zurcido
Rammendo
Punto Lunghezza Piedino Punto diritto Ago a sinistra
Appliqués
Aplicaciones
Applicazioni
Punto Lunghezza
Monogramming Embroidering
Preparing for Monogramming and Embroidering
Monogramming
Embroidering
Monogramas y bordados
Monogrammi e ricami
Monogrammi
Ricami
Optional Accessories
Using the Walking Foot
Utilización del pie caminante
Punto diritto Ago al centro Punto zigazg
Using the Spring-action Quilting Foot
Utilización del prensatelas Enguatador accionado por muelle
Utilizzazione del piedino per Trapunte azionato a molla
Regolare il selettore dei punti sul punto dritto
Motivo da trapuntare linea
Using the 1/4-Inch Quilting Foot
Utilización del prensatela para Pespunte 1/4
Utilizzazione del piedino per Patchwork
Changing the Light Bulb
Cambio de la bombilla
Sostituzione della lampadina
Cleaning
Pulizia
Limpieza
Montare prima la guida quindi la placca dellago
Performance Check List
Maintenance
Listado DE Posibles Incidencias
El selector de largo de
Superiore
DEL Tessuto
SI Rompe
Il filo inferiore è
Trasportato
Correttamente
Embalaje de la máquina
Repacking the Machine
Imballaggio della macchina
Icnch Quilting Foot
Página
Pagina
Sostituzione
Applicazione di cerniere
Sostituzione della lampadina
English Español