Button Sewing
Pattern | Stitch Length | Stitch Width | Foot | |
(Zigzag Stitch) |
| Fixed 1.5 |
| |
|
|
| Zigzag | |
(Zigzag Stitch) | 0 | Fixed 3.5 | ||
Presser Foot | ||||
|
|
| ||
(Zigzag Stitch) |
| Fixed 5 |
| |
|
|
|
|
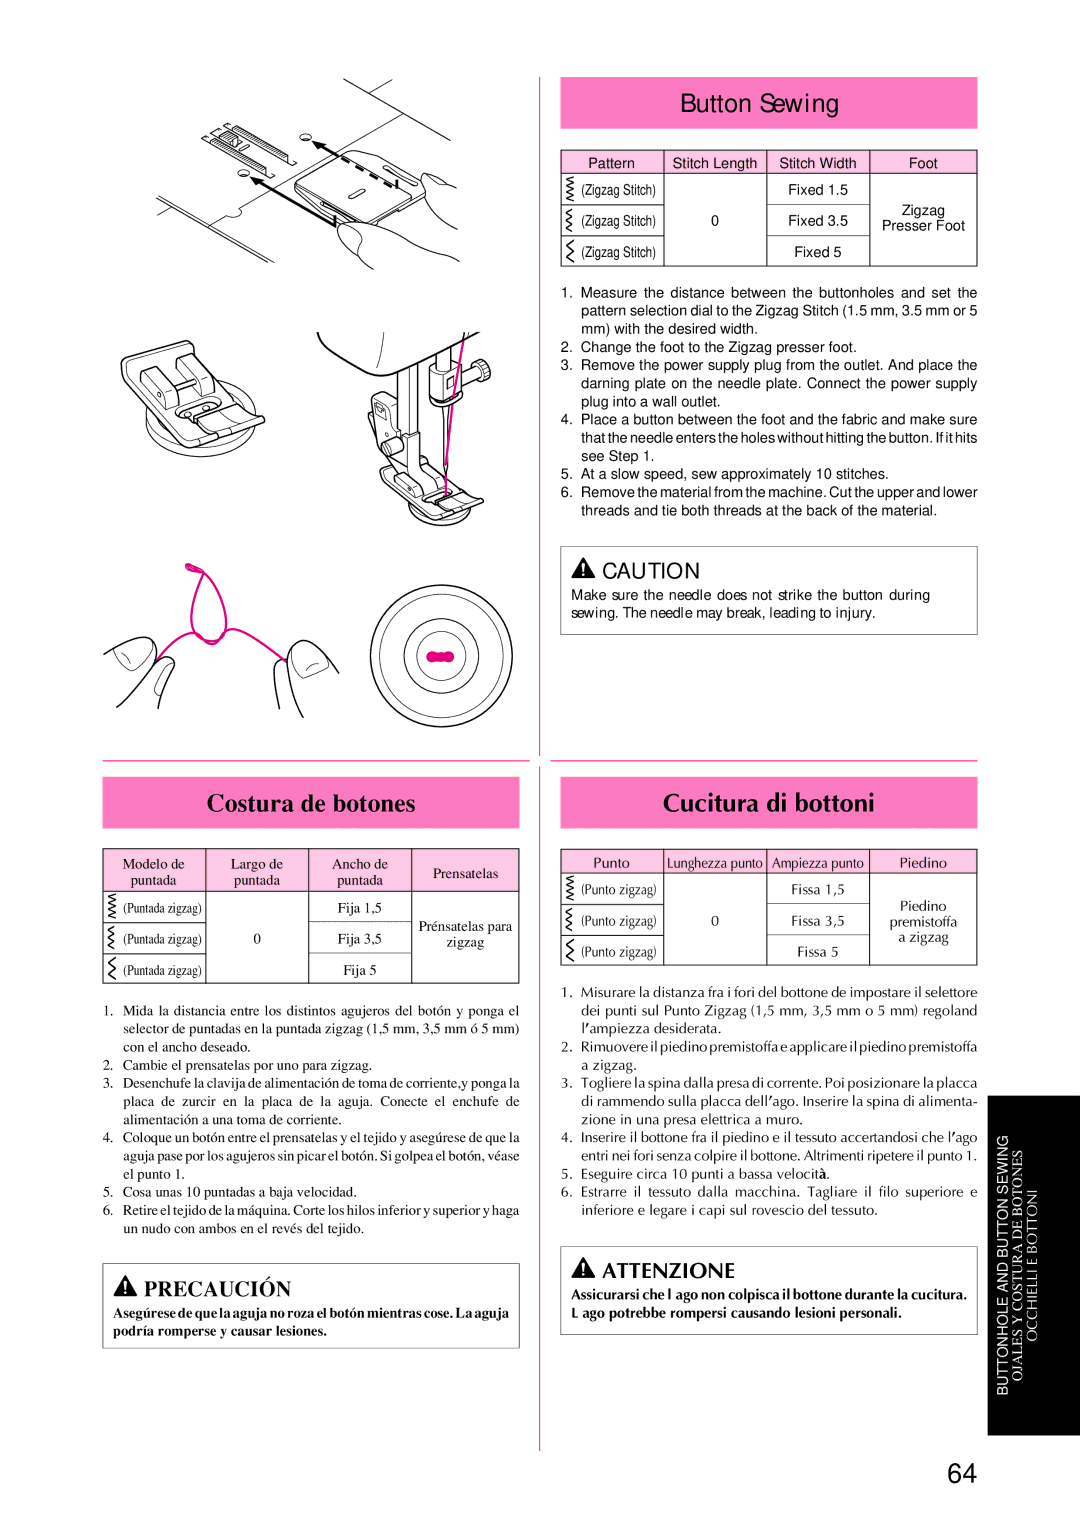
1.Measure the distance between the buttonholes and set the pattern selection dial to the Zigzag Stitch (1.5 mm, 3.5 mm or 5 mm) with the desired width.
2.Change the foot to the Zigzag presser foot.
3.Remove the power supply plug from the outlet. And place the darning plate on the needle plate. Connect the power supply plug into a wall outlet.
4.Place a button between the foot and the fabric and make sure that the needle enters the holes without hitting the button. If it hits see Step 1.
5.At a slow speed, sew approximately 10 stitches.
6.Remove the material from the machine. Cut the upper and lower threads and tie both threads at the back of the material.
![]() CAUTION
CAUTION
Make sure the needle does not strike the button during sewing. The needle may break, leading to injury.
Costura de botones
Modelo de | Largo de | Ancho de | Prensatelas | |
puntada | puntada | puntada | ||
| ||||
(Puntada zigzag) |
| Fija 1,5 |
| |
|
|
| Prénsatelas para | |
(Puntada zigzag) | 0 | Fija 3,5 | ||
zigzag | ||||
|
|
|
| |
(Puntada zigzag) |
| Fija 5 |
| |
|
|
|
|
1.Mida la distancia entre los distintos agujeros del botón y ponga el selector de puntadas en la puntada zigzag (1,5 mm, 3,5 mm ó 5 mm) con el ancho deseado.
2.Cambie el prensatelas por uno para zigzag.
3.Desenchufe la clavija de alimentación de toma de corriente,y ponga la placa de zurcir en la placa de la aguja. Conecte el enchufe de alimentación a una toma de corriente.
4.Coloque un botón entre el prensatelas y el tejido y asegúrese de que la aguja pase por los agujeros sin picar el botón. Si golpea el botón, véase el punto 1.
5.Cosa unas 10 puntadas a baja velocidad.
6.Retire el tejido de la máquina. Corte los hilos inferior y superior y haga un nudo con ambos en el revés del tejido.
 PRECAUCIÓN
Asegúrese de que la aguja no roza el botón mientras cose. La aguja podría romperse y causar lesiones.
Cucitura di bottoni
| Punto | Lunghezza punto | Ampiezza punto |
| Piedino |
|
| (Punto zigzag) |
| Fissa 1,5 |
| Piedino |
|
|
|
|
|
|
| |
| (Punto zigzag) | 0 | Fissa 3,5 |
|
| |
|
| premistoffa |
| |||
|
|
|
|
| a zigzag |
|
| (Punto zigzag) |
| Fissa 5 |
|
| |
|
|
|
|
| ||
|
|
|
|
|
| |
1. | Misurare la distanza fra i fori del bottone de impostare il selettore | |||||
| dei punti sul Punto Zigzag (1,5 mm, 3,5 mm o 5 mm) regoland | |||||
| l’ampiezza desiderata. |
|
|
|
| |
2. | Rimuovere il piedino premistoffa e applicare il piedino premistoffa | |||||
| a zigzag. |
|
|
|
|
|
3. | Togliere la spina dalla presa di corrente. Poi posizionare la placca | |||||
| di rammendo sulla placca dell’ago. Inserire la spina di alimenta- | |||||
| zione in una presa elettrica a muro. |
|
| |||
4. | Inserire il bottone fra il piedino e il tessuto accertandosi che l’ago | |||||
| entri nei fori senza colpire il bottone. Altrimenti ripetere il punto 1. | |||||
5. | Eseguire circa 10 punti a bassa velocità. |
| SEWINGBUTTONANDBUTTONHOLE BOTONESDECOSTURAYOJALES BOTTONIEOCCHIELLI | |||
|
| |||||
6. | Estrarre il tessuto dalla macchina. Tagliare il filo superiore e | |||||
| inferiore e legare i capi sul rovescio del tessuto. |
|
| |||
 ATTENZIONE
Assicurarsi che l’ago non colpisca il bottone durante la cucitura. L’ago potrebbe rompersi causando lesioni personali.
64