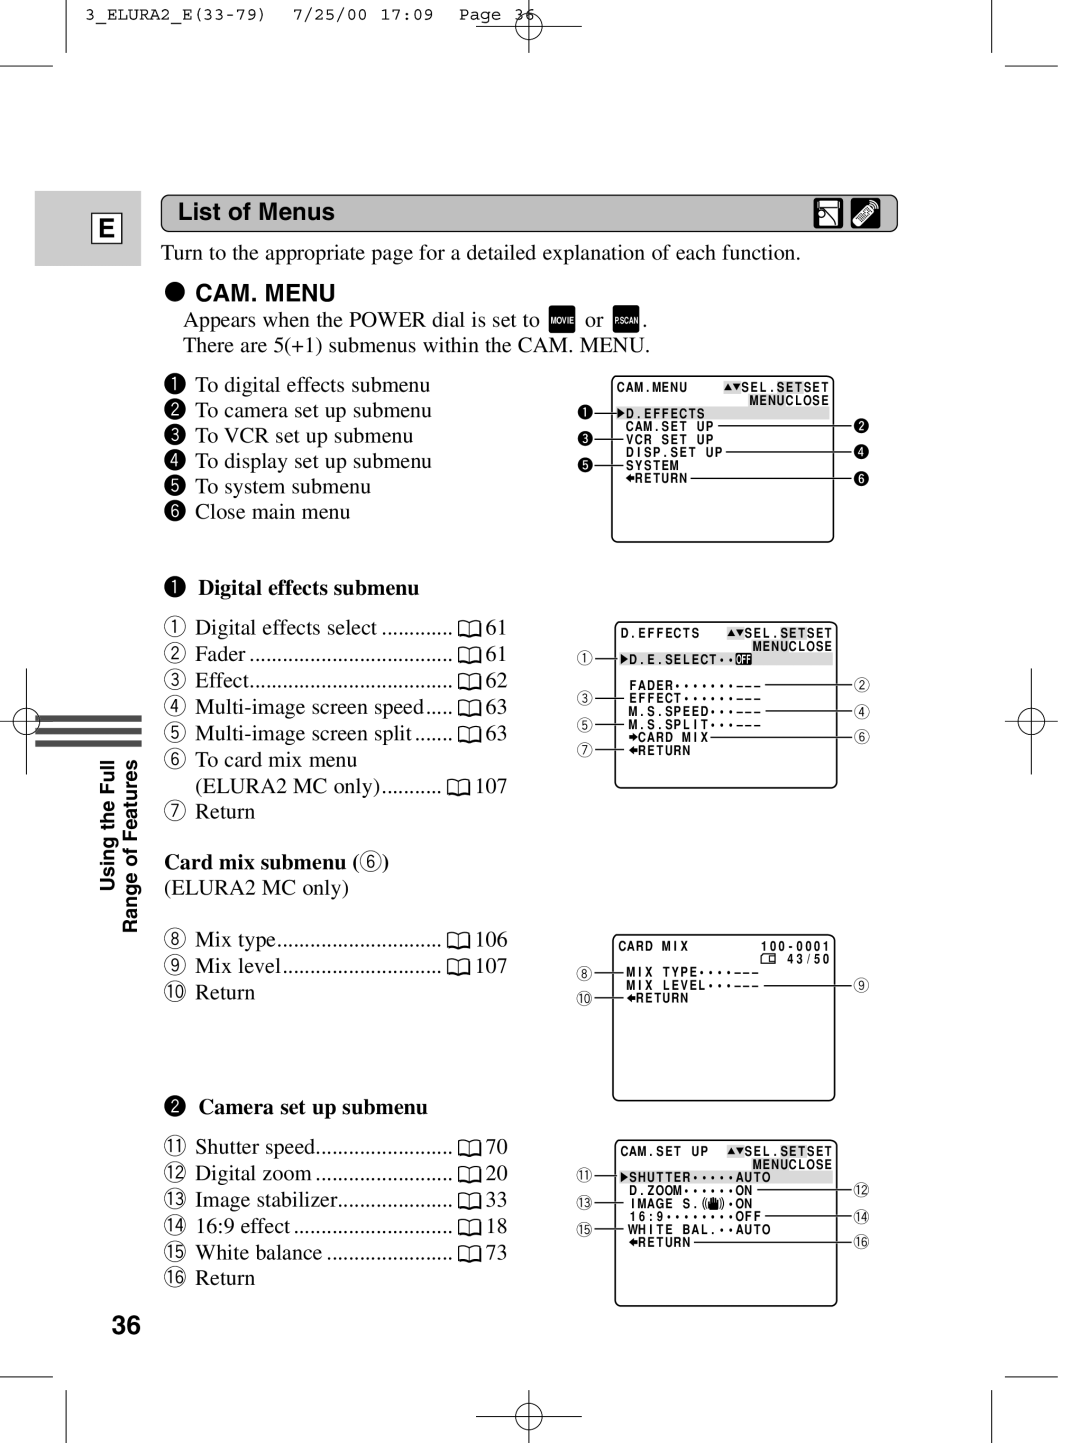
Main
DIGITALVIDEO CAMCORDER
Instruction Manual
CAMESCOPE ET LECTEUR VIDEO NUMERIQUES
NTSC
Manual de Instrucciones
Mode demploi
Important Usage Instructions
IMPORTANT SAFETY INSTRUCTIONS
Page
~ Preparations ...~
~ Basic Recording ... ~
~ Basic Playback ... ~
~ General ... ~
Contents
Introduction Editing
Additional Information
Using the Full Range of Features
Using the MultiMediaCard
Thank you for Choosing a Canon
Getting started
Introducing the ELURA2/ ELURA2 MC
IEEE 1394 DV Terminal
Digital Effects
PCM Digital Sound
Image Stabilizer
Finding Your Way Around the ELURA2/ELURA2 MC
2_ELURA2_E(08-32) 7/25/00 17:03 Page 8
2_ELURA2_E(08-32) 7/25/00 17:03 Page 9
Easy Recording (p. 53)
P
Program AE (p. 53)
2_ELURA2_E(08-32) 7/25/00 17:03 Page 10
Powering Your Camcorder
Charging and attaching the battery packs
1. Connect the power cable to the adapter and plug the powercable into an AC outlet.
2. Attach one or two battery packs to the power adapter.
CA-400 Compact Power Adapter
Loading a Cassette
Protecting tapes from accidental erasure
Handling cassettes
Cassette memory
Basic Recording
Before you start recording
2. Load a cassette ( 14).
To record 1. Press the button next to the POWER dial and hold, turn the POWER dial to MOVIE.
3. Slide the program selector to [.
4. Press and release the start/stop button once to begin recording.
When you have finished recording
5. Press and release the start/stop button again to pause recording.
Changing the recording mode (SP/LP)
16:9 (Widescreen TV recording)
Confirmation/Warning beeps
About the POWER dial lock lever
40digital zoom
Zooming
10optical zoom
Using the LCD Screen
Open the LCD screen
Changing the angle of the LCD screen
Adjusting the LCD screen
Allowing the subject to monitor recording
The indicators that appear in the LCD display when MIRROR is turned on:
Playing Back a Cassette
1. Attach a power source and turn the POWER dial to VCR.
2. Load the cassette. 3. Press the ee(play) button to start playback.
Other playback modes
Special playback
Built-in speaker
Connections for Playback on a TV Screen
If your TV (or VCR) has an S (S1) -video input terminal
If your TV (or VCR) has audio/video input terminals
Tips for Making Better Videos
Composition
Holding the camera
Using a tripod
Picture angle
Camera moves
Turning the Image Stabilizer Off
Using the Full Range of Features
3_ELURA2_E(33-79) 7/25/00 17:09 Page 34
Using the Menus
POWER
P.SCAN
POWER
ELURA2 ELURA2 MC
Page
22CAM. MENU
List of Menus
22VCR MENU
Page
22C. REC MENU (ELURA2 MC only)
22C. PLAY MENU (ELURA2 MC only)
Page
Using the Wireless Controller/Tally Lamp
Inserting batteries
When Operating 2 Canon DV Camcorders (Remote Sensor Mode)
If your wireless controllerisnt working:
Turning off the tally lamp
Setting the Date and Time
Using the Full Range of Features
3_ELURA2_E(33-79) 7/25/00 17:09 Page 46
1. Open the menu and select SYSTEM. 2. Select D/TIME SET.
Setting the clock
Date and time display
Recording in Progressive Scan Mode (Digital Motor Drive)
1. Set the POWER dial lock lever to the 2222position. 2. Turn the POWER dial to P.SCAN.
3. Press the start/stop button to begin recording.
Taking Still Pictures to a Cassette
Press the PHOTO button fully down and the still picture will be taken immediately.
1. Press the PHOTO button halfway down and hold it:
2. Press the PHOTO button fully down to take the still picture.
Transferring Still Pictures to a PC with the FR-100 (optional)
Searching and Reviewing While Recording
Using the Various Recording Programs
Page
Portrait
Easy Recording
Sports
Auto
Sand & Snow
Spotlight
Low Light
Using Digital Effects
Page
Fade Trigger (FADE-T)
Wipe (WIPE)
Mosaic Fade (M. FADE)
Faders
Scroll (SCROLL)
Page
Page
Page
Using the Multi-Image Screen
8. Close the menu.
9. Push the D.EFFECTS ON/OFF button.
10.If youre in MOVIE or P.SCAN, push the start/stop button to begin recording.
Audio Recording
Selecting the audio mode
External microphone and headphones
1. Attach the microphone to the adapter bracket.
2. Attach the adapter bracket to the docking unit. 3. Connect the microphone.
Wind screen
2. Press the start/stop button.
Setting the Self-Timer
Page
Adjusting Exposure Manually
Exposure lock
Exposure adjustment
Shutter speed
Page
Manual focus
Focus lock
Adjusting Focus Manually
Setting the White Balance
Page
Press the DATACODE button while the camera is in play, slow or still mode.
Displaying Date, Time and Camera Data (Data Code)
Selecting date/time
Setting the data code
Six-second auto date
Searching the Tape (Photo Search/Date Search)
1. Press the SEARCH SELECT button to choose between photo/date search.
Returning to a Pre-Marked Position
Editing to a VCR
Dubbing to/from a Cassette with Digital Video Equipment
1. Connect the camera and the other digital device.
2. Prepare the otherdevice.
3. Turn the cameras POWER dial to VCR and load a blank cassette.
Page
Recording from a VCR, TV or Analog Camcorder
(Analog Line-in)
3. Turn the cameras POWER dial to VCR, and load a blank cassette.
1. Connect the camera to the VCR, TVor other camcorder. 2. Prepare the device.
Page
Editing
4_ELURA2_E(80-92) 7/25/00 17:16 Page 85
Recording Over Existing Scenes (A/V Insert Editing)
Insert start point Insert end point
Attach the DU-300 Docking Unit in order to use the S-video terminal ( 28).
The video and audio of the new scene replace that of the old.
OUTPUT
Page
Page
Audio Dubbing
Dubbing
Page
Setting the Audio Mix
Choose the output.
Selecting audio output channels
<<<<
MultiMediaCard Introduction -ELURA2 MC only-
Page
Page
File numbers
Turning the shutter sound off
Recording Still Images to a MultiMediaCard
3. Press the PHOTO button halfway and hold it.
4. Press the PHOTO button fully down to record the still picture.
Page
Recording an Image from a Cassette as a Still Image
3. Press the PHOTO button fully down to record the image to the MultiMediaCard.
Recording from Another DV Device as a Still Image
Viewing Still Images
2. Search for the desired still image by pressing the CARD +/ buttons.
22Slide Show With an image in the display, press the SLIDE SHOWbutton.
22Index
Preventing Accidental Erasure (Protect)
1. Open the menu and select CARD OPER. 2. Select PROTECT .
3. Move the mark to the image you want to protect.
4. Press the SELECT dial in.
Erasing Still Images
6. Close the menu.
4. Select SINGLE.
5. Select YES.
Page
Combining Images and Recording Them to a Cassette (Card Mix)
1. Open the menu and select D. EFFECTS. 2. Select D.E.SELECT. 3. Select CARD MIX.
4. Select \\CARD MIX again.
Page
Copying Still Images from a Cassette
2. Open the menu and select CARD OPER. 3. Select COPY . 4. Select EXECUTE.
5. Press the stop button when your desired images have finished copying.
Copying MMC Still Images to a Cassette
Marking a Still Image for Printing (Print Mark)
1. Open the menu and select CARD OPER. 2. Select PRINT MARK .
3. Move to the image you want to mark.
4. Press the SELECT dial in.
Formatting a MultiMediaCard
Other Information and Precautions
MultiMediaCard operating precautions
Sample images
Page
Preparing the Camera
Adjust the viewfinder
Prepare the lens cap
Fasten the grip belt
Notes on Using the Batteries
Charging and recording times
How much power is left?
Taking care of the battery pack
When to recharge
DANGER!
WARNING!
Installing the backup battery
Maintenance
Cautions
Maintenance
Storage
Using the camera abroad
Condensation
Troubleshooting
Recording/Playback
Recording/Playback (Contd.)
MultiMediaCard operations ELURA2 MC only
Miscellaneous
The ELURA2/ELURA2 MC System Diagram
6_ELURA2_E(116-146) 7/25/00 17:33 Page 128
Optional Accessories
Page
Page
Screen Displays
Turning off the LCD screen displays
Page
Page
MultiMediaCard Displays
Page
Caution phrases
The camera displays various caution phrases they appear for 4 seconds before disappearing.
For ELURA MC
Specifications
ELURA2/ELURA2 MC
BP-406 Battery Pack
Index
Page
Page
* ELURA2 MC only
Menu at a Glance
Use the list below to quickly navigate the cameras menu. Functions are listed alphabetically.
Function First make sure the POWER dial is set to...
Then select it from this submenu and set.
Function First make sure the POWER dial is set to...
Then select it from this submenu and set.
* ELURA2 MC only
U.S.A.
6_ELURA2_E(116-146) 7/25/00 17:34 Page 145
CANONELURA2/ELURA2 MC DIGITALVIDEO CAMCORDER LIMITED WARRANTY
Canon U.S.A., Inc. One Canon Plaza Lake Success, New York 11042
CANADA
6_ELURA2_E(116-146) 7/25/00 17:34 Page 146
CANON CONSUMER DIGITALVIDEO EQUIPMENT LIMITED WARRANTY
DIGITALVIDEO CAMCORDER
Instruction Manual
CAMESCOPE ET LECTEUR VIDEO NUMERIQUES
NTSC
Manual de Instrucciones
Mode demploi