Cisco Systems, Inc 170 West Tasman Drive San Jose, CA
Release 4.2/6.2
Americas Headquarters
800 553-NETS 6387 Fax 408
THE SPECIFICATIONS AND INFORMATION REGARDING THE PRODUCTS IN THIS MANUAL ARE SUBJECT TO CHANGE WITHOUT NOTICE. ALL STATEMENTS, INFORMATION, AND RECOMMENDATIONS IN THIS MANUAL ARE BELIEVED TO BE ACCURATE BUT ARE PRESENTED WITHOUT WARRANTY OF ANY KIND, EXPRESS OR IMPLIED. USERS MUST TAKE FULL RESPONSIBILITY FOR THEIR APPLICATION OF ANY PRODUCTS
Multiple Site Deployment with Centralized VSM Management
Planning for Your Installation
C O N T E N T S
Where to Go from Here
Configuring Network Settings
Configuring Archives
Configuring VSM
Organization
Preface
Overview
Chapter 2, “Setting Up and
Obtaining Documentation, Obtaining Support, and Security Guidelines
How to Use this Manual, page Planning for Your Installation, page
How to Use this Manual
Overview
C H A P T E R
Install, set up, and configure the system
Planning for Your Installation
Installation” section on page
See Chapter 2, “Setting Up and
Information Required for Configuring VSM, page
Items Required for Installation
Information Required for Configuring a Multi Services Platform, page
Items required for all installations
Information Required for Configuring a Multi Services Platform
Description
Information Required for Configuring VSM
Required Information
Configuration Task
Table 1-4 Overview of Basic VSM Configuration Tasks
Introducing the Cisco Video Surveillance System
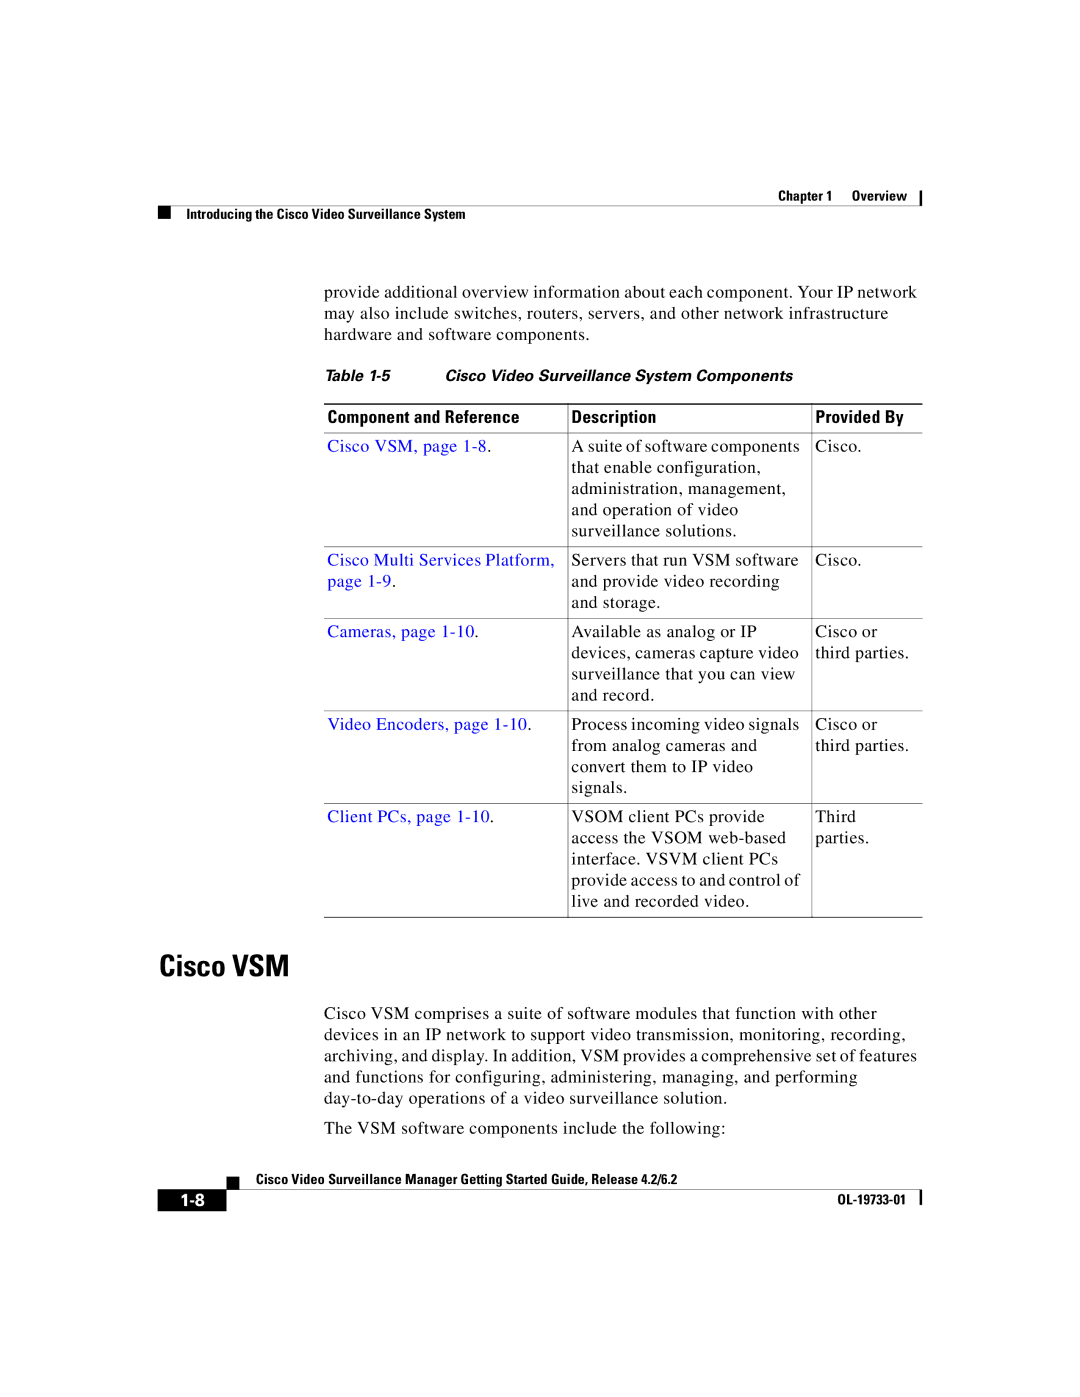
Configuration Task
Table 1-4 Overview of Basic VSM Configuration Tasks continued
Required Information
Component and Reference
Cisco VSM
Cisco Multi Services Platform
Description
Cisco Multi Services Platform
Client PCs
Cameras
Video Encoders
1-10
H.264
Deployment Scenarios
Motion JPEG
Mixed
Multiple Site Deployment with Centralized VSM Management, page
Single Site Deployment
Single Site Deployment, page
1-12
Multiple Site Deployment with Centralized VSM Management
1-13
1-14
Figure 1-3 Multiple Site Deployment-Centralized VSM Management
Chapter 1 Overview Deployment Scenarios
1-15
Figure 1-4 Multiple Site Deployment-Distributed VSM Management
OL-19733-01
OL-19733-01
1-16
Chapter 1 Overview Deployment Scenarios
C H A P T E R
Services Platform
Setting Up and Configuring the Multi
Task
Mounting the Multi Services Platform in a Rack, page
Unpacking the Multi Services Platform
Unpacking the Multi Services Platform, page
Installing Hard Drives, page
Procedure
Preparing to Rack Mount, page Rack Mounting, page
Preparing to Rack Mount
Mounting the Multi Services Platform in a Rack
Choosing a Location
Rack Mounting Considerations
Rack Precautions
General Precautions
Rack Mounting
Procedure
b. Slide the rail toward to front of the chassis
b. Attach the outer rack rails to the rack, following these guidelines
Figure 2-3 Placing the Server in a rack
2-10
Installing Hard Drives
Procedure
Procedure
Connecting to Power, the Network, and External Devices
Performing the Initial Configuration of the Multi Services Platform
2-11
Configuring Network Settings, page Setting the System Time, page
Powering On the System and Accessing the YaST Control Center
Powering On the System and Accessing the YaST Control Center, page
Configuring NTP, page
The server desktop appears
2-13
Performing the Initial Configuration of the Multi Services Platform
Figure 2-5 Accessing the YaST Control Center
Chapter 2 Setting Up and Configuring the Multi Services Platform
2-14
2-15
Configuring Network Settings
Procedure
Figure 2-6 YaST Control Center Window
Performing the Initial Configuration of the Multi Services Platform
Figure 2-7 Accessing Network Configuration Options
Chapter 2 Setting Up and Configuring the Multi Services Platform
2-16
Step 4 Take these actions
2-17
2-18
Chapter 2 Setting Up and Configuring the Multi Services Platform
Performing the Initial Configuration of the Multi Services Platform
Figure 2-9 Choosing a Network Card
a. Click the Static Address Setup radio button
2-19
Step 6 In the Routing Configuration area, take these actions
2-20
2-21
Setting the System Time
Procedure
Performing the Initial Configuration of the Multi Services Platform
Figure 2-12 Accessing System Time Options
Chapter 2 Setting Up and Configuring the Multi Services Platform
2-22
Selecting UTC
2-23
Figure 2-13 Clock and Time Zone Area
Configuring NTP
2-24
2-25
Procedure
Figure 2-16 Accessing NTP Options
2-26
Figure 2-17 Advanced NTP Configuration Area
Figure 2-18 Choosing the During Boot Radio Button
Step 7 The New Synchronization area appears, as shown in Figure
2-27
c. Check the Use for Initial Synchronization check box
2-28
Where to Go from Here
2-29
2-30
Chapter 2 Setting Up and Configuring the Multi Services Platform
Where to Go from Here
OL-19733-01
Setting the VSOM Log In Page as the Default Web Page, page
Configuring VSM
Setting the VSOM Log In Page as the Default Web Page
Configuring VSM, page Where to Go from Here, page
Step 2 Take either of these actions to access the Management Console
Figure 3-3 Choosing Operations Manager
Configuring Archives, page
Configuring VSM
Accessing Video Surveillance Operations Manager, page
Adding Servers, page Adding Video Encoders, page
Accessing Video Surveillance Operations Manager
Procedure
Adding Servers
Procedure
The Administration area appears
Figure 3-8 Choosing to Add a Server
Figure 3-9 Choosing a VSMS Server Type
Figure 3-10 Server Name Field
Description Field
3-10
Figure 3-12 Host IP/Name Field
Figure 3-13 Choosing a VSVM Server Type
Adding Video Encoders
3-11
Procedure
3-12
The Encoders area appears
3-13
3-14
Figure 3-17 Choosing an Encoder Type
3-15
Figure 3-18 Encoder Name Field
Username Field
3-16
Figure 3-20 Host IP/Name Field
Adding Analog Cameras
3-17
Procedure
3-18
Figure 3-27 Camera Name Field
3-19
Figure 3-26 Choosing to Add an Analog Camera
Status Enabled
3-20
Figure 3-31 Encoder Channel Drop-Down List
3-21
Figure 3-30 Encoder Drop-Down List
Figure 3-32 Server Drop-Down List
Chapter 3 Configuring VSM Configuring VSM
3-22
Figure 3-33 Media Type Drop-Down List
Figure 3-34 Format Drop-Down List
Figure 3-35 Resolution Drop-Down List
3-23
Figure 3-37 Bitrate Drop-Down List
3-24
Figure 3-36 Transport Option
3-25
Figure 3-38 Frame Rate Drop-Down List
3-26
Adding IP Cameras
Procedure
Quality Slider
The Administration area appears
3-27
Figure 3-42 Choosing to Add an IP/Network Camera
Chapter 3 Configuring VSM Configuring VSM
3-28
Figure 3-43 Camera Name Field
3-29
Figure 3-45 Camera Type Drop-Down List
Figure 3-46 Host IP-Name Field
Chapter 3 Configuring VSM Configuring VSM
3-30
Figure 3-47 Status Drop-Down List
The options in this list depend on the camera model that you chose
3-31
Figure 3-50 Format Drop-Down List
Figure 3-51 Resolution Drop-Down List
3-32
Figure 3-52 Transport Option
Chapter 3 Configuring VSM Configuring VSM
3-33
Figure 3-53 Bitrate Drop-Down List
Figure 3-54 Frame Rate Drop-Down List
Chapter 3 Configuring VSM Configuring VSM
3-34
Step 7 In the Camera requires authentication area in the Camera Type tab, take these actions
3-35
d. In the Confirm Password field see Figure 3-59, reenter the password
3-36
3-37
Configuring Archives
Procedure
3-38
Figure 3-61 Choosing Archives
Figure 3-63 Choosing to Schedule a New Archive
3-39
Figure 3-62 Choosing to Schedule a New Archive
3-40
Figure 3-64 Archive Name Field
3-41
Figure 3-66 Status Drop-Down List
Figure 3-68 Keep On Server Drop-Down List
3-42
Figure 3-67 Force Start Drop-Down List
1. Click the Simple Schedule radio button
3-43
1. Click the Recurring Schedule radio button
3-44
1. Click the Continuous Loop radio button
3-45
Step 8 Click Submit
Where to Go from Here
Procedure
3-46
Step 3 Click the camera from which you want to display video
3-47
OL-19733-01
Chapter 3 Configuring VSM Where to Go from Here
3-48