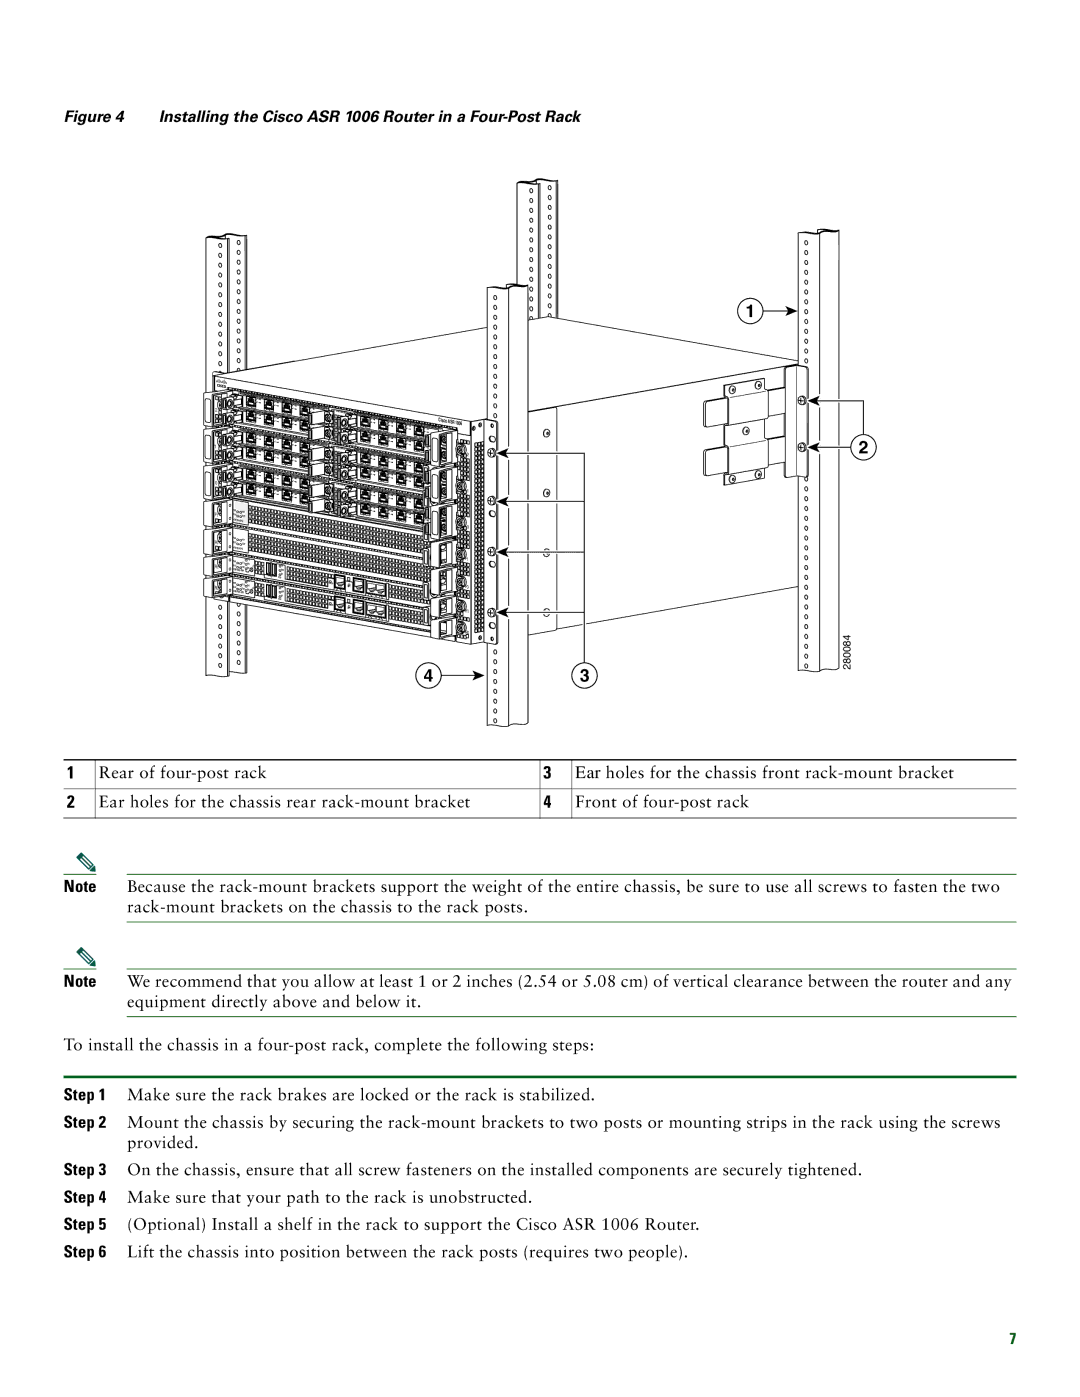
Figure 4 Installing the Cisco ASR 1006 Router in a Four-Post Rack
2 |
|
| 0 |
|
|
|
| 1 | |
|
|
| 0 |
|
|
|
|
| 1 |
1 |
|
| 0 |
|
|
|
| 1 | |
|
|
| 0 |
|
|
|
|
| 1 |
0 |
|
| 0 |
|
|
|
| 1 | |
|
|
| 0 |
|
|
|
|
| 1 |
F1 | PWR | ACTV |
|
|
STAT | STBY |
|
| |
|
|
| ||
F0 | PWR | ACTV |
|
|
STAT | STBY |
|
| |
|
|
| ||
| PWR |
| CRIT |
|
| ACTV | MAJ |
| |
R1 | STAT | STBY | MIN | ACO |
|
|
| ||
|
|
|
| 0 |
2 |
| |
| 3 | |
|
|
|
|
|
| 0 |
2 |
|
|
|
|
| 3 |
|
| |
|
|
|
| |
|
| PWR | STATUS |
|
|
|
| 0 | |
2 |
|
| ||
| 3 |
|
| |
|
|
|
| |
|
|
|
| 0 |
2 |
|
|
|
|
| 3 |
|
| |
|
|
|
| |
|
| PWR | STATUS |
|
|
|
| 0 | |
2 |
| |
| 3 | |
|
|
|
|
| 0 |
2 |
|
|
|
3 |
|
| |
|
|
| |
| PWR | STATUS |
|
|
| 0 |
HD |
USB |
BF |
1![]()
![]()
![]()
![]()
![]()
![]() 2
2![]()
1![]()
![]() 2
2
1![]()
![]()
![]()
![]()
![]()
![]() 2
2![]()
1![]()
![]() 2
2
1 ![]()
![]()
![]()
![]()
![]()
![]() 2
2![]()
1![]()
![]()
![]()
![]() 2
2
|
| Cisco |
|
| ASR 1006 |
3 |
| |
|
| |
3 | SPA- | 2 |
|
3 |
| |
|
| |
3 | SPA- | 1 |
|
3 |
| |
|
| |
3 | SPA- | 0 |
| ||
|
| F1 |
1
2
|
|
|
| 1 |
| PWR |
| CRIT |
|
R0 | STAT | ACTV | MAJ | O |
| STBY | MIN | AC | |
|
|
| ||
0 | 1 |
DISK |
|
| CARRIER |
HD | LINK |
USB | BITS |
MGMT ETHERNET | |
BF | CON |
DISK |
|
| CARRIER |
| LINK |
| BITS |
| MGMT ETHERNET |
| CON |
![]()
![]()
![]()
![]()
![]()
![]()
![]()
![]()
![]()
![]() F0
F0
AUX
![]()
![]()
![]()
![]()
![]()
![]()
![]()
![]()
![]()
![]()
![]()
![]()
![]() R1
R1
AUX
![]()
![]() R0
R0
43
280084
1 | Rear of | 3 | Ear holes for the chassis front |
|
|
|
|
2 | Ear holes for the chassis rear | 4 | Front of |
|
|
|
|
Note Because the
Note We recommend that you allow at least 1 or 2 inches (2.54 or 5.08 cm) of vertical clearance between the router and any equipment directly above and below it.
To install the chassis in a
Step 1 Make sure the rack brakes are locked or the rack is stabilized.
Step 2 Mount the chassis by securing the
Step 3 On the chassis, ensure that all screw fasteners on the installed components are securely tightened. Step 4 Make sure that your path to the rack is unobstructed.
Step 5 (Optional) Install a shelf in the rack to support the Cisco ASR 1006 Router.
Step 6 Lift the chassis into position between the rack posts (requires two people).
7
