Image Projection
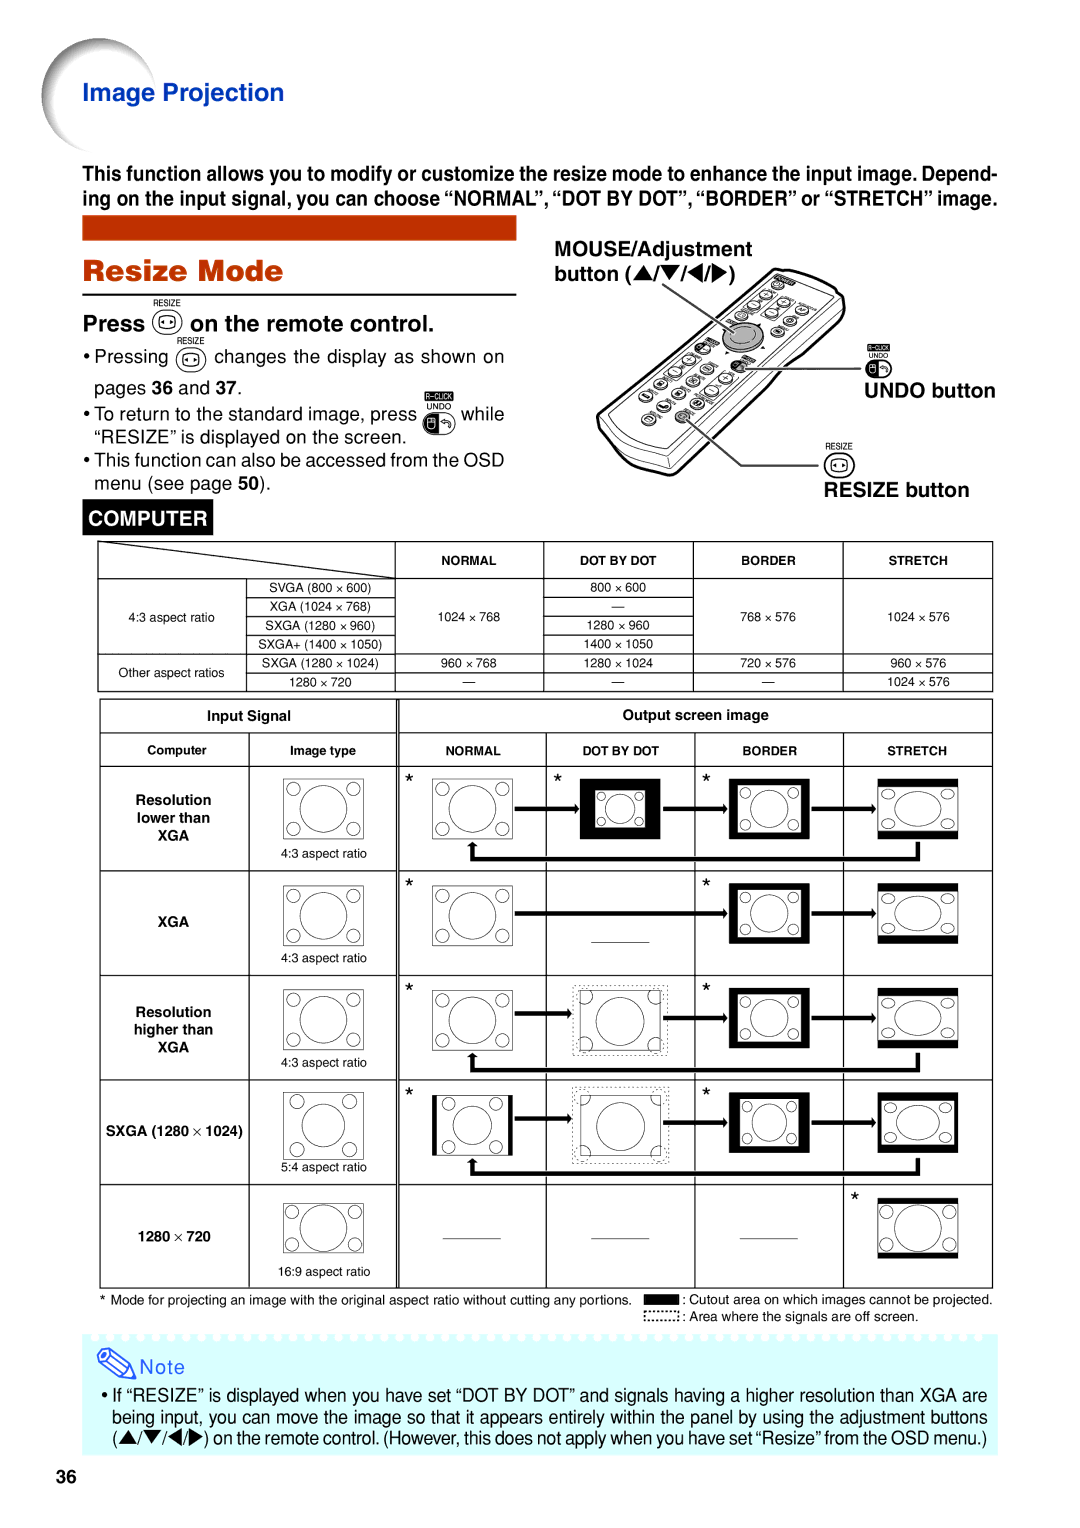
This function allows you to modify or customize the resize mode to enhance the input image. Depend- ing on the input signal, you can choose “NORMAL”, “DOT BY DOT”, “BORDER” or “STRETCH” image.
| MOUSE/Adjustment | |
Resize Mode | ||
button ('/"/\/) | ||
|
|
Press  on the remote control.
• Pressing ![]() changes the display as shown on pages 36 and 37.
changes the display as shown on pages 36 and 37.
• To return to the standard image, press ![]() while “RESIZE” is displayed on the screen.
while “RESIZE” is displayed on the screen.
•This function can also be accessed from the OSD menu (see page 50).
UNDO button
RESIZE button
COMPUTER |
|
|
|
|
|
|
| NORMAL | DOT BY DOT | BORDER | STRETCH | ||
SVGA (800 ⋅ 600) |
| 800 | ⋅ | 600 |
|
|
XGA (1024 ⋅ 768) | 1024 ⋅ 768 |
| — |
| 768 ⋅ 576 | 1024 ⋅ 576 |
4:3 aspect ratio | 1280 ⋅ 960 | |||||
SXGA (1280 ⋅ 960) |
|
|
| |||
SXGA+ (1400 ⋅ 1050) |
| 1400 | ⋅ | 1050 |
|
|
SXGA (1280 ⋅ 1024) | 960 ⋅ 768 | 1280 | ⋅ | 1024 | 720 ⋅ 576 | 960 ⋅ 576 |
Other aspect ratios | — |
| — |
| — | 1024 ⋅ 576 |
1280 ⋅ 720 |
|
| ||||
| Input Signal |
| Output screen image |
| |
Computer | Image type | NORMAL | DOT BY DOT | BORDER | STRETCH |
| * | * |
| * |
|
Resolution lower than
XGA
4:3 aspect ratio
* | * |
XGA
4:3 aspect ratio
* | * |
Resolution higher than
XGA
4:3 aspect ratio |
|
* | * |
SXGA (1280 ⋅ 1024) |
|
5:4 aspect ratio |
|
*
1280 ⋅ 720
16:9 aspect ratio
*Mode for projecting an image with the original aspect ratio without cutting any portions. ![]() : Cutout area on which images cannot be projected.
: Cutout area on which images cannot be projected.
![]() : Area where the signals are off screen.
: Area where the signals are off screen.
![]() Note
Note
•If “RESIZE” is displayed when you have set “DOT BY DOT” and signals having a higher resolution than XGA are
being input, you can move the image so that it appears entirely within the panel by using the adjustment buttons ('/"/\/) on the remote control. (However, this does not apply when you have set “Resize” from the OSD menu.)
36