CD-R/RW Master Recorder
8588076000
Safety Instructions
CD-R/RW Master Recorder CR500 Safety instructions/Contents
Important Safety Instructions
Table of contents
Selecting a song to be played back
Playback in the Memory Play mode
Recording aWAV file
Disk Utility menu
About Menu mode SYS Setup menu
Play Setup menu
About this manual
Precautions on installation
Overview
CD-R/RW Master Recorder CR500 Overview
Main features
Supporting two recording formats
Easy-to-see large display and level meters
High-performance CD-R/RW drive built
Various playback modes
For worldwide use
USB keyboard can be used for file name entry, etc
Versatile analog and digital connectability
Fader start function
Preparation before using the CR500
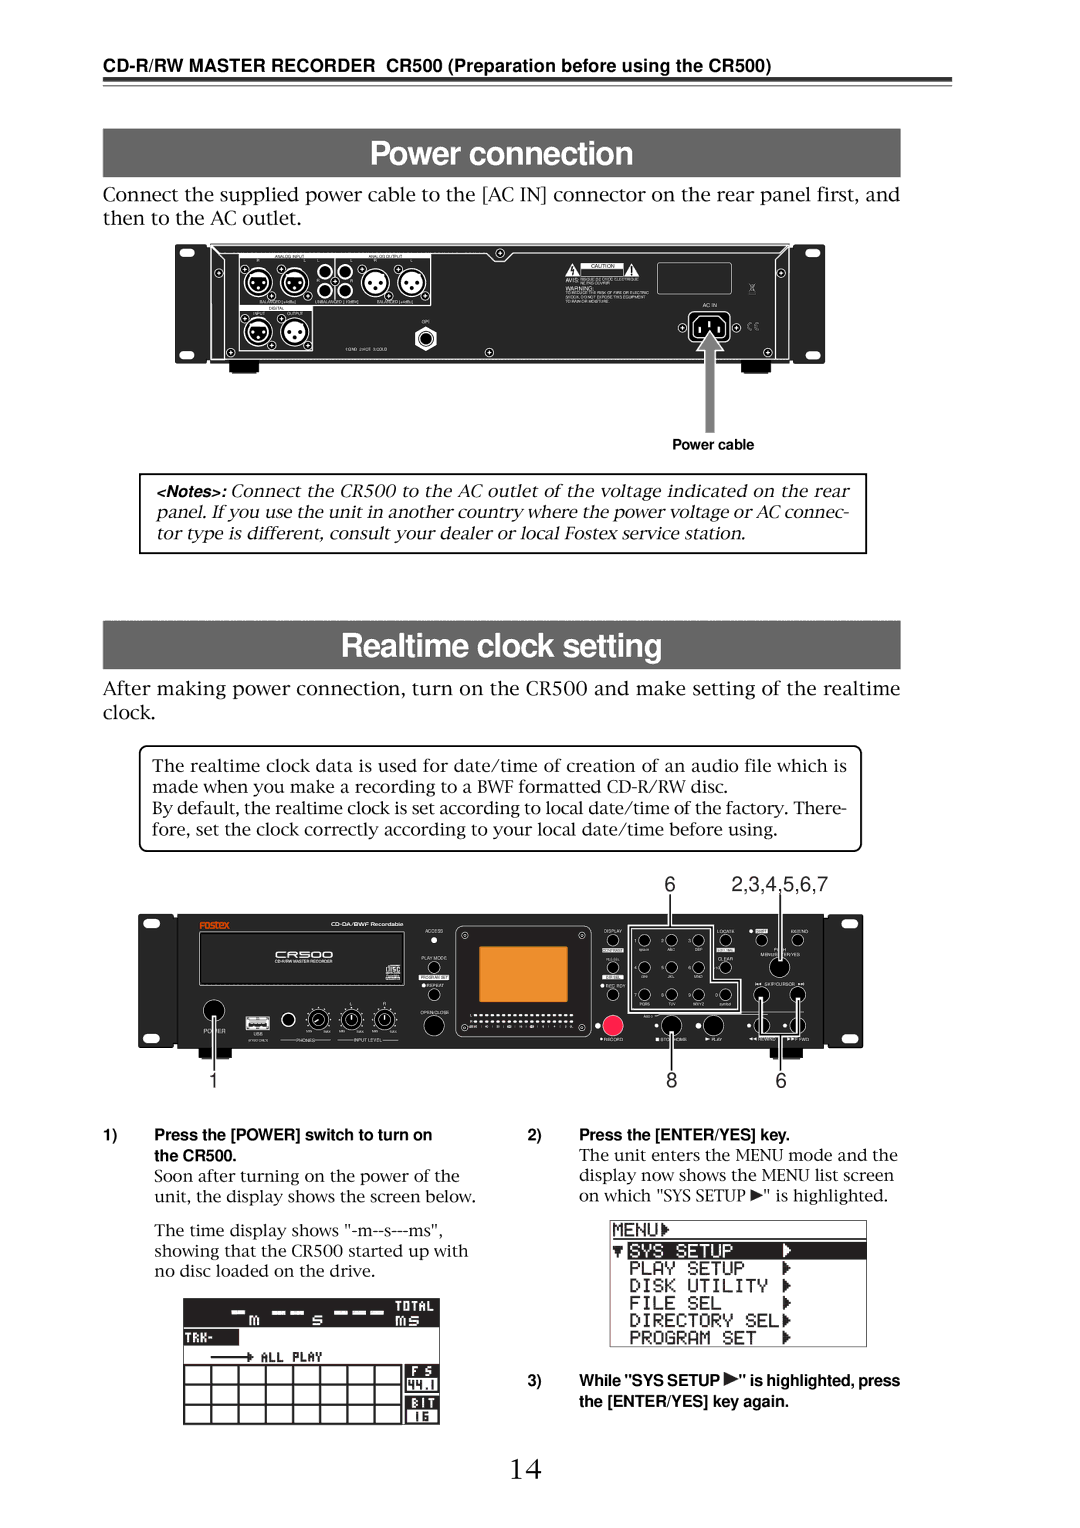
Press the Power switch to turn on the CR500
Power connection
Realtime clock setting
Press the ENTER/YES key
After editing date/time data, press the ENTER/YES key
Using the numeric keys
Press the ENTER/YES key again
Format types
Initial format of the CD-R/RW disc
Usable discs
Handling of CD-R/RW discs
Recorded CD-R/RW disc
Unformatted CD-R/RW disc
Unused formatted CD-R/RW disc
CD-DA format audio CD including a commercially available CD
Press the OPEN/CLOSE key to open the disc tray
Initial format of a disc
Recordable time and the maximum number of tracks
Use the numeric keys or Menu dial to edit the volume label
Page
Format type
Strong contrast
Adjusting display contrast
Weak contrast
CD-R/RW Master Recorder CR500 Names and functions
Front panel
Rear panel
Front panel section Rear panel section Screen details
Audio file and audio track
About Non-shift mode and Shift mode
Front panel section
DISPLAY/ Contrast key
Key
LCD display
Shift key
Memory Play mode
CLEAR/+10 key
EXIT/NO key
Transport control keys
Menu dial/ENTER/YES key
SKIP/CURSOR keys
Repeat key
REC RDY key
Level meters
OPEN/CLOSE key
Rear panel section
Disc elapsed time
Screen details
Time information
Track remaining time
Total time indication example
Play mode
File name
WAV file
Audio file or audio track information
Playback FS/Playback bit
Next track
Record mode
Current track
Input selection
Disk Utility menu screen
SYS Setup menu screen
Play Setup menu screen
File SEL screen
Connection
CD-R/RW Master Recorder CR500 Connection
Connecting to other devices
Analog audio device
Fader start connection
Numeric keyboard
Shortcut keys
USB keyboard
Function keys
Control keys
CD-R/RW Master Recorder CR500 Recording
Closing
Finalizing
BWF formatted CD-R/RW disc CD-DA formatted CD-R/RW disc
Connecting a sound source
Preparation for recording
Adjusting recording levels for analog input only
Selecting the input
Examples below is shown
Stopping recording
Recording a WAV file
Starting recording
Playing back a recorded audio file
Press the REC RDY key to disable the record ready mode
Checking the recorded audio file
Closing a disc
While stopped, press the OPEN/CLOSE key
Recording a CD-DA track Creating an audio CD
Space key
Checking the recorded audio track
Playing back the recorded audio track
STOP/HOME key Rewind key Play key
Finalizing a disc
How to use the CLEAR/+10 key
Method 1 Using the SKIP/CURSOR keys
Method 2 Using the Memory
Selecting a song to be played back
While stopped, press the ENTER/YES key
Method 3 Using the File SEL screen
Go down the menu to the File SEL menu
Menu list screen
CD-R/RW Master Recorder CR500 Recording
CD-R/RW Master Recorder CR500 Playback/Locate
Playback in the Program Play mode
Playback in the Memory Play mode
About play mode
Playback in the ALL Play mode
Home screen of the ALL Play mode
Digital scrub
Waveform screen in the scrub mode
Cueing
Backward cueing
Playback in the Program Play mode
Above
Creating the play list
While stopped, press the ENTER/YES key
Move the cursor to Play Mode and press the ENTER/YES key
To insert a song between songs in the play list
Move the cursor to Save and press the ENTER/YES key
Deleting a song form the play list
Deleting all songs in the play list
Playback in the Memory Play mode
While Save is highlighted, press the ENTER/YES key
Assigning audio data to a memory
While TNO is highlighted, press the ENTER/YES key
Replacing the audio file in a memory bank
Editing a memory name
Editing the start time/end time by entering time data
After entering the desired time, press the ENTER/YES key
Example when you select Start
Example when you select END
Example when you select SCRUB-E
Deleting memory play data
File SEL/ DIR SEL key
Then press the ENTER/YES key
Locate/skip functions
Locating an audio file or audio track
SKIP/CURSOR key
Skipping between audio files or audio tracks
Locating the specific ABS time Locate ABS 0/Locate REC END
After entering the time, press the Locate
Locating a point by entering a time
Key
Play Setup menu
CD-R/RW Master Recorder CR500 Menu mode System Setup menu
About Menu mode SYS Setup menu
Disk Utility menu
About Menu mode
Main menu name Contents
Sys User Load
Adjust RTC
Sys User Save
While the recorder is stopped, press the ENTER/YES key
Basic procedure for using the SYS Setup menu
While SYS Setup is highlighted, press the ENTER/YES key
Default file name Scene NAME/TAKE Number setting
Default file name setting Default File Name
Selecting File name mode
Analog
Unbalanced. This is the default
Input selection Select Input
Digital output signal format selection Digital Out
Peak hold time setting Peak Hold
Reference level setting Ref. Level
USB keyboard type setting Keyboard Sel
Saving SYS Setup data Sys User Save
Loading SYS Setup data Sys User Load
Initializing system memory data Sys Default Set
Initializing flash memory Sys Initial Memory
ROM version checking Version
Off
Basic procedure for using the Play Setup menu
CD-R/RW Master Recorder CR500 Menu mode Play Setup menu
Off
Play mode selection Play Mode
Repeat mode on/off Repeat
Off Recorder stops after starting up default
Auto play mode on/off Auto Play
Auto play on/off when powered on Power On Play
CD-R/RW Master Recorder CR500 Menu mode Disk Utility menu
Finalize
Formatting a disc Format
While Format is highlighted, press the ENTER/YES key
Press the ENTER/YES key to start formatting the disc
Rewriting the file system Rewrite File Sys
Press the ENTER/YES key to rewrite the system file
To exit the Menu mode, press the STOP/ Home key
Editing a file name Edit file name
Edit the file name
Deleting an unnecessary audio file Delete File
Press the ENTER/YES key to delete the file
Restoring a deleted audio file Restore Del. File
Finalized BWF discs
Finalizing a disc Finalize
Press any operation key on the panel
Specifications
CD-R/RW Master Recorder CR500 Specifications
CR500 main specifications
Power consumption
Signal to noise ratio
External dimensions Weight Power requirements
Recording medium Sampling frequency fs/ Quantization bit
Physical dimensions
482
Declaration of EC Directive
Affect of Immunity on This Equipment
For the US Customers only
Fostex America Limited Warranty Shipping
Fostex CO