HP StorageWorks File System Extender Software user guide
File System Extender Software user guide
Contents
Managing media
Migration, release, recall, and deletion
Backup, restore, and recovery
Troubleshooting
Introduction FSE startup and shut-down problems
Monitoring and maintaining FSE
Directory layout B FSE configuration templates
Document conventions and symbols
Intended audience
Related documentation
Document conventions Convention Element
Subscription service
HP technical support
HP web sites
Documentation feedback
What is FSE?
What is FSE?, FSE basics, FSE architecture,
FSE basics
Infinite file system
Automatic error detection
Library tape compatibility
Automatic detection of low storage space
NFS and Cifs support
FSE operations
FSE architecture
Migration
Recall
Release
\Program Files\Hewlett-Packard\FSE
FSE components
Deletion
HSM file system
FSE partition
FSE media pool
FSE medium
FSE library
File System Catalog
FSE drive
FSE implementation options
Consolidated implementation
Distributed implementation
Page
FSE daemons services and FSE agents
FSE implementation with multiple libraries
Fse-fsevtmgr
Fse-hsm
Fse-svc
Fse.exe
Fse-la-s
FSE utility daemons services
Fse-bea
Introduction to the FSE command-line interface
FSE command-line interface
FSE user interfaces
FSE command list
Remove,--list,--show,--status, and so on
FSE command Description
Accessing the online FSE command-line reference
FSE Management Console
FSE Management Console server
FSE Management Console client
Configuring the FSE Management Console
InstallPath%\var\log\guisrv.log
InstallPath%\var\cfg\gui\guisrv.users.db
InstallPath%\var\log\fse.log
Var/opt/fse/log/guisrv.log
Configuring the logging level
Parameter Description
Example of a configured FSE Management Console logging
Starting and stopping the FSE Management Console
Starting and stopping the FSE Management Console server
Debuglevel = -d4 -DAll Debuglevel = -dTrc -DAllD
# /etc/init.d/guisrv start
Starting the FSE Management Console server on Linux systems
# /opt/fse/lbin/guisrv Options
Stopping the FSE Management Console server on Linux systems
# /etc/init.d/guisrv stop
HP StorageWorks File System Extender Software user guide
InstallPath%\binguisrv Options
InstallPath%\binguisrv -F
\cd %InstallPath%\bin
\Documents and Settings\Username\Application Data\guicltrc
Starting and stopping the FSE Management Console client
Starting the FSE Management Console client on Linux systems
# export DISPLAY=fsemcclient0
Stopping the FSE Management Console client on Linux systems
# guiclt Options
Page
Configuring FSE
Before you start
Configuration files
Configuration basics
FSE configuration file elements
Configuration Database
Templates
Configuring a new FSE resource
Resource Management Database
Var/opt/fse/cfg
Var/opt/fse/rmdb
Modifying the configuration of an FSE resource
Fsepartition --list --detail
Fsepartition --show Partition01 MyFile
Fsepartition --modify Partition01 MyFile
Operational modes of the FSE Management Console client
Fsepartition --show PartitionName --history
Choosing online operational mode
# /opt/fse/bin/guiclt
Choosing offline operational mode
Graphical user interface overview
Graphical user interface layout
GUI layout
Object tree
SystemName
Page
Configuring FSE
HP StorageWorks File System Extender Software user guide
Configuring FSE
HP StorageWorks File System Extender Software user guide
Configuration dialog box
Menu bar
Menu bar contains several menus
New Connection
Menu item action Applicable objects Action description
Toolbar
View is displayed
Status bar
Recovery mode
Open
Unusable
Unreliable
Keyboard shortcuts
FSE Management Console users
Managing FSE Management Console users
Configuring an FSE resource using an FSE user interface
Configuration procedure
FSE Management Console user properties
Phase 1 configuring FSE libraries and FSE drives
Overview of the configuration procedure
About Scsi identification
Library and drive configuration procedure
Name Host ControlDevice LibType MediaFamily Slots
Opt/fse/newconfig. Windows specific
Name Library MediaFamily
DriveIndex Capabilities Host ControlDevice
Fselibrary --addLibraryCfgFileName
Library and tape drive configuration examples
Example of a library configuration file
# AIT Sony AIT Family # LTO LTO Ultrium MediaFamily
= LTO
Example of an LTO Ultrium tape drive configuration file
Example of an LTO Ultrium Worm tape drive configuration file
Phase 2 configuring FSE media pools
Name
Phase 3 preparing HSM file systems
Name MediaFamily PoolType BlockSize VolumeSize
Creating and preparing new HSM file systems
Preparing HSM file systems on the Linux platform
Preparing HSM file systems on the Windows platform
\mkdir hsmfsfolder
Integrating existing file systems on the Linux platform
Integrating existing file systems in the FSE implementation
Integrating existing file systems on the Windows platform
Phase 4 configuring FSE partitions
Configuring a regular FSE partition on the Linux platform
Fsepartition --status PartitionName
Configuring a regular FSE partition on the Windows platform
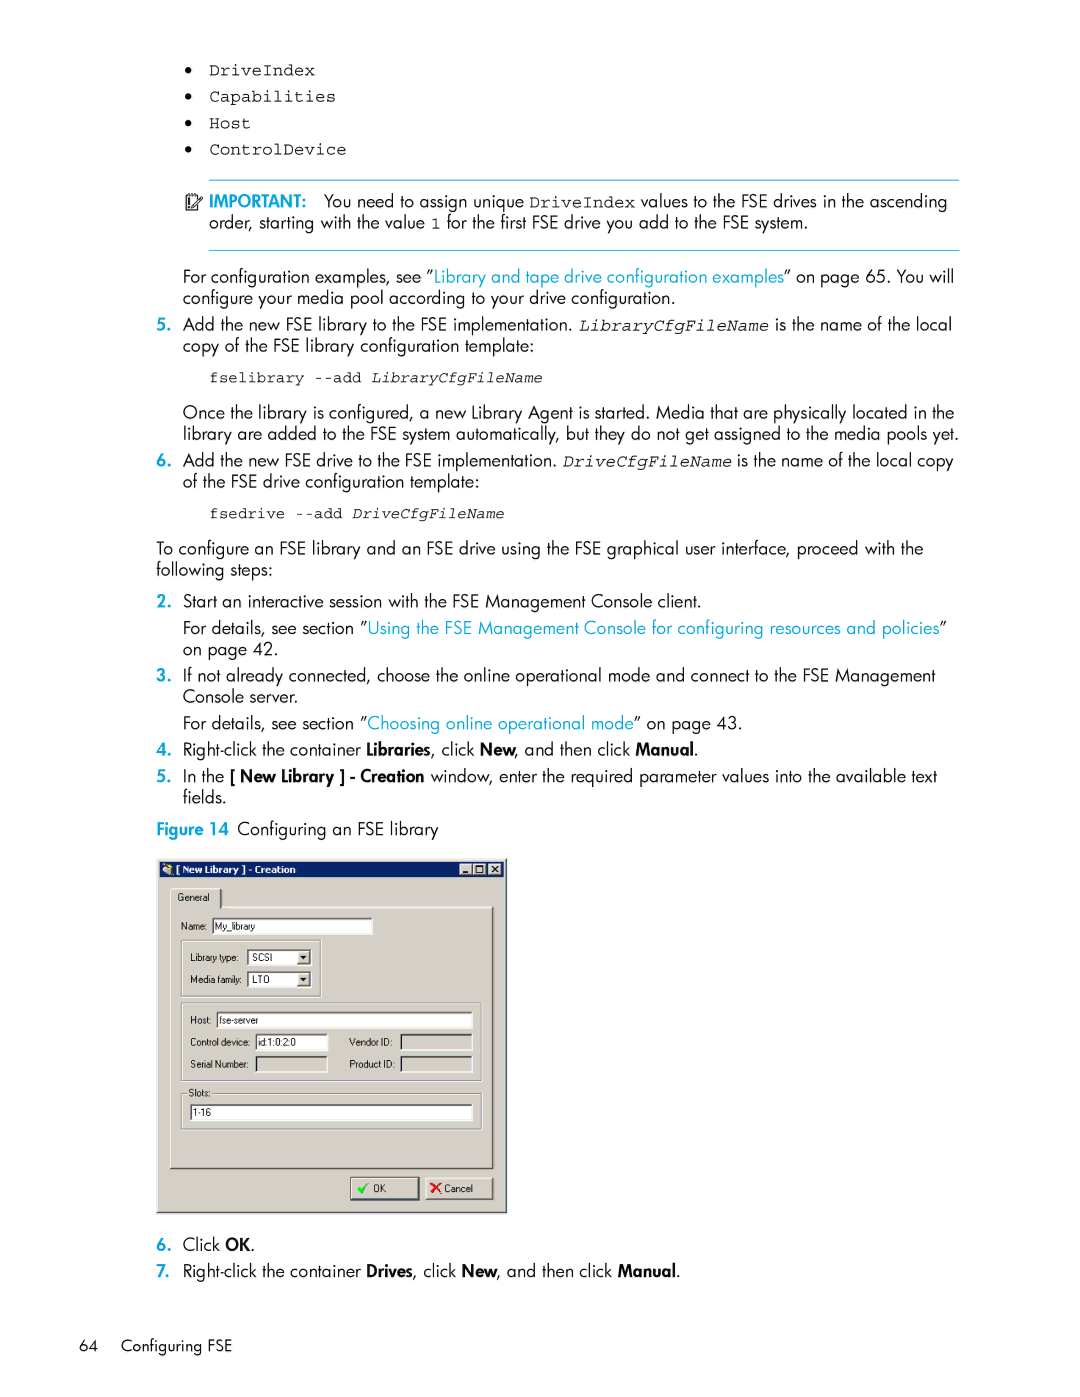
Configuring an FSE partition Click OK
\\?\Volumef6f3e1b6-b2ac-11d7-9c99-00b0d02fadef\
Fsepartition --addPartitionCfgFileName
Configuring a Worm FSE partition
Examples of configuration files for Worm FSE partitions
Phase 5 preparing FSE media
Fselibrary --update-inventory LibraryName --rescan
Fsemedium --format Barcode
Fsemedium --format Barcode --force
Fsemedium --init Barcode
For forced initialization use the following command
Fsemedium --init Barcode --force
Mounting HSM file systems on the Linux platform
Phase 6 mounting HSM file systems
Fsesystem --status
Command generates an output similar to the following
Reconfiguring FSE interprocess communication
\\?\VolumeVolumeGUID\
Mounting HSM file systems on the Windows platform
\fsepartition --list
Reconfiguration procedure
Services.cfg Etc/opt/fse
Var/opt/fse/omniorb. Windows specific
OmniORB.cfg Etc/opt/fse
Ordinary LAN connection
Private network connection
Server = fse-server1.company.com
Hostname = fseserver.fsenet Server = fseserver.fsenet
Services.cfg file
OmniORB.cfg file, configure the parameters in the section
Services.cfg and omniORB.cfg files
Reconfiguring communication on external Linux FSE clients
Hostname = fseclient.fsenet Server = fseserver.fsenet
Reconfiguring communication on external Windows FSE clients
Changing the IP address of an FSE host
Configuring FSE
Media pool types and their characteristics
Introduction
FSE media pools
Introduction, FSE media pools, FSE media,
Configuring a media pool
MyConfiguration. Linux specific
LTO
# Regular Regular media pool for FSE partition
Example of an LTO Worm media pool configuration file
SysVolLocation = None SizeOfSysVol = 0MB
Example of a disk media pool configuration file
Determining the configured media pools
Fsepool --list --detail
Managing media
Excerpt from the fsepool --list output
Checking the status of a particular media pool
Excerpt from the fsepool --list --detail output
FSE media
FSE medium volumes
Excerpt from the fsepartition --status output
FSE media types
Disk media
LTO Ultrium 3 Worm
Disk media
Capacity disk
Local and remote file systems as disk media
Var/opt/fse/dm/dm000001 Var/opt/fse/dm/dm000002
Mnt/diskmedium linuxhost.company.comrw,nosquashroot
Disk media specifics
`-- dm000001
Adding media to an FSE media pool
Formatting media
Medium is formatted using the following command
Medium is initialized using the following command
Initializing media
Skipping media formatting
Duplicating media
Procedure for duplicating media
How it works
Prerequisites
LTO 1 100 GiB * 2 = 200 GiB
Forced duplication
Normal duplication
LTO 2 200 GiB * 2 = 400 GiB LTO 3 400 GiB * 2 = 800 GiB
Media reorganization process
Reorganizing media
Limitation
Fsemedium --list Barcode --volume
Enabled/mounted
Media reorganization parameters
Exceptions to the reorganizational rule
Boundary migration date and time parameter
Number of latest generations parameter
Example command output
Scanning media for obsolete data
Displaying the FSE media pool-based statistics
Meaning of the columns is the following
Running the media reorganization job
Job to the command shell for --no-monitoroption
Displaying the FSE media-based statistics
An example output is the following
Reusing the recycled medium volumes
Fsemedium --list
Redundant copy recreation process
Recreating redundant copies of migrated data
052002 Data 5949 Open, scanned Empty System 1019
Media Pool
Command output will be similar to the following
Fsemedium --copy-contents Barcode --no-monitor
Determining the unusable media
Starting redundant copy recreation
Resolving situations with no alternative migrated copies
Fsefile -M Filename
Checking the status of media
Example output of the fsemedium --list command
Example output of the fsemedium --list --detail command
PoolLTO Open LiblibLTO3 000046
PoolLTO Open LiblibLTO5 000116
Checking the status of a particular medium
Changing the condition status of media
Status of the medium can be one of the following
Closing medium volumes
Recreating Fast Recovery Information from media
Preventing writing to an FSE medium
Preventing reading from and writing to an FSE medium
Fselibrary --update-inventory command for this purpose
Fsemedium --recreate-fri Barcode --volume VolumeNumber
Removing FSE media
Fsemedium --remove Barcode
Managing media
FSE operation basics
How does FSE function?
Policies
HSM lists
FSE disk buffer
Hierarchical Storage Manager lists
Storage space allocation in an extended FSE disk buffer
Policies
Changes of states of files under FSE
What is a retried migration?
Migration
Migration policy parameters
Minimum file age for migration MinFileAge
Minimum wait time for migration MinWaitTime
Maximum wait time for migration MaxWaitTime
Minimum number of files for migration MinNumMigFiles
Maximum number of files for migration MaxNumMigFiles
Default migration policy
Release
Example situations that trigger migration
Watermarks
High watermark
Reaching the critical watermark on an HSM file system
Exclusion from release
Low watermark
Filename pattern conventions
Considerations before configuring exclusion from release
Limitations
Special pattern-matching characters
Release policy parameters
Example situations that trigger release
Migration retention time MigRetentionTime
Recall retention time RecallRetentionTime
Minimum file size for release MinFileSize
Recall
Default release policy
Recall parameters
Default recall policy
Recall timeout RecallTimeout
Deletion
Automatic deletion process
File expiration time FileExpiration
Deletion policy parameters
Directory paths Path
Examples of a configured deletion policy
Default deletion policy
Resource allocation
Starting the deletion job
Recalling deleted files
Resource allocation concepts
Media selection by media location
Central FSE resource manager
Several allocation parameters
System allocation and job priority policy
System allocation and job priority policy parameters
Job priorities
ThresholdJobCount = 3/2 * MaxNumDrives
Resource allocation threshold ResourceAllocationThreshold
Time step TimeStep
Partition allocation and job priority policy
Partition allocation and job priority policy parameters
Maximum number of drives for recovery MaxNumDrivesRecovery
Recovery priority RecoveryPriority
Maintenance priority MaintenancePriority
Default partition allocation and job priority policy
Administrative and backup job priority calculation
Priority calculation
Parallel copying
Multiple copying
Example of resource allocation
Limited Access Mode LAM and Full Access Mode FAM
HSM file system access modes
Sequential copying
HP StorageWorks File System Extender Software user guide
Migration, release, recall, and deletion
Procedures in this chapter provide instructions for
About monitoring and maintaining in FSE
Monitoring general FSE implementation status
Number of running jobs
Example output of the fsesystem --status command
Managing FSE partitions
Monitoring FSE partition status
Host and mount point of the belonging HSM file system
Displaying the status of an FSE partition
Example output of the fsepartition --status command
Disabling an FSE partition
To enable an FSE partition, do the following
Windows specific Invoke the following command
Enabling an FSE partition
Removing an FSE partition
Switching the access mode for an HSM file system
Retrieving detailed information for an FSE partition
Switching to Limited Access Mode
Switching to Full Access Mode
Limited Access Mode error messages
Monitoring FSE jobs
Example output of the fsejob --list --detail command
Example output of the fsejob --list command
Fsejob --list --maint PartitionName --detail
Displaying the status of a particular FSE job
Fsejob --status JobID
Example output of the fsejob --status command
Recalling older generations of a file
Example output of the fsefile --history command
Recalling sets of files in an efficient way
Example of recall by date
Example of recall by file migration ID
Example of recall by file ID instead of filename
Command fsefile --recall --if
Efficient recall invocation
Logging file recalls
512MBc, and 512MBd
Retrieving detailed information
Example excerpt from the FSE error log file
Managing FSE recall jobs
Fsemedium --list --volume
Fselibrary --list
Fsedrive --list
Fsepool --list
Scsi
Name Drv01 Family
Pool Pool01
UsageCount 137 Capabilities Key Name Drv02 Family
Ac3050b1-a838-458e-9a21-d3d3429cade9
33d4ef52-7ec8-4926-97f9-909edfe66c41
47b5fddc-03f7-4b80-8dab-5d2f6fe18cc1
HP StorageWorks File System Extender Software user guide
Barcode 000009 VolNum
1acf6a41-a23f-4836-9e4d-539d31ad572f
Eca50ba5-f068-4650-a587-945fcffda287
Cfe954e0-21bb-428b-84fa-076754539f76
B8e4d73b-890c-41d0-bb20-eefe19d3f057
8920cdd9-57ee-4f2e-a09a-d701249c6434
LastVer 1970/01/01 ValidData TotalData
Partition Part01
583
Bfca4697-a1e0-4881-ba12-953acbb72a02
Monitoring and maintaining FSE
HP StorageWorks File System Extender Software user guide
Extending storage space of FSE disk buffer
How to extend the FSE disk buffer?
Benefits of extended FSE disk buffer
Consistency check of FSC vs. HSM file system
Checking the consistency of the File System Catalog
Removing a file system from the FSE disk buffer
Types of inconsistencies
Fsecheck --fsc-hsmfs PartitionName
MigID 273932147200 FileSize 18691
Hsmfs Notes
OwnerID 154336
MigID 273931007488 FileSize 2815
REPORTING-BUGS REPORTING-BUGS
Consistency check of FSC vs. FSE media
Starting the consistency check
Options for consistency check of FSC against FSE media
Example results of the FSC vs. FSE media consistency check
Inconsistency types
MigID MediaKey MedVolNum
Dump FRI
Low storage space detection
Var/opt/fse
General HHM settings
HHM configuration file
Var/opt/fse/part Var/opt/fse/log
Key Description Default value on Linux Windows
Mail settings
Triggered actions definitions
Variable Description Examples or possible values
Triggered actions section of the configuration file
Monitored items definitions
Filesystemtype
CriticalThreshold
CriticalActionGE
CriticalActionLT
Monitoring and maintaining FSE
HP StorageWorks File System Extender Software user guide
Monitoring and maintaining FSE
Listing the contents of the HHM configuration file
Configuring low storage space detection
Modifying the contents of the HHM configuration file
FSE log files
Viewing FSE log files
Monitoring and analyzing FSE log files
Configuring monitoring and analysis of FSE log files
FSE event log /var/opt/fse/log/fse.log
General configuration file
LogAnalyzerRules.py
LogAnalyzer
# --- Debug
ActivityLog = /var/opt/fse/log/loganalyzermessages.log
# --- From # From-Part of the mailheader
# --- Subject # Subject-Part of the mailheader
# --- To # To-Part of the mailheader
# Default is 1 minute
# CommunityName # The community name of the machine
SleepTime
Debug
UseSMTPAuthentication
ProcessFileFromBeginning
IgnoreCase
ServerName
Rules configuration file
Rules = \
MailLogMessagessbj
MailLogMessages
MailCurrentLogMessagesbj
Starting the monitoring and analysis of log files
Action Name Description
Reconfiguring the monitoring and analysis of log files
FSE event log
Logging FSE media operations
Example FSE event log
Monitoring and maintaining FSE
HP StorageWorks File System Extender Software user guide
Windows specific
HP StorageWorks File System Extender Software user guide
FSE error log
Example FSE error log
HP StorageWorks File System Extender Software user guide
Monitoring and maintaining FSE
Windows specific
Monitoring and maintaining FSE
HP StorageWorks File System Extender Software user guide
Determining total offline storage capacity
Generated report conforms to the following example
# cd /opt/fse/sbin/tools # ./checklic
Checklic checklic-output.txt
Introduction, Defining your backup strategy,
Defining your backup strategy
Backup, Restore, Recovery,
Recovery methods for FSE components
See HSM file system
What is FSE backup?
Backup
FSE component Description Recovery method
Backup configuration file on Linux platform
How it works?
Prerequisites
# modprobe dm-snapshot
Backup process
Backup media management
MODULESLOADEDONBOOT=dm-snapshot
Configuring a backup media pool
Estimating resources
Preparation of new media
Preparation of already used media
Defining the backup policy
Backup media recycling
Estimating backup frequency
Fsebackup --medium Barcode --init
Fsebackup command
Starting FSE backup
Examples of backing up to disk
Example FSE backup log file
Activity logging
Example of backing up to tape
Example of backing up to disk and tape
CMD
HP StorageWorks File System Extender Software user guide
What is FSE restore?
Restore
Aborting FSE backup
Restore process
Starting FSE restore
Fserestore command
Examples of retrieving backup images from tape
Examples of restoring from disk
Fsebackup --device /dev/sg1 --offset 3 --count
Example FSE restore log file
Opt/fse/lbin/fserestore.py -f /root/test.tar.bz2
CMD
Recovery
Post-restore steps
File System Catalog recovery
Aborting FSE restore
HSM file system recovery
HSM file system recovery procedure
Enable the FSE partition Start the recovery of FSC
Prerequisite
# fserecover --hsmfs PartitionName
Status of user data on the recovered HSM file system
\fserecover --hsmfs PartitionName
Backup, restore, and recovery
Troubleshooting
FSE startup and shut-down problems
# ps -ef grep CommandName
Defaults to C\Program Files\Hewlett-Packard\FSE
Examining the process list in Windows Task Manager
Agent.pkg Cli-admin.pkg Common.pkg Server.pkg
# ls -a /etc/opt/fse
Cli-user.pkg Client.pkg Common.pkg
# rpm -qa grep fse- grep -v fse-gui.client.pkg
OmniORB cannot work with such a configuration
Resolve it
Use the kill command to terminate the FSE processes
Try to start them manually, the following error is reported
Operating system tools to terminate all FSE processes
Use Task Manager to terminate the FSE processes
Firebird server problems
Firebird.sourceforge.net
# /etc/init.d/firebird status
Ibserver pid 896 895 581 577 576 is running
Communication problems
It defaults to C\Program Files\Hewlett-Packard\FSE
Service daemon service
Run the command omniNames --statusand inspect its output
Stop the FSE processes with the fse --stopcommand
You must restart FSE with the fse --restartcommand
Use the command ps -ef grep fse-hsm
Fsepartition --status PartitionName
Scsi problems
Driver is disabled
Hprescan -a
Etc/rc.d/rc.local
Cat /proc/scsi/scsi
Tape library problems
Options scsimod maxscsiluns=255
# echo scsi scan-new-devices /proc/scsi/scsi
# cat /proc/scsi/scsi
Fselibrary --update-inventory LibraryName --rescan
Fsedrive --remove Name
FseError 11005 Medium overflow physical EOM
Media management problems
Volume Overflow 0x00,0x02 End-of-partition/medium detected
Problematic medium volume
Is known
Into the Rmdb
Execution
Workaround
HSM file system mounting problems
\fse --dismount-ntfs VolumeName
Fse --mount I\fse\fsefs01 \\?\Volume
Fse --umount I\fse\fsefs01 \\?\Volume...\
Fse --mount I\fse\fsefs01 \\?\Volume...\
Fsepartition --disable PartitionName
Fsepartition --enable PartitionName
Fsepartition --remove PartitionName
Fsepartition --add PartitionName
HSM file system filter problems
Fse --dismount-ntfs VolumeName
Accessed for the first time
HSM file system mounting problems on
Fse --start
Fse --stop
Fsecheck --fsc-hsmfs PartitionName
Migration problems
Start writing to tape
Runs out of free space
Prevent it from running out of free space
Fsefile --history FileName
Fsefile --recall --id PartitionName FileID --into Path
FSE error log
File DirectoryPath/FileName
Complete
Migration of the file is started
Recall problems
Use the ps -ef grep fse-hsmcommand for this purpose
Has been allocated for recall
Unusable FSE medium to become good usable
Scanning against viruses
Not indicate data loss
Backup, restore, and recovery problems
Recall them manually
FSE Windows Service stopped
Section Verifying and repairing the installed FSE software
\fse --stop
FSE backup cannot be started
File backup.pid and start FSE backup once again
Layout
Status of the medium will be empty
Etc/sysconfig/kernel, like shown in the following example
Dm-snapshot to the variable Modulesloadedonboot in the file
# modprobe dm-snapshot
Sharing problems
To directories cannot be shared
Acpi=oldboot pci=noacpi apm=power-off
Other problems
Fsefile --migrate FileName
Directory and its contents from the external FSE client
Following message is written to the FSE event log
No space left on device
On this partition
File System Catalog recovery on
Explanation Workaround
For files that cannot be deleted
Log
Is running on the associated FSE partition
FSE troubleshooting tools
Debugging FSE processes
Debugging and operation fine-tuning options
Tool name Description
InstallPath%\var\log\debug
Debugging options
Example
Var/opt/fse/log/debug
Var/opt/fse/log/error.log
InstallPath%\var\log\error.log
Windows specific Flag value Description
Operation fine-tuning options
Export HSMFRISAFETYBUFTAPE=1000
Export HSMPTDIRECT=no
Export HSMBEAVERIFYPOSITION=ALWAYS
Export HSMLASERIALUNLOAD=yes
Debugging HSM file system filter
Debugging FSE backup and restore processes
Restart the syslogd daemon
Potential problems with debugging
Gathering information about your problem
Backup or restore debugging results in job failure
Checklist for required information
FSE error codes
Contact
999
1001
1002
1003
2004
2005
2006
2007
3001
3002
3003
3004
4023
4024
4025
4026
8004
8005
8006
8007
10002
10003
10004
10005
13002
13003
13004
13005
OmniNames command
Opt/fse/bin
Opt/fse/doc
Opt/fse/lbin
Path on Linux platform Path on Windows platform Contents
FSE configuration templates
Template for FSE libraries
Libraryhostname
Slots Slots = 1-15
Template for FSE drives
# Tips
HP StorageWorks File System Extender Software user guide
Template for LTO media pools
SysVolLocation = None SizeOfSysVol = 0MB
Template for disk media pools
Template for FSE partitions General part
Write-Once-Read-Many file system
Template for FSE partitions Migration part
Template for FSE partitions Release part
FSE configuration templates
Template for FSE partitions Recall and Allocation part
Template for FSE partitions Deletion part
Template for FSE system configuration
FSE configuration templates
Media pool FSE media pool
FSE configuration file template
Configuration file
External client FSE external client
File System Catalog FSC
Needs cleaning or servicing
Own deletion policy
Disk buffer
See media duplication
See recovery FSE recovery, recovery job
See recovery FSE recovery
Also Data Location Catalog DLC and Name Space Catalog NSC
Mode LAM
Job
It, you must use forced initialization
FSE job
Medium
See Medium Auxiliary Memory MAM
Retention time
Offline medium
Library
Online medium
Set to unusable
An FSE users request with the fserecover command
Recovery job
InstallPath%\var\rmdb directory on Windows platform
Recall, recall job
FSE implementation
See media pool FSE media pool
Is set by enabling the drive with the fsedrive command
Ultrium
See LTO Ultrium
Unusable medium
320
Index
Default partition allocation policy
Default job priority policy 144
184
Configuring, consolidated FSE system
GUI
HP StorageWorks File System Extender Software user guide
326
FSE Management Console GUI 57 status check
Media 117, 119 media pools
328