FEATURES OF THE CAMERA SECTION
How to Use Skin Detail
FEATURES OF THE CAMERA SECTION
Using the Skin Detail Function
SHUTTER dial
USER 1 |
| USER 2 | USER 3 |
| SHUTTER |
| |
ND FILTER |
|
|
|
2 |
|
|
|
1 |
|
|
|
MENU |
| ||
OFF |
|
| DV |
|
|
| |
|
| STATUS |
|
WHT.BAL | AUTO | AUTO | |
STATUS button
1.
Cursor ![]()
![]()
![]()
![]()
![]()
![]()
![]()
![]()
CAMERA PROCESS [2/2] menu screen
2.
ADVANCED PROCESS menu screen
3. 4.
Detection area
This function suppresses edge sharpening in the skin color areas of the video signal, enabling velvety, smooth skin tones.
Setting the skin detail function color and range
1.Display the ADVANCED PROCESS menu screen. In menu setting procedure
TOP MENU screen ο CAMERA PROCESS [1/2] ο CAMERA PROCESS [2/2] ο Select ADVANCED PRO- CESS item.
2.Turn the SHUTTER dial, bring the cursor (K) to the SKIN COLOR ADJUST item and press the SHUTTER dial.
•The SKIN COLOR ADJUST screen is displayed.
•The entire screen becomes black and white, and only the areas recognized by the skin detail function are dis- played in color.
3.Move the cursor (K) to the SKIN COLOR DET. item, press the SHUTTER dial and select EXECUTE to switch to skin color detection mode.
4.Shoot so that the color area you want to detect within the detection area frame is input.
To confirm the detection area, press the SHUTTER dial and set SKIN COLOR DET. to STOP.
•The frame on the screen is the detection area for the skin detail function.
•The color within the detection area is recognized as the color that the skin detail function will use.
•If the color within the detection area is not recognized as the color that the skin detail function will use, “ERROR” is displayed on the screen.
5.If you want to change the range of colors recognized with the skin color detection function, follow the steps below.
1Turn the SHUTTER dial, bring the cursor (K) to the SKIN COLOR RANGE item and press the SHUTTER dial.
οThe setting area flashes and can be changed.
2Turn the SHUTTER dial up or down to widen or narrow the color range.
• Set the range as you check the color display.
3To confirm the color range, press the SHUTTER dial.
•The setting returns to its lit state.
6.To stop the SKIN COLOR ADJUST function, turn the SHUTTER dial, bring the cursor (K) to the PAGE BACK item and press the SHUTTER dial.
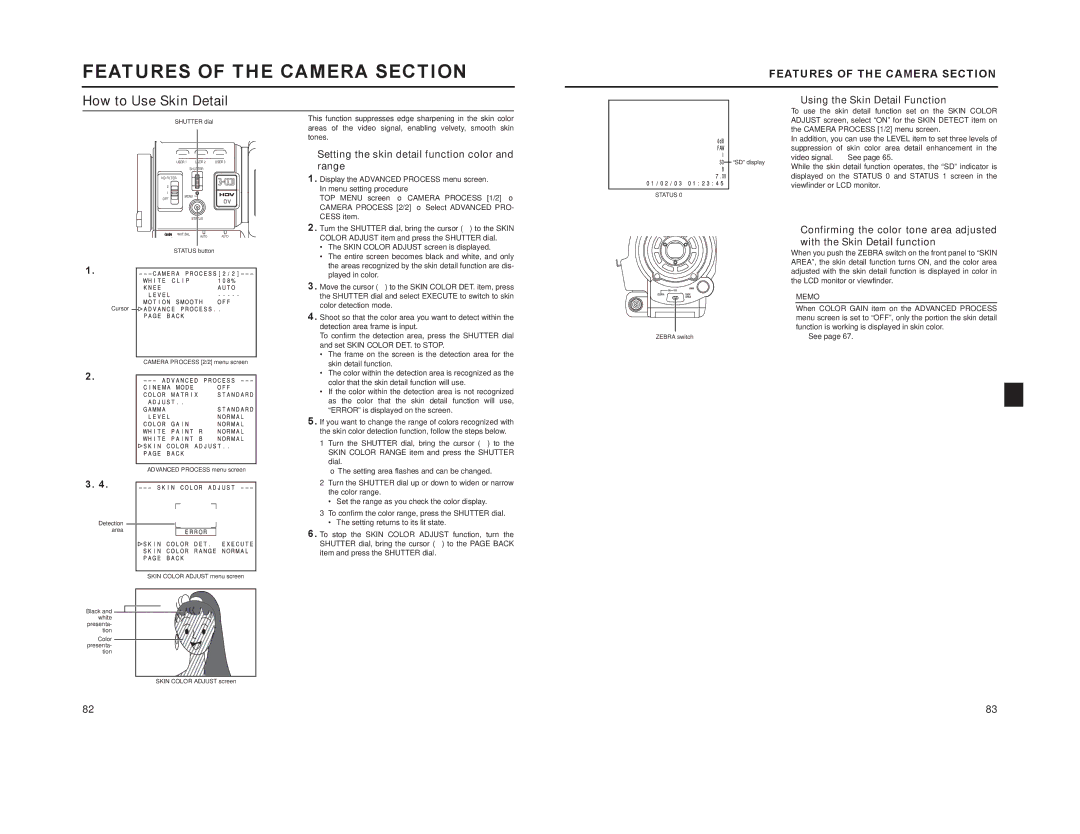
| To use the skin detail function set on the SKIN COLOR | |
| ADJUST screen, select “ON” for the SKIN DETECT item on | |
| the CAMERA PROCESS [1/2] menu screen. | |
| In addition, you can use the LEVEL item to set three levels of | |
| suppression of skin color area detail enhancement in the | |
“SD” display | video signal. X See page 65. | |
While the skin detail function operates, the “SD” indicator is | ||
| ||
| displayed on the STATUS 0 and STATUS 1 screen in the | |
| viewfinder or LCD monitor. |
STATUS 0
Confirming the color tone area adjusted
with the Skin Detail function
When you push the ZEBRA switch on the front panel to “SKIN AREA”, the skin detail function turns ON, and the color area adjusted with the skin detail function is displayed in color in the LCD monitor or viewfinder.
|
| MEMO |
|
| |
|
| When COLOR GAIN item on the ADVANCED PROCESS |
|
| menu screen is set to “OFF”, only the portion the skin detail |
|
| function is working is displayed in skin color. |
ZEBRA switch | X See page 67. | |
SKIN COLOR ADJUST menu screen
Black and white presenta- tion
Color presenta- tion
SKIN COLOR ADJUST screen
82 | 83 |