PLAYBACK MODE
Playback Procedure | emit a sound while operating. This does not indicate a | ||
|
| • Following loading of the tape, the | |
|
| malfunction. |
|
Recorded pictures can be viewed in the viewfinder, or on the |
| ||
LCD monitor, or on the monitor connected to the video output | • The data recorded for the date and time or time code on | ||
connector. | the tape can be shown on the screen. To enable or dis- | ||
|
| able the display is selected on the menu screen: | |
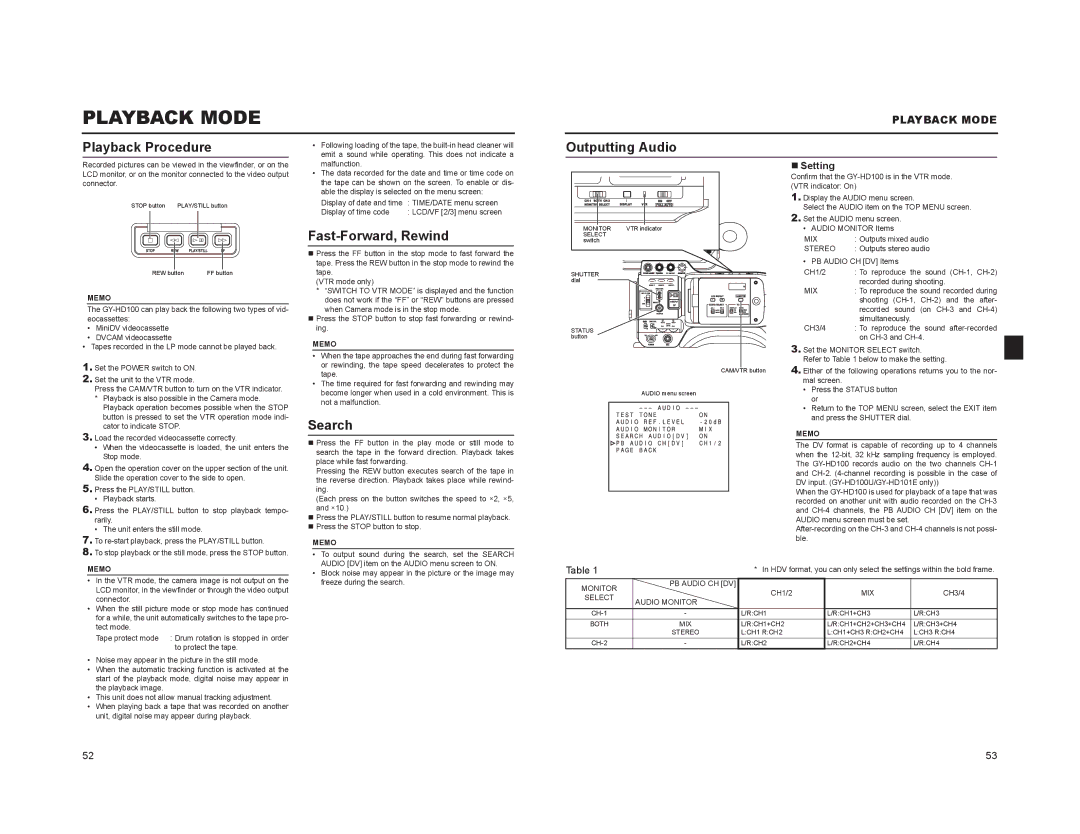
STOP button PLAY/STILL button | Display of date and time | : TIME/DATE menu screen | |
|
| Display of time code | : LCD/VF [2/3] menu screen |
PLAYBACK MODE
Outputting Audio
Setting
Confirm that the
1. Display the AUDIO menu screen. |
Select the AUDIO item on the TOP MENU screen. |
2. Set the AUDIO menu screen. |
REW button | FF button |
MEMO
The
•MiniDV videocassette
•DVCAM videocassette
•Tapes recorded in the LP mode cannot be played back.
1. Set the POWER switch to ON. |
2. Set the unit to the VTR mode. |
Press the CAM/VTR button to turn on the VTR indicator. |
* Playback is also possible in the Camera mode. |
Playback operation becomes possible when the STOP |
button is pressed to set the VTR operation mode indi- |
cator to indicate STOP. |
Fast-Forward, Rewind
Press the FF button in the stop mode to fast forward the tape. Press the REW button in the stop mode to rewind the tape.
(VTR mode only)
*“SWITCH TO VTR MODE” is displayed and the function does not work if the “FF” or “REW” buttons are pressed when Camera mode is in the stop mode.
Press the STOP button to stop fast forwarding or rewind- ing.
MEMO
•When the tape approaches the end during fast forwarding or rewinding, the tape speed decelerates to protect the tape.
•The time required for fast forwarding and rewinding may become longer when used in a cold environment. This is not a malfunction.
Search
MONITOR | VTR indicator |
SELECT |
|
switch |
|
SHUTTER |
|
dial |
|
STATUS |
|
button |
|
AUDIO menu screen
• AUDIO MONITOR Items |
MIX | : Outputs mixed audio |
STEREO | : Outputs stereo audio |
| • PB AUDIO CH [DV] Items | |
| CH1/2 | : To reproduce the sound |
|
| recorded during shooting. |
| MIX | : To reproduce the sound recorded during |
|
| shooting |
|
| recorded sound (on |
|
| simultaneously. |
| CH3/4 | : To reproduce the sound |
|
| on |
| 3. Set the MONITOR SELECT switch. | |
| Refer to Table 1 below to make the setting. | |
CAM/VTR button | 4. Either of the following operations returns you to the nor- | |
| mal screen. |
|
| • Press the STATUS button | |
| or |
|
| • Return to the TOP MENU screen, select the EXIT item | |
| and press the SHUTTER dial. | |
3. Load the recorded videocassette correctly. |
• When the videocassette is loaded, the unit enters the |
Stop mode. |
4. Open the operation cover on the upper section of the unit. |
Slide the operation cover to the side to open. |
5. Press the PLAY/STILL button. |
• Playback starts. |
6. Press the PLAY/STILL button to stop playback tempo- |
rarily. |
• The unit enters the still mode. |
7. To |
8. To stop playback or the still mode, press the STOP button. |
MEMO
•In the VTR mode, the camera image is not output on the LCD monitor, in the viewfinder or through the video output connector.
•When the still picture mode or stop mode has continued for a while, the unit automatically switches to the tape pro- tect mode.
Tape protect mode : Drum rotation is stopped in order to protect the tape.
•Noise may appear in the picture in the still mode.
•When the automatic tracking function is activated at the start of the playback mode, digital noise may appear in the playback image.
•This unit does not allow manual tracking adjustment.
•When playing back a tape that was recorded on another unit, digital noise may appear during playback.
Press the FF button in the play mode or still mode to search the tape in the forward direction. Playback takes place while fast forwarding.
Pressing the REW button executes search of the tape in the reverse direction. Playback takes place while rewind- ing.
(Each press on the button switches the speed to ×2, ×5, and ×10.)
Press the PLAY/STILL button to resume normal playback.
Press the STOP button to stop.
MEMO
•To output sound during the search, set the SEARCH AUDIO [DV] item on the AUDIO menu screen to ON.
•Block noise may appear in the picture or the image may freeze during the search.
|
|
|
|
|
|
| MEMO |
| |
|
|
|
|
|
|
|
| ||
|
|
|
|
|
|
| The DV format is capable of recording up to 4 channels | ||
|
|
|
|
|
|
| |||
|
|
|
|
|
|
| when the | ||
|
|
|
|
|
|
| The | ||
|
|
|
|
|
|
| and | ||
|
|
|
|
|
|
| DV input. | ||
|
|
|
|
|
|
| When the | ||
|
|
|
|
|
|
| |||
|
|
|
|
|
|
| recorded on another unit with audio recorded on the | ||
|
|
|
|
|
|
| and | ||
|
|
|
|
|
|
| AUDIO menu screen must be set. |
| |
|
|
|
|
|
|
| |||
|
|
|
|
|
|
| ble. |
| |
Table 1 |
|
|
|
| * In HDV format, you can only select the settings within the bold frame. | ||||
MONITOR |
|
| PB AUDIO CH [DV] | CH1/2 |
| MIX | CH3/4 | ||
|
|
|
|
| |||||
SELECT | AUDIO MONITOR |
| |||||||
|
|
|
| ||||||
|
|
|
|
|
| ||||
- |
| L/R:CH1 |
| L/R:CH1+CH3 | L/R:CH3 | ||||
BOTH |
|
| MIX | L/R:CH1+CH2 |
| L/R:CH1+CH2+CH3+CH4 | L/R:CH3+CH4 | ||
|
|
|
| STEREO | L:CH1 R:CH2 |
| L:CH1+CH3 R:CH2+CH4 | L:CH3 R:CH4 | |
- |
| L/R:CH2 |
| L/R:CH2+CH4 | L/R:CH4 | ||||
52 | 53 |