KD-LH401
Specification
Section Precaution
Handling the traverse unit optical pickup
Preventing static electricity
Grounding to prevent damage by static electricity
Important for laser products
Reproduction and Position of Labels
Section Specific Service Instructions
Removing the heat sink See
Main body section Removing the front panel assembly See
Reference
Removing the top chassis assembly See Figs.3 to
Removing the mechanism control board See
Removing the front chassis See Figs.7
Top chassis
Removing the CD mechanism assembly See
Removing the main board See Figs.11
FPC guide
Removing the rear bracket See
Removing the gear bracket unit See
Removing the front board See Figs.15 to
Rear cover assembly P
CD Mechanism section Removing the top cover See Figs.1
Removing the connector board See Figs.3 to
DET
Removing the DET switch See Figs.6
Removing the chassis unit See Figs.8
Removing the clamper assembly See Figs.10
Removing the loading / feed motor assembly See Figs.12
Reattaching the pickup unit See Figs.14 to
Removing the pickup unit See Figs.14 to
Removing the trigger arm See Figs.19
Removing the top plate assembly See
Removing the mode sw. / select lock arm See Figs.22
Reference
Reassembling the mode sw. / select lock arm See Figs.24 to
Reattaching the Select arm R / link plate See Figs.29
Removing the select arm R / link plate See Figs.27
Removing the loading roller assembly See Figs.31 to
Removing the loading gear 5, 6 and 7 See Figs.35
Pull out the feed gear
Removing the gears See Figs.37 to
Removing the turn table / spindle motor See Figs.41
„ Dummy load
„ Standard volume position
Tracking section
Feed section
Focus section Spindle section
Signal processing section
Replacement of laser pickup
Maintenance of laser pickup
ANT
No.MA0631-33
Victor Company of JAPAN, Limited
CD-ROM No.SML200404
Contents
No.MA063SCH 2004/4
Safety precaution
X571
IC573
IC572
IC571
Main amplifier section
Standard schematic diagrams
SN74AHCU04PW-X
CD servo control section
C823
LCD & Key control section
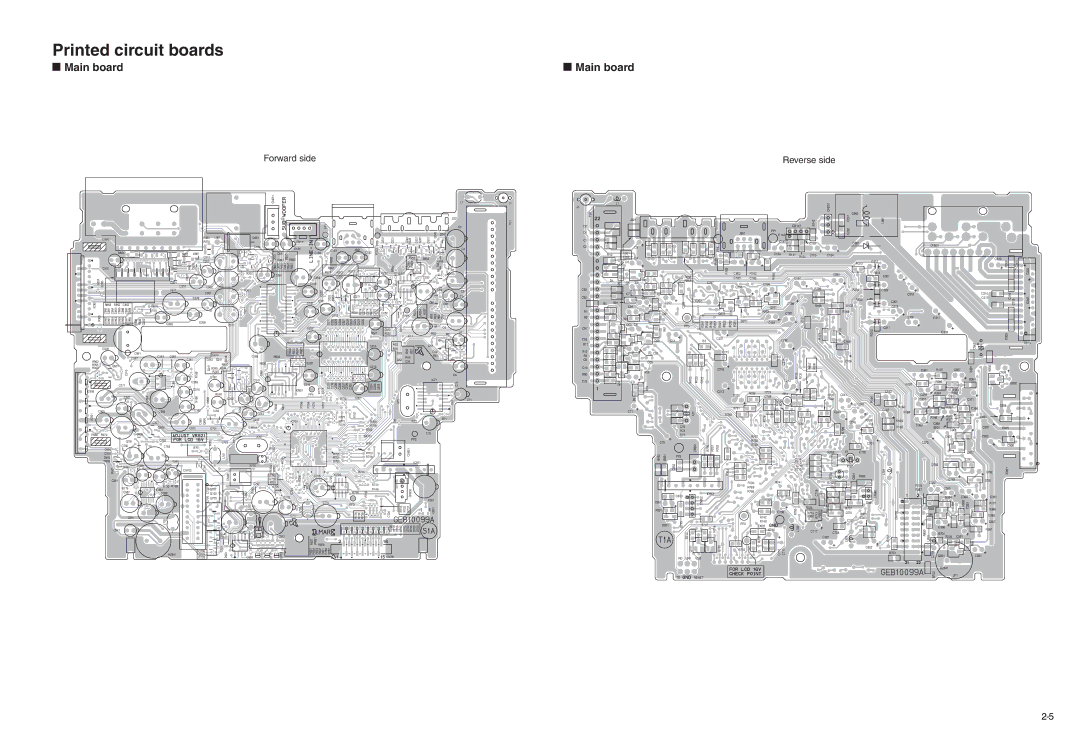
Main board
Printed circuit boards
Mecha control board
Front board
M O
No.MA063SCH
Parts List
Exploded view of general assembly and parts list
Main board C32
General Assembly
CD mechanism assembly and parts list
CD mechanism
Electrical parts list
QERF1CM-226Z Capacitor
Part Name Description Local R74 NRSA63J-101X
Front board
TA E Capacitor
Micon control board
NRSA63J-4R7X MG Resistor
Part Name Description Local R685 NRSA63J-682X
Memo
Packing materials and accessories parts list
Packing and Accessories
KD-LH401
Important for Laser Products
How to reset your unit
Contents
Control panel
Location of the Buttons
Illumination Navigation for easy operations
Control dial ¢ buttons
Remote controller
Remove the battery holder
Installing the battery
Return the battery holder
Place the battery
Current sound mode iEQ see
Adjust the sound as you want. See pages 32
Basic Operations
Select the source
To turn off the power
To drop the volume in a moment
Adjust the hour Set the minute
Setting the clock
To check the clock time when the unit is
Set the clock system
Listening to the radio
Radio Operations
Searching for a station automatically Auto search
Start searching for a station
Each time you press Button, the band changes as Follows
Searching for a station manually Manual search
When an FM stereo broadcast is hard to receive
FM station automatic preset SSM
Start automatic preset
Storing stations in memory
Each time you press the button, the band changes as follows
Manual preset
Tune in to a station in this example, of 92.5 MHz
Select the number 1 6 for the preset station you want
Selecting a preset station directly
Selecting a preset station using the preset station list
Changing the display pattern
When receiving an AM or non FM RDS
Station
See the following pages
To use Network-Tracking Reception
RDS Operations
What you can do with RDS
PTY Stnby standby setting screen Appears on the display
Using TA Standby Reception
To select your favorite PTY code for PTY Standby Reception
Using PTY Standby Reception
To set PTY Standby Reception
Select one of the twenty-nine PTY codes. See
To store your favorite programme types
Searching for your favorite programme
To store your favorite programme types, see
To search for your favorite programme type
To search for your favorite programme
Setting the TA volume level
Other convenient RDS functions and adjustments
Automatic clock adjustment
To activate programme search, follow the procedure below
Same programme can be received on different frequencies
PTY codes
About MP3 and WMA discs
Disc Operations
Playing a disc
Open the control panel
To stop play and eject the disc
Display indications when inserting an audio
CD or a CD Text Or a WMA discs
To return the control panel to its previous
To activate ImageLink, follow the procedure below
What is ImageLink?
Particular portion on a disc
Locating a track or a
To go to the next or previous tracks
To go to a track quickly
¢ or 4 after selecting the folder
To select a particular track in a folder, press
Selecting a folder and start playback
Selecting a track and start playback
Select the number 1 6 for the folder you want to play
Select the number 1 6 for the track you want to play
To play back tracks repeatedly Repeat Play
To play back tracks at random Random Play
To cancel intro scan, select Intro Off by
To cancel the prohibition and unlock the disc
Prohibiting disc ejection
To play back only intros Intro Scan
Tag is set to Off
While playing an audio CD or a CD Text disc
Current track
Number
Adjusting the sound
Sound Adjustments
Make adjustments
Select the item you want to adjust
To adjust the input level of each source -Vol Adj
Selecting preset sound modes iEQ intelligent equalizer
Press SEL select once
Available sound modes
Press the number button to select the sound mode you want
Sound modes preset frequency level settings
To cancel the sound mode, select Flat
To exit from the sound mode selection
Select the sound mode you want to adjust
Storing your own sound modes 4 Make adjustments as you like
Store the adjustment you made
Enter the sound adjustment mode
Meter
View
Shake
Off
Graphic Displays
Install / Start the program
Import the images
Retouch and edit the images
Press number button 6 to show the download selection screen
Press M Mode after the disc is detected
Downloading images and animations
You can assign your own names when editing a CD-R
If you want to cancel the procedure
If it is OK, press number button 1 to start downloading
Select highlight a file you want to download
File name appears, and the unit will Ask you Download OK?
Again
To delete all the stored files at a time
Deleting unwanted files
Time, and Movie
To delete the files stored for Opening
Again
To delete the stored files for Picture one by one
Ex. When you select Opening
Activating the graphic screen using either picture or movie
Graphics setting screen appears on Display
Activating the downloaded images and animations
To cancel all graphic displays, select Off in step
Select a file you want Finish the setting
Select UserMovie, UserSlide, or UserPict
Select UserPict
Adjust
Basic Procedure
Other Main Functions
Ex. To change Contrast
Preferred Setting Mode PSM items
Indications Selectable values/items
TA Volume
PTY Stnby
AF-Regn’l
To show the graphics on the display -Graphics
To adjust the display contrast level -Contrast
To select the display illumination pattern -LCD Type
To turn the tag display on or off-Tag
To select the amplifier gain control -Amp.Gain
To change the FM tuner selectivity -IF Filter
To select the external component to use -Ext Input
Set the dimmer mode as you like
Select the source that you want to
Setting the desired color for each source
Set the display color for
Press and hold SEL select for more
One of the user color adjustment screens appears
Select the user color adjustment screen
You can adjust within the range of 00 to
Creating your own color-User
Assigning names to the sources
When you select a source, the power Automatically comes on
To erase the entered characters
Sources Maximum number Characters
Control panel angles changes as follows
Changing the control panel angle
Attaching the control panel
Connectors
Detaching the control panel
Select the CD changer CD-CH
CD Changer Operations
Playing discs
To go to a particular disc directly
To change the display pattern
To fast-forward or reverse the track
Selected disc number Current track and elapsed playing time
To skip to the next or previous folder only for MP3 discs
Disc name list Folder name list Track name list
Selecting a disc/folder/track using the name lists
Display can show only six names at a time
Selected disc number
For MP3 discs For CDs
For MP3 discs For CDs Mode Active Plays at random
To cancel repeat play, select Repeat Off by
Mode Active Plays repeatedly
Mode changes as follows
For MP3 discs For CDs Mode Active
Turn on the connected component and start playing the source
External Component Operations
DAB Tuner Operations
What is DAB system?
Select the DAB tuner
Select the DAB band DAB1, DAB2, or DAB3
To stop searching before an ensemble is
To tune in to a particular ensemble without searching
Start searching for an ensemble
To restore the FM/AM tuner
Storing DAB services in memory
To cancel the DRC effect, select DRC Off
To select the next service To select the previous service
Selecting a preset service using the preset service list
Service
What you can do more with
Using Announcement Standby Reception
Road Traffic News Standby Reception TA Standby Reception
For Announcement Standby Reception
How Announcement Standby Reception works
To activate Announcement Standby Reception
Announcement type
Travel Programmes about travel
While receiving a DAB service
Searching for your favorite service
To use Alternative Reception
While receiving an FM RDS station
Changing the display pattern
Symptoms Causes Remedies
Troubleshooting
MP3/WMA track although it has
Noise is generated Track played back is not an
Wma
Longer readout time is Readout time varies due to
Accented letters
Available characters
Graphics CD Changer
Upper case Lower case
Handling discs
Maintenance
FM Tuner
Specifications
MW Tuner
LW Tuner
Zie de pagina met de paragraaf Het apparaat terugstellen
Refer to page of How to reset your unit
Siehe Seite Zurücksetzen des Geräts
Die folgenden Teile werden zusammen mit
Und Erdung ausgelegt. Verfügt Ihr
Diesem Gerät geliefert
Nach ihrer Überprüfung, die Teile richtig einsetzen
Remarque
Hinweis
Fuse blows
Sound is distorted
Alvorens de verbindingen tot stand te
Avant de commencer la connexion Vérifiez
KD-LH401
Pour l’amplificateur seulement
Oder
KS-U57 *4 KD-LH401