HR-XVS20AA
Safety Precautions
Use only discs marked with the following
Do not place the unit
Do not block the unit’s ventilation openings or holes
To mobile phone users
On placing the unit
Safety Precautions
Remote Control Functions
Connecting To a Satellite Receiver
Mode Set S-VHS deck Mode Set DVD deck Tuner Set Clock Set
About Discs
Playable Discs
Region Number
Unplayable Discs
DVD Video Marks
File Structure of Discs
Marks related to video
Audio CD/Video CD
Placing a Disc
Care and Handling of Discs
Open the disc tray
Place the disc
Front View
Rear View
10 EN
ON-SCREEN Display S-VHS deck
On the tape
Remote Control
How To Use
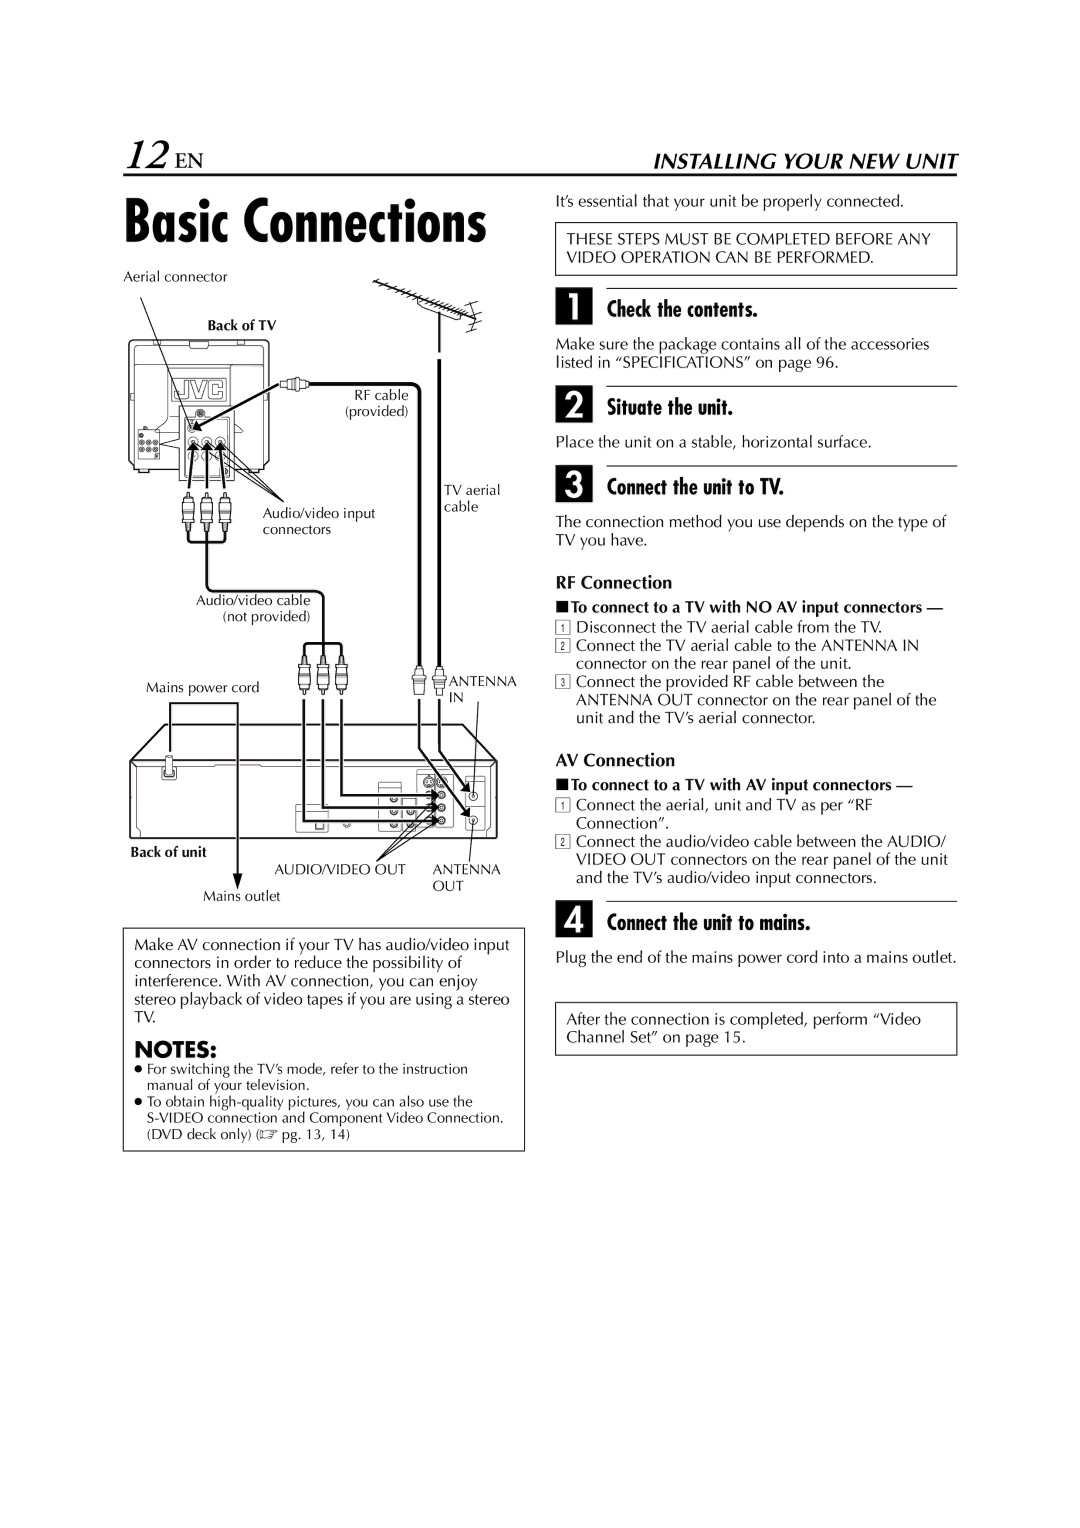
Check the contents
12 EN
Situate the unit
Connect the unit to TV
8To connect to a TV with S-VIDEO/AUDIO in connectors
Plug the end of the mains power cord into a mains outlet
Video Connection
8To connect to a TV with Component Video in connectors
Back of TV Audio in connectors
Component Video Connection
DVD deck only
Access the Video Channel Set mode
Exit the Video Channel Set mode
Video Channel Set
Set the video channel
Auto Set Up
16 EN
Select the TV system
Start Auto Channel Set
Press OK or e
Monitor Set
18 EN
DVD deck
Scan Mode Set
Access the DVD Set Up menu screen
How to change the Scan mode
Press rt to move 0 to Progressive MODE, then press OK
Language
20 EN
Press rt to move 0 to on Screen LANGUAGE, then press OK
Press w e to select Language
See Language Code List � pg
Press rt to move 0 to Menu LANGUAGE, then press OK
Language Code List
22 EN
Basic Playback
24 EN
Slow Motion
High-Speed Turbo Search
Pause during playback
Index Search
Skip Search
Activate Index Search
To resume normal playback during a Skip Search, press
26 EN
Next Function Memory
Repeat Playback
Manual Tracking
Choose a programme
Set the tape speed
Start recording
Pause/Resume recording
Instant Timer Recording ITR
Engage the ITR mode
28 EN
Set the recording duration
Reset the counter
Tape Remaining Time
Receiving Stereo and Bilingual Programmes
Set the counter display
30 EN
Playback
Recording
Access the Main Menu screen
Access the Initial Set screen
Guide Program Number Set
Guide Program Number
Access the G-CODE/SHOWVIEWscreen
Before performing the G-CODE/SHOWVIEW Timer Programming
Programming
32 EN
Access the G-CODEProgram screen
Engage the unit’s timer mode
Satellite Receiver Users
Guide Program Number Set
Express Timer Programming
34 EN
To Timer-Record Weekly Or Daily Serials
Enter the channel position
Press PR +
Disengage the timer mode
Access the Programme Check screen
Press # TIMER, then press
Cancel or change a programme
Return to the timer mode
Press # Timer
When programmes overlap each other
Cancel or change programme setting
38 EN
Confirm the overlapping programmes
Recording mode
Indicator
Programme Recording
Set the tape speed
40 EN
Load the disc
Pause playback
Place the disc in the disc tray
Access the PBC menu
Stop mode
Playback Control PBC Function
During playback Press TOP Menu
Access the DVD menu
42 EN
DVD menu
Press TOP Menu or Menu
Skip the item Playback
High-Speed Search
Resume Function
Access the digest screen
44 EN
Digest
For DVD Video
Strobe Playback
Zooming
Press Zoom during playback or while paused
Press rt w e to move the zoomed-in scene
Access the selection menu
46 EN
3D Phonic
Select the effect level
VFP function Adjusting the picture quality
Contents of the on-screen bar during playback
48 EN
Press Display twice whenever a disc is loaded
Video CD
Access the on-screen bar
Change the time information
Select the option
Select menu item
Select the repeat mode
Access the repeat mode
50 EN
Select the repeat mode Select the chapter
Chapter Search
Select the start point
Select the end point
52 EN
Time Search
Select the time
Reactivate the Playback Control PBC Function
Programme Playback
Random Playback
Select the menu item
Select the tracks in the desired order
Access the menu
54 EN
Subtitle Selection
Select the subtitle language
When using the Angle button
Angle Selection
Select the view angle
Press Angle
When using the A.MONITOR button
56 EN
Audio Language Selection
Select the audio language
When using the Audio button
Audio Channel Selection
Select the audio channel
For Svcd
Parental Lock
58 EN
To change the settings
To temporarily release the Parental Lock
Country/Area Code List for Parental Lock
60 EN
Page
What is MP3?
62 EN
MP3 control display
Current track
Using the MP3 control display
MP3 Playback
Select the group
64 EN
Track/group selection
To skip groups/tracks during playback
To start playback by specifying the track number
What is JPEG?
Jpeg control display
Using the Jpeg control display
Jpeg Playback
66 EN
Press rt to select the desired file, then press OK
File/group selection
To start slide-show playback by specifying the file number
Press number keys 0-10, +10 to enter the file number
To return to the Jpeg control display
Edit From a Camcorder
68 EN
Set the input mode of recording deck
Another Video Recorder
Advantages of S-VHS video recorders
Start the source player
Dubbing
70 EN
From DVD to S-VHS
Digital Audio Dubbing
Place a disc and load a MD
Prepare the audio device for dubbing
For the digital audio device
72 EN
TV Multi-Brand Remote Control
Set the TV brand code
Operate the TV
Audio/video input connectors
Output connectors
Outdoor unit Aerial Satellite cable Video output
Make connections
Mode Set
Access the Function Set screen
For each mode setting, see pages 77 to
76 EN
Modes
Programme while timer-recording in SP mode
78 EN
Ntscpal To playback a Ntsc tape on PAL TV
For Example
Indicator lights up on the front display panel
S-VHS recording mode is selected
VHS indicator lights up on the front display panel
Mode setting
For each mode setting, see pages 81 to
80 EN
Language Picture Audio Others Back to the beginning
Press rt to move 0 to RESUME, then press OK
Picture Settings
Audio Settings
Others Settings
82 EN
Access the Auto Channel Set screen
Tuner Set
Auto Channel Set
84 EN
Perform Auto Channel Set
Stations your unit located
Appear on a channel list screen
Manual Channel Set
86 EN
Delete a Channel
Swap Channel Position
Access the Clock Set screen
Clock Set
Set the date and time
Start the clock operation
Information on Multi-System Compatibility
88 EN
VHS deck only Off-Air Recording
Tape-To-Tape Editing
Recorded tape Playback equipment
Recording circuit
On the remote control
90 EN
On the unit
DVD indicator lights up
Press DVD so that the DVD indicator
92 EN
Timer recording won’t work
Re-perform the clock and/or timer
Timer recording Recorded in its entirety. Next time make
Timer mode is disengaged
94 EN
Front display panel
Playback
96 EN
Express Timer Programming File/group selection
Mode Set S-VHS deck
Repeat Playback About Discs
Chapter Search
98 EN
Memo
HR-XVS20AA