ThinkCentre Edge Hardware Maintenance Manual
Page
ThinkCentre Edge Hardware Maintenance Manual
Second Edition September Copyright Lenovo
Contents
Appendix A. Notices 155
About this manual
Important Safety Information
ThinkCentre Edge Hardware Maintenance Manual
Safety information
General safety
Electrical safety
ThinkCentre Edge Hardware Maintenance Manual
Handling electrostatic discharge-sensitive devices
Safety inspection guide
Grounding requirements
Safety notices multi-lingual translations
To Connect To Disconnect
≥18 kg 37 lbs ≥32 kg 70.5 lbs ≥55 kg 121.2 lbs
Safety information
Perigo
Para Conectar Para Desconectar
Cuidado
Perigo
Safety information
ThinkCentre Edge Hardware Maintenance Manual
Safety information
ThinkCentre Edge Hardware Maintenance Manual
Connexion Déconnexion
Vorsicht
Achtung
Arbeitsschutzrichtlinien beim Anheben der Maschine beachten
Safety information
Pericolo
Per collegarsi Per scollegarsi
Attenzione
Prestare attenzione nel sollevare lapparecchiatura
Safety information
Peligro
No debe
Adopte procedimientos seguros al levantar el equipo
Lenovo ThinkVantage Toolbox
General information
Lenovo ThinkVantage Tools
Lenovo Welcome
Environment
Specifications
Dimensions
Weight
General Checkout
Problem determination tips
ThinkCentre Edge Hardware Maintenance Manual
Troubleshooting and diagnostics
Basic troubleshooting
Symptom Action
Troubleshooting procedure
Troubleshooting
Audio problems
No audio in Windows
CD problems
Sound comes from one external speaker only
No audio in DOS applications or games
CD or DVD does not work
DVD problems
Playback is very slow or choppy
Black screen instead of DVD video
DVD movie will not play
No audio or intermittent audio while playing DVD movie
Intermittent problems
Keyboard, mouse, or pointing device problems
All or some keys on the keyboard do not work
Fingerprint reader does not work
Wireless keyboard does not work
Mouse or pointing device does not work
Pointer on the screen does not move smoothly with the mouse
Monitor problems
Wrong characters appear on the screen
Image appears to be flickering
Networking problems
Ethernet problems
Image is discolored
Click Start Control Panel Click Hardware and Sound
Wireless LAN problem
Wireless WAN problem
Bluetooth problems
Option problems
An option that was just installed does not work
An option that previously worked does not work now
Insufficient free hard disk drive space
Performance and lockup problems
Printer problems
Serial port problems
Excessive number of fragmented files
Software does not work as expected
Software problems
Diagnostics
USB problems
PC-Doctor for DOS
Creating a diagnostic disc
Running the diagnostic program from a diagnostic disc
Navigating through the diagnostics programs
Function Code
Viewing the test log
Using passwords
Using the Setup Utility program
Starting the Setup Utility program
Viewing and changing settings
Enabling or disabling a device
Power-On Password
Administrator Password
Setting, changing, and deleting a password
Selecting or changing the startup device sequence
Exiting the Setup Utility program
Selecting a startup device
Selecting a temporary startup device
ThinkCentre Edge Hardware Maintenance Manual
Error FRU/Action
Symptom-to-FRU Index
Hard disk drive boot error
Power Supply Problems
Diagnostic error codes
Diagnostic Error Code FRU/Action
XXX Bios Timeout
001-01X-XXX System Error
001-00X-XXX System Error
XXX 001-255-XXX 001-256-XXX
XXX 001-264-XXX System IRQ error
XXX 001-287-XXX 001-288-XXX System Timer
005-00X-XXX Video error
XXX 005-011-XXX 005-012-XXX
Diagnostic Error Code FRU/Action
011-03X-XXX 011-04X-XXX Serial port failure
XXX 011-014-XXX Serial port Control
014-03X-XXX 014-04X-XXX Parallel port failure
XXX 014-014-XXX Parallel port Control
014-2XX-XXX 014-3XX-XXX Parallel port failure
Diagnostic Error Code FRU/Action
025-00X-XXX 025-01X-XXX IDE interface failure
030-00X-XXX 030-01X-XXX Scsi interface failure
030-03X-XXX 030-04X-XXX Scsi interface error
Diagnostic Error Code FRU/Action
XXXAudio port test halt, error threshold exceeded
Diagnostic Error Code FRU/Action
Diagnostic Error Code FRU/Action
XXXVoltage Sensors test failed, cause unknown
XXX-XXX Mouse error
Beep Symptom FRU/Action
Beep symptoms
Post error codes
XXX-XXX Modem error
Display/Monitor
Miscellaneous error conditions
Error code Post Error Message Description/Action
Message/Symptom FRU/Action
Check power supply and signal cable connections
Undetermined problems
First device network
Second device hard disk
Replacing FRUs
Front connector, control, and indicator locations
Rear connector locations
Locating connectors on the rear of your computer
Following illustration shows the locations of the FRUs
FRU locations
Replacing FRUs
System board part and connector locations
System board parts and connectors
Removing the system stand hinge cover
Removing and reinstalling the system stand hinge cover
Reinstalling the system stand hinge cover
Removing and reinstalling the system stand
Removing the system stand
Removing the rubber on the foot stand
Removing and reinstalling the foot stands
Reinstall the rubber on the foot stand
Reinstall the rubber on the foot stand
Removing the computer cover
Removing the computer cover
Removing the screw that secures the hard disk drive
Replacing the hard disk drive
Removing the hard disk drive
Removing the optical drive
Replacing the optical drive
Removing the Vesa mount bracket
Installing the optical drive
Removing the Vesa mount bracket
Replacing the rear I/O assembly
Removing the two screws that secure the rear I/O assembly
Removing the power cord connector
Removing and reinstalling the system board shield
Removing the system board shield
Replacing the power supply
Replacing the microprocessor fan
Removing the three screws that secure the power supply
Removing the microprocessor fan
Replacing the heat sink assembly
ThinkCentre Edge Hardware Maintenance Manual
Replacing the microprocessor
Opening the retainer to access the microprocessor
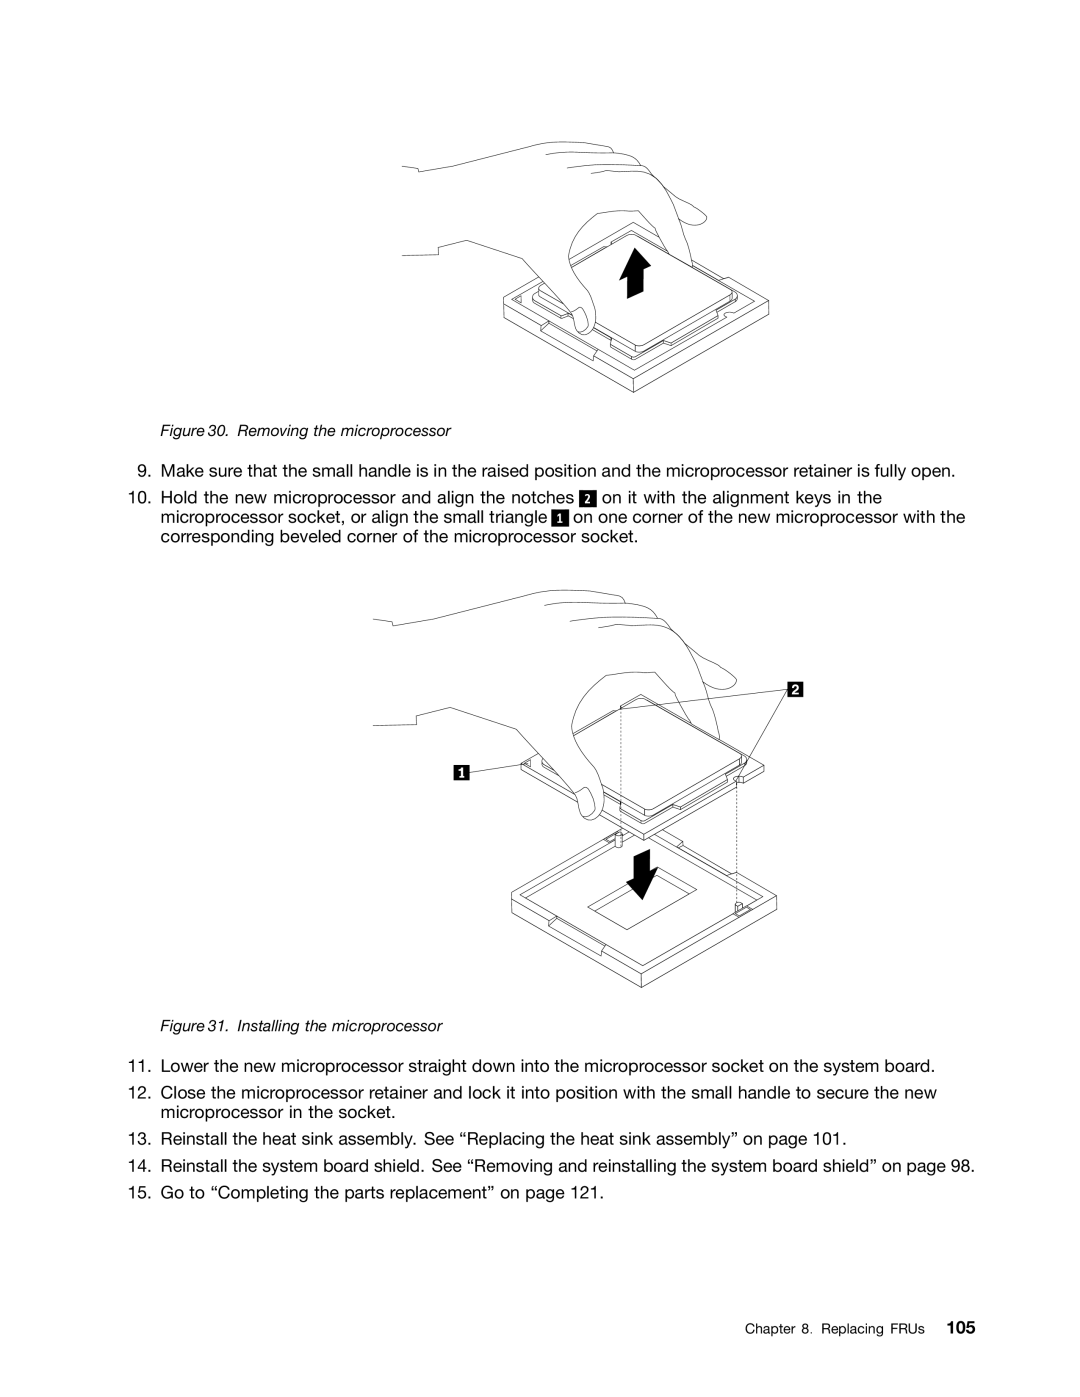
Removing the microprocessor
Removing the card reader
Replacing the card reader
Opening the system board shield window
Opening the system board shield window
Removing the battery
Replacing the battery
Replacing the inverter
Installing a new battery
Installing or replacing a memory module
Removing a memory module
Removing the internal speakers
Replacing the internal speakers
Removing the integrated camera
Replacing the integrated camera
Replacing the system board
Replacing FRUs
Replacing the LCD panel
Removing the foot stands
Removing the four screws that secure the LCD panel
Reconnect the LCD panel cable to the system board. See
Replacing the WI-FI card
Removing the WI-FI card
Completing the parts replacement
Installing the computer cover
Overall MT 5068, 7558,
FRU lists
FRU # CRU
Item # FRUs
MT 7558 CTO
G5B H2B H7T H8A H1B G6Q G9Q
B6G B7G B8G
H6V H3P H3G
FRUs listed in the following tables are not illustrated
Mechanical FRUs
FRU, cables MT 5068 all models
Keyboard Lenovo Slim New F5 USB
Adapters and miscellaneous FRUs
Keyboard and Mouse
Adapters and miscellaneous FRUs
MT 7558 CTO H3P
Slim New F5 USB--French Canadian MT 5068 CTO
G2D G2Y
54Y9323
F2Q F3Q F4Q F5Q H2B H1B G6Q G7Q G8Q G9Q
Keyboard Wireless Edge keyboard and mouse
Wireless Edge --A/F MT 5068 CTO
Wireless Edge --French Canadian MT 5068 CTO
Wireless Edge --Korean MT 5068 CTO
H8A H5V H6V
Keyboard Preferred professional fullsize USB
Preferred Pro Fullsize USB--B/F MT 5068 CTO
Preferred Pro Fullsize USB--French Canadian MT 5068 CTO
Preferred Pro Fullsize USB--LA Spanish MT 5068 CTO
Preferred Pro Fullsize USB--Swedish/Finnish MT 5068 CTO
Power Cords
Power Cords --primary
Mice
G3G G4G G5B H2B H8A H4G H1B H3G
C8A C9A E4A E5G E6G E7G E8G E9M F1M F2M F3M F4M F5A
Power Cords --secondary
MT 7567 CTO Line Cord Japan MT 5068 CTO
C7A C8A C9A E4A E5G E6G E7G E8G E9M F1M F2M F3M F4M F5A
ThinkCentre Edge Hardware Maintenance Manual
Additional Service Information
Recovering from a POST/BIOS update failure
Updating flashing the Bios from your operating system
Power management
Automatic configuration and power interface Acpi Bios
Automatic Power-On features
ThinkCentre Edge Hardware Maintenance Manual
Appendix A. Notices
European conformance CE mark Trademarks
Television output notice
CRU
Index
Removing the system stand hinge cover
Page
0B03379