<RECORD SETTINGS> (continued)
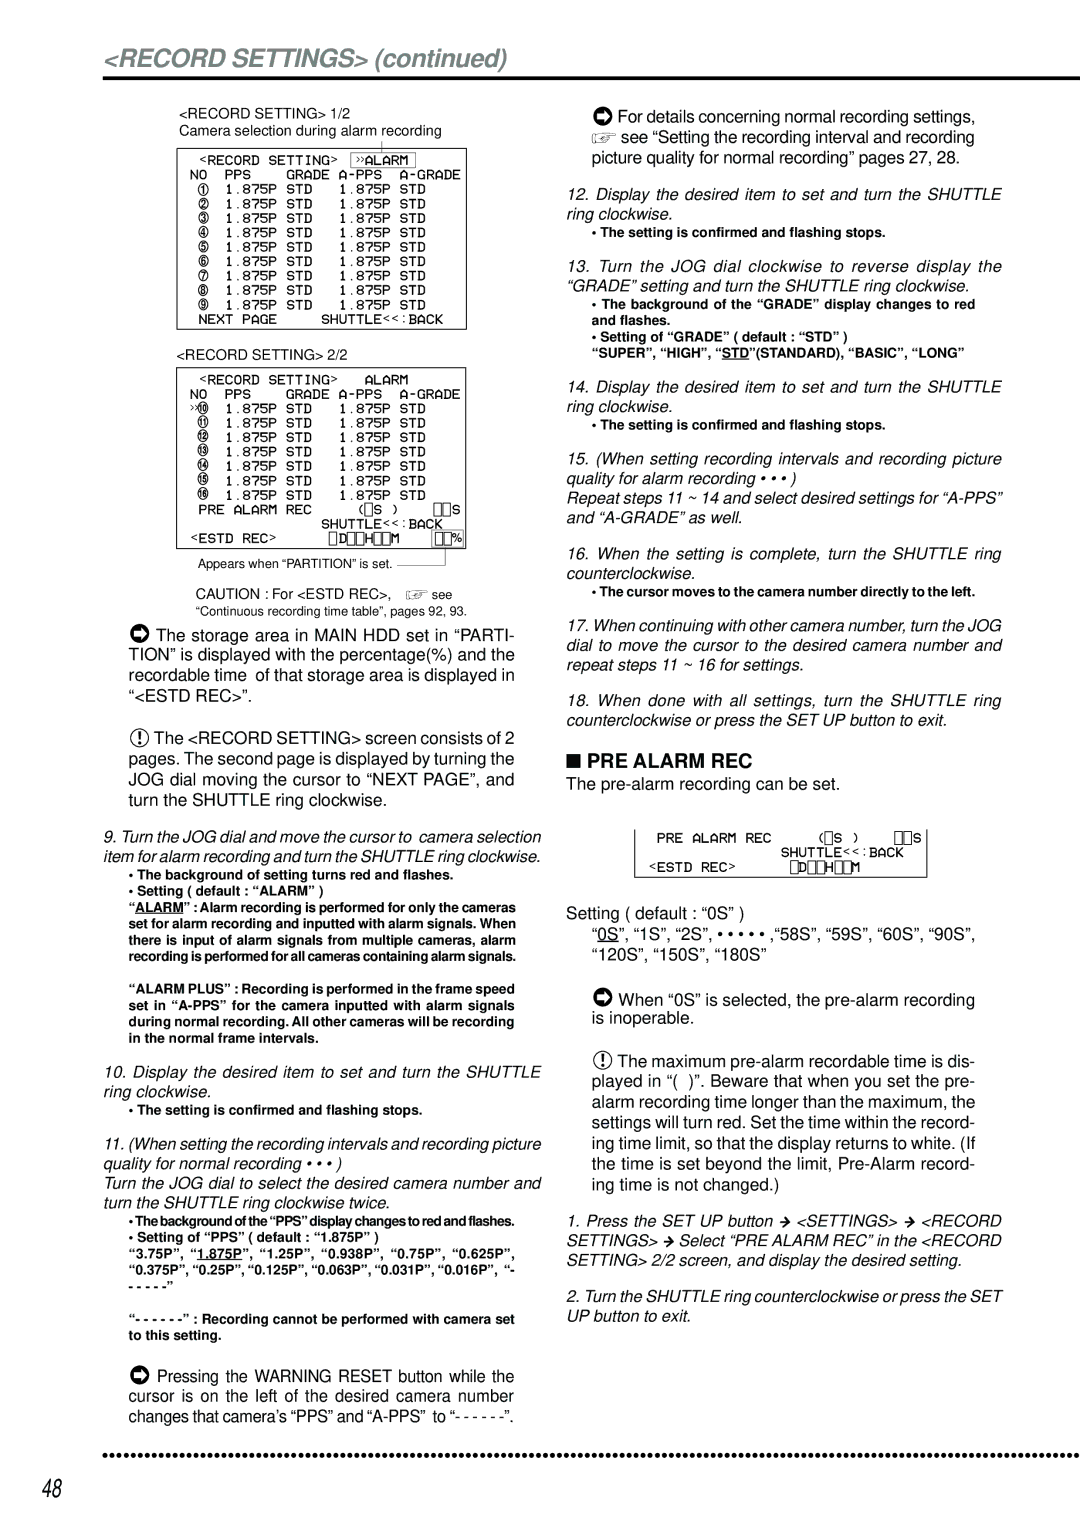
<RECORD SETTING> 1/2
Camera selection during alarm recording
|
|
|
|
|
|
|
|
|
<RECORD SETTING> |
| >>ALARM |
| |||||
NO | PPS | GRADE | A- | GRADE | ||||
1 | 1.875P | STD | 1.875P | STD | ||||
2 | 1.875P | STD | 1.875P | STD | ||||
3 | 1.875P | STD | 1.875P | STD | ||||
4 | 1.875P | STD | 1.875P | STD | ||||
5 | 1.875P | STD | 1.875P | STD | ||||
6 | 1.875P | STD | 1.875P | STD | ||||
7 | 1.875P | STD | 1.875P | STD | ||||
8 | 1.875P | STD | 1.875P | STD | ||||
9 | 1.875P | STD | 1.875P | STD | ||||
NEXT PAGE | SHUTTLE<<:BACK | |||||||
<RECORD SETTING> 2/2
<RECORD SETTING> | ALARM | ||||
NO | PPS | GRADE | |||
>>10 | 1.875P | STD | 1.875P | STD | |
11 | 1.875P | STD | 1.875P | STD | |
12 | 1.875P | STD | 1.875P | STD | |
13 | 1.875P | STD | 1.875P | STD | |
14 | 1.875P | STD | 1.875P | STD | |
15 | 1.875P | STD | 1.875P | STD | |
16 | 1.875P | STD | 1.875P | STD | |
PRE ALARM REC | ( S ) |
| S | ||
|
| SHUTTLE<<:BACK | |||
<ESTD REC> |
| D H M |
| % | |
Appears when “PARTITION” is set.
CAUTION : For <ESTD REC>, ![]() see
see
“Continuous recording time table”, pages 92, 93.
![]() The storage area in MAIN HDD set in “PARTI- TION” is displayed with the percentage(%) and the recordable time of that storage area is displayed in “<ESTD REC>”.
The storage area in MAIN HDD set in “PARTI- TION” is displayed with the percentage(%) and the recordable time of that storage area is displayed in “<ESTD REC>”.
![]() The <RECORD SETTING> screen consists of 2 pages. The second page is displayed by turning the JOG dial moving the cursor to “NEXT PAGE”, and turn the SHUTTLE ring clockwise.
The <RECORD SETTING> screen consists of 2 pages. The second page is displayed by turning the JOG dial moving the cursor to “NEXT PAGE”, and turn the SHUTTLE ring clockwise.
9.Turn the JOG dial and move the cursor to camera selection item for alarm recording and turn the SHUTTLE ring clockwise.
•The background of setting turns red and flashes.
•Setting ( default : “ALARM” )
“ALARM” : Alarm recording is performed for only the cameras set for alarm recording and inputted with alarm signals. When there is input of alarm signals from multiple cameras, alarm recording is performed for all cameras containing alarm signals.
“ALARM PLUS” : Recording is performed in the frame speed set in
10.Display the desired item to set and turn the SHUTTLE ring clockwise.
•The setting is confirmed and flashing stops.
11.(When setting the recording intervals and recording picture quality for normal recording • • • )
Turn the JOG dial to select the desired camera number and turn the SHUTTLE ring clockwise twice.
•The background of the “PPS” display changes to red and flashes.
•Setting of “PPS” ( default : “1.875P” )
“3.75P”, “1.875P”, “1.25P”, “0.938P”, “0.75P”, “0.625P”, “0.375P”, “0.25P”, “0.125P”, “0.063P”, “0.031P”, “0.016P”, “-
- - - -
“- - - - -
![]() Pressing the WARNING RESET button while the cursor is on the left of the desired camera number changes that camera’s “PPS” and
Pressing the WARNING RESET button while the cursor is on the left of the desired camera number changes that camera’s “PPS” and
![]() For details concerning normal recording settings,
For details concerning normal recording settings, ![]() see “Setting the recording interval and recording
see “Setting the recording interval and recording
picture quality for normal recording” pages 27, 28.
12.Display the desired item to set and turn the SHUTTLE ring clockwise.
•The setting is confirmed and flashing stops.
13.Turn the JOG dial clockwise to reverse display the “GRADE” setting and turn the SHUTTLE ring clockwise.
•The background of the “GRADE” display changes to red and flashes.
•Setting of “GRADE” ( default : “STD” )
“SUPER”, “HIGH”, “STD”(STANDARD), “BASIC”, “LONG”
14.Display the desired item to set and turn the SHUTTLE ring clockwise.
•The setting is confirmed and flashing stops.
15.(When setting recording intervals and recording picture quality for alarm recording • • • )
Repeat steps 11 ~ 14 and select desired settings for
16.When the setting is complete, turn the SHUTTLE ring counterclockwise.
•The cursor moves to the camera number directly to the left.
17.When continuing with other camera number, turn the JOG dial to move the cursor to the desired camera number and repeat steps 11 ~ 16 for settings.
18.When done with all settings, turn the SHUTTLE ring counterclockwise or press the SET UP button to exit.
■PRE ALARM REC
The pre-alarm recording can be set.
16 1.563P | STD | 1.563P STD |
|
PRE ALARM REC | ( S ) | S | |
<ESTD REC> |
| SHUTTLE<<:BACK |
|
| D H M |
| |
Setting ( default : “0S” )
“0S”, “1S”, “2S”, • • • • • ,“58S”, “59S”, “60S”, “90S”, “120S”, “150S”, “180S”
![]() When “0S” is selected, the
When “0S” is selected, the
![]() The maximum
The maximum
1.Press the SET UP button } <SETTINGS> } <RECORD SETTINGS> } Select “PRE ALARM REC” in the <RECORD SETTING> 2/2 screen, and display the desired setting.
2.Turn the SHUTTLE ring counterclockwise or press the SET UP button to exit.
••••••••••••••••••••••••••••••••••••••••••••••••••••••••••••••••••••••••••••••••••••••••••••••••••••••••••••••••••••••••••••••• | ••••••••••••• |
48