Manuals
/
NETGEAR
/
Computer Equipment
/
Network Router
NETGEAR
PR2000
user manual
Click the Create Network Folder button
Models:
PR2000
1
74
145
145
Download
145 pages
2.94 Kb
71
72
73
74
75
76
77
78
Page 74
Image 74
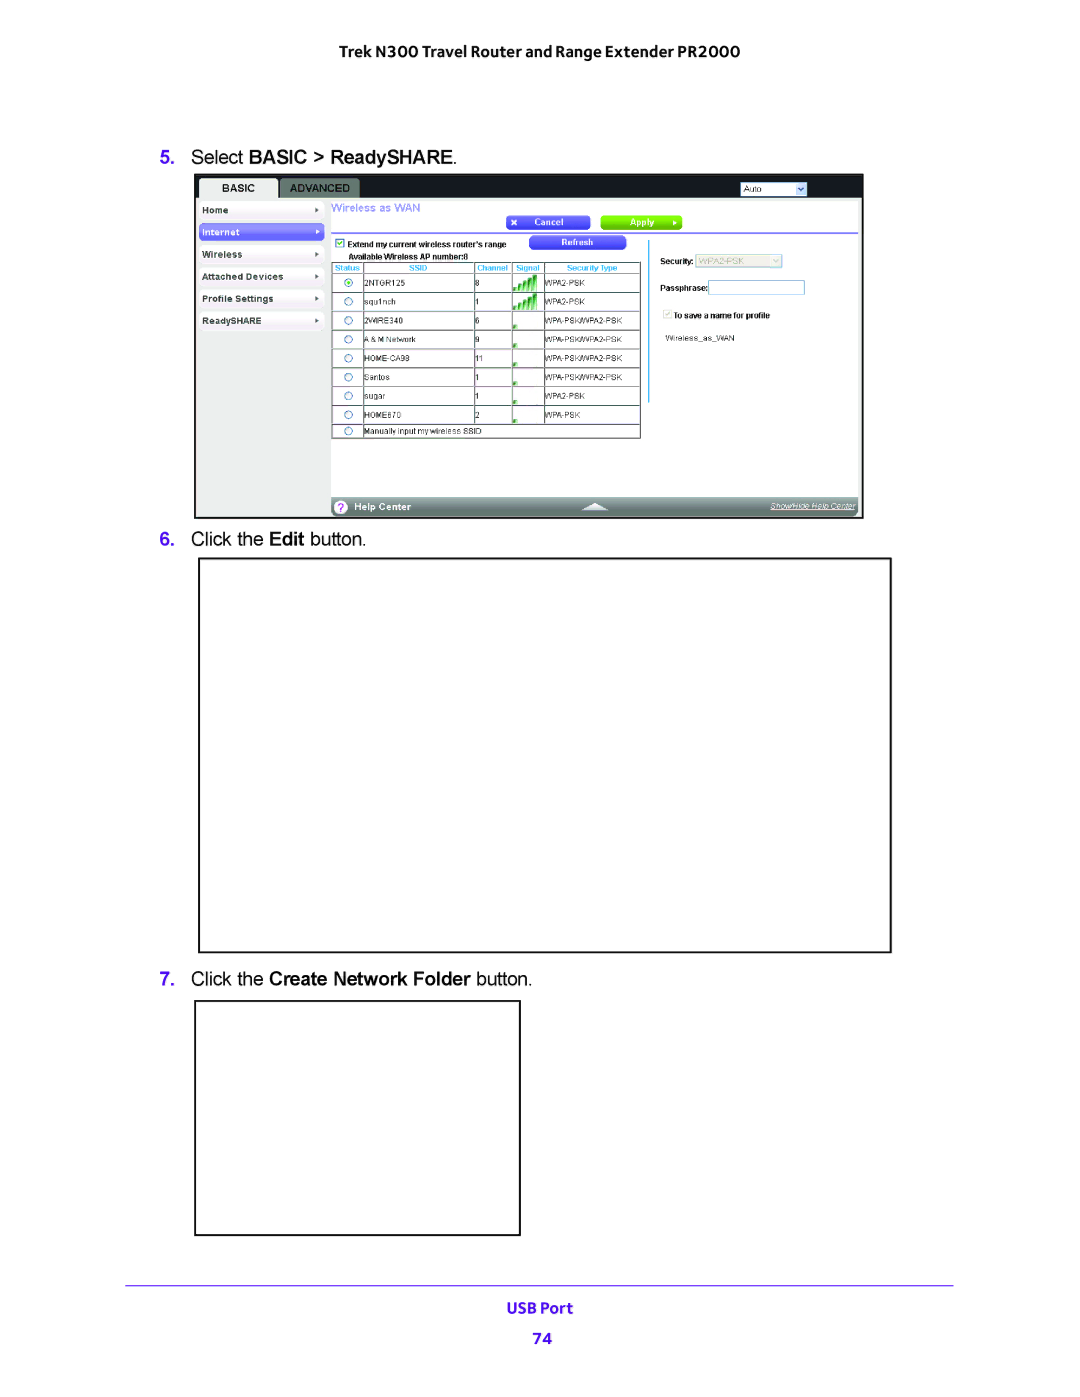
Trek N300 Travel Router and Range Extender PR2000
5.
Select
BASIC > ReadySHARE
.
6.
Click the
Edit
button.
7.
Click the
Create Network Folder
button.
USB Port
74
Page 73
Page 75
Page 74
Image 74
Page 73
Page 75
Contents
Netgear Trek N300 Travel Router and Range Extender
Trademarks
Support
Compliance
Contents
Security
Appendix a Supplemental Information
Hardware Setup
Get to know your Trek
Unpack Your Trek
Position Your Trek
To prepare your Trek for installation
Prepare Your Trek
Internet Mode Switch
Get to Know Your Netgear Trek
Indicator LEDs
Netgear
Connection Ports and Reset Button
USB
Power Inputs
Netgear
Antenna Orientation
Product Label
WiFi Connection at a Public Hotspot Setup
Different Ways You Can Connect to the Internet
To connect to a public WiFi hotspot
WiFi hotspot connection
WiFi Range Extender Setup
To use the Trek as a WiFi range extender
DON’T
Internet Connection at Home Setup
To connect to the Internet with an Ethernet cable
Hardware Setup
WiFi Bridge Setup
To use the Trek as a WiFi bridge
Hardware Setup
Get Started with Netgear genie
Connect to the Trek
Wireless Devices and Security Settings
Trek Setup Preparation
Types of Logins and Access
Use Standard TCP/IP Properties for Dhcp
Netgear genie Setup
To use Netgear genie to set up your Trek
Use Netgear genie After Installation
To view or change the settings for the Trek
Upgrade the Trek Firmware
Change the Password
Password Recovery
Select Advanced Administration Set Password
To set up password recovery
To recover your password
Manual Method
Add Wireless Devices or Computers to Your Trek
To connect WiFi devices manually to your Trek
Click Advanced WPS Wizard
Wi-Fi Protected Setup Method
To connect WiFi devices to your Trek with WPS
Push Button recommended. Click the button
Netgear genie App and Mobile genie App
Genie mobile app home screen
Genie Basic Settings
Your Internet connection and network
To view or change the Internet setup
Internet Setup
Wired WAN Connection Router Mode
Internet Service Provider. Select PPPoE, L2TP, or Pptp
Select Basic Internet
Wired WAN Connection Wireless AP Mode
To view or change the Internet setup
Genie Basic Settings
Wireless WAN Connection WiFi Mode
Select the To save a name for profile check box
Basic Wireless Settings
To view or change basic wireless settings
Select Basic Wireless
Change the Wireless Security Option
To change the WPA settings
Netgear recommends that you do not disable security
Select Basic Attached Devices
Attached Devices
To view the attached devices
Profile Settings
To view or delete the saved profile settings
Select Basic Profile Settings
Specify custom settings
Genie Advanced Home
Setup Wizard
To launch the Setup Wizard
Click the Take me to the Internet button
Select Advanced Setup WAN Setup
WAN Setup
To change the WAN settings
Default DMZ Server
To set up a default DMZ server
Change the MTU Size
Common MTU sizes
LAN Setup
To change the MTU size
To change the LAN settings
Select Advanced Setup LAN Setup
Use the Trek as a Dhcp Server
To disable the Dhcp server feature
Set Up Address Reservation
To reserve an IP address
To edit or delete a reserved address entry
Quality of Service Setup
Wi-Fi Multimedia Quality of Service for Wireless Traffic
Quality of Service Priority Rules and Internet Access
To set up QoS
Scroll down
Genie Advanced Home
Genie Advanced Home
Genie Advanced Home
USB Port
Enhance your local network
Enhance Your Local Network
To connect a USB storage device
Set Up Network Storage
Connect or Safely Remove a USB Drive
To remove a USB disk drive safely
View or Configure a USB Drive
To view basic information about the USB storage device
Select Basic ReadySHARE
Configure the USB Storage Device and Access Settings
To view or change the USB storage advanced settings
Select Basic ReadySHARE
Configure the Available Network Folders
To view network folders
To add a network folder
Click the Create Network Folder button
To edit a network folder
To set up approved USB devices
Specify Approved USB Devices
Select the Allow only approved devices check box
Access and Share Your Network Storage
Common Uses of Network Sharing
Share Photos and Multimedia
Access Your USB Storage Device Locally
To map the USB device to a local Windows network drive
To access the USB drive with FTP from a remote computer
Access Your USB Storage Device Remotely
To access the USB drive from a remote computer
Set Up a Network Printer
To set up ReadySHARE Printer
USB Port
USB Port
USB Port
USB Port
Power or Recharge a USB Device
Keep unwanted content out of your
Security
Port Filtering to Block Services
To block services
Select Advanced Security Block Services
Defined
Select Advanced Security Schedule
Schedule Blocking
To schedule blocking
To set up email notifications
Security Event Email Notifications
Security
Administration
Manage your network
To view Trek status and usage information
View Trek Status
Router Information Pane
To display the Router Information pane
To display the Internet Port pane
Internet Port Pane
LAN Port
Statistics
To view the traffic statistics
Connection Status
To view and manage the connection status
Administration
Wireless Settings Pane
To display the Wireless Settings pane
Administration 101
To view and manage the logs
Specify Log Settings
Select Advanced Administration Logs
To specify log settings
Restore Configuration Settings
Manage the Configuration File
Back Up Settings
To erase the configuration settings
Erase the Current Configuration Settings
Do not interrupt the reboot process
Update the Trek Firmware
To check for new firmware and update your Trek
Select Advanced Administration Firmware Update
Advanced Settings
Fine-tune your network
To turn the wireless radio on or off
Advanced Wireless Settings
Control the Wireless Radio
Select Advanced Advanced Setup Wireless Settings
Set Up a Wireless Schedule
To configure and enable the wireless schedule
View or Change WPS Settings
To specify WPS settings
Advanced Settings 112
Set Up a Wireless Access List by MAC Address
To restrict access based on MAC addresses
Select the Turn Access Control On check box
To set up Dynamic DNS
Dynamic DNS
Static Routes
Select Advanced Advanced Setup Dynamic DNS
Select the Use a Dynamic DNS Service check box
To set up a static route
Select Advanced Advanced Setup Static Routes
To edit or delete a static route
To set up remote management
Remote Management
Advanced Settings 120
To turn on Universal Plug and Play
Select Advanced Advanced Setup UPnP
Universal Plug and Play
Traffic Meter
To monitor Internet traffic
Click Advanced Advanced Setup Traffic Meter
Select Advanced Advanced Setup Traffic Meter
Advanced Settings 125
Troubleshooting
Diagnose and solve problems
Quick Tips
Troubleshoot with the LEDs
Internet Port LED is Off
Power LED Is Off
LEDs Never Turn Off
WiFi LED is Off
Cannot Log In to the Trek
To check the WAN IP address
Cannot Access the Internet
Select Administration Router Status
Troubleshoot PPPoE
To troubleshoot a PPPoE connection
Troubleshoot Internet Browsing
To display the current date and time
Changes Not Saved
Incorrect Date or Time
Wireless Connectivity
Restore the Factory Settings and Password
Troubleshoot Your Network Using the Ping Utility
To ping the Trek from a running Windows computer
Test the LAN Path to Your Trek
Test the Path from Your Computer to a Remote Device
Troubleshooting 137
Supplemental Information
View the Trek specs
Factory Settings
Factory default settings
Technical Specifications
PR2000 Trek specifications
Supplemental Information 141
Index
142
143
144
145
Top
Page
Image
Contents