ONLINE INSTRUCTIONS
recommend that you test the record function and volume before use
DS-2
DIGITAL VOICE RECORDER
3 About Recording
Table of Contents
2 Menu Setting
1 Getting Started
8 DSS Player Expanded
6 Preparation Before Using DSS Player
9 Setting of the USB Class
7 Managing Files on Your PC
Safe and Proper Usage
General Precautions
Batteries
Main Features
1 Getting Started
Recording time
Plus
Main Features
Identification of Parts
Record/Play indicator lamp
HOLD switch
Battery cover
9 Total number of recorded files in the folder 0 Erase lock indicator
1 Battery indicator 2 VCVA Variable Control Voice Actuator indicator
3 Timer recording display 4 Alarm indicator
7 Record mode indicator 8 Current file number
Lightly press down on the arrow and slide the
1 battery cover open
3 Close the battery cover completely
Inserting Batteries
Release the HOLD switch of the recorder
Power Supply
Turning Off the Power
Turning On the Power
Hold
Setting the HOLD switch to the HOLD position
Remember to reset the HOLD switch when using the recorder
Hold
3 Set the year
Setting Time/Date TIME&DATE
1 Set the hour
2 Set the minute
5 Set the date
Changing the Time/Date
6Press the STOP button to close the menu
4 Set the month
4Press the 3 or 2 button to change the setting
Menu Setting Method
Main Menu Setting
2 Menu Setting
Press and hold the MENU/SET
Sub Menu Setting
6 Press the 3 or 2 button to change the setting
7 Press the MENU/SET button to complete the setup screen
Menu List
Main Menu
Menu List
P.14 P.59
Sub Menu
Menu List
P.16
recording
Recording
1 Press the FOLDER button to choose a folder
Press the REC button to start
Recording
Recording functions
Pause
Resume Recording
Press the MENU/SET button
Recording Modes REC MODE
4Press the MENU/SET button to complete the setup screen
1,2,4
“VCVA”
5 Press the MENU/SET button to complete the setup screen
1,3,5
Press the 3or 2button to choose
Adjust the start/stop actuation level
Using the Variable Control Voice Actuator VCVA
7 Press the REC button to start recording
5 Press the MENU/SET button to complete the setup screen
Microphone Sensitivity MIC SENSE
1,3,5
2,4 “MIC SENSE”
Recording from External Microphone or Other Devices
Recording with External Microphone
Recording the sound of other devices with this recorder
Recording the sound of this recorder with other devices
Recording from External
Microphone or Other Devices
Timer Recording TIMER REC
2,4 3,5
5Press the 3or 2button to choose “ON”
Start time setting
Setting end time
Press the MENU/SET button
Press the 3 or 2 button to
Timer Recording TIMER REC
Recording mode setting
complete the setup screen
12 Press the STOP button to close the main menu
Timer Recording TIMER REC
Connect the earphone to the EAR jack on the recorder
Listening While Audio is Recorded Recording Monitor
Press the FOLDER button to
4 Press the VOL + or VOL - button to select the proper sound volume
Playing
4 About Playback
Playing
Save Function of the Playback End Position
Fast Playback Slow Playback Cue CUE Review
How to Cancel
Operation
Playback functions
7 When playback was set to “OFF” previously in the menu setting P.44
Playing
Playing
Last File End
Playing
Playback through earphone
When the earphone is used, the recorder speaker will be switched-off
Playing
Press the FF or REW button while
Changing the Playback Speed PLAY SPEED
Changing during playback
1 Press the PLAY button during playback
2 choose “PLAY SPEED”
Changing from the menu
Changing the Playback Speed PLAY SPEED
Press the 3 or 2 button to
5 Press the MENU/SET button to complete the setup screen
Continuous Playback ALL PLAY
2,4 2 choose “ALL PLAY”
4 Press the 3 or 2 button to choose between “ON” and “OFF”
Press the REPEAT button
Repeat Playback
Choose the file for Repeat
button
4 Cancel the continuous playback function
“BACK SPACE”
5complete the setup screen
Auto Backspace Review BACK SPACE
1,3,5
Press and hold the MENU/SET
Skip Interval Setting SKIP SPACE
2,4 2 choose “SKIP SPACE”
4 Press the 3 or 2 button to set the skip interval
Skip Interval Setting SKIP SPACE
7 Press the FF or REW button while the file is being replayed
5 Press the MENU/SET button to complete the setup screen
level
Noise Cancel Function
1 button for 1 second or longer
while the file is playing
Press the FOLDER button to
Alarm Playback Function ALARM
the alarm sounds
4 Press the 3or 2button to choose “ALARM”
to accept the hour
8,10
Press the 3or 2button to set
8 the hour
Alarm Playback Function ALARM
To enable alarm sound only
Alarm Playback Function ALARM
Press the ERASE button
Erasing
Erasing One File at a Time
2 Press the FF or REW button to choose the file you want to erase
Press the MENU/SET button
Erasing
5 while “START” flashing
“ERASE DONE” is displayed when the file
3 Press the 3 button to choose the “START”
Erase All Files from a Folder
Press the ERASE button for
seconds or longer
The display changes to “ALL ERASE!”
4 while “START” flashing
Erasing
Press the MENU/SET button
3,5,7 4,6
Press the MENU/SET button to complete the setup screen
8 1
Locking Files LOCK
Clearing an Index Mark
Setting an Index Mark
Index Marks
Locating an Index Mark
Index Marks
Index marks cannot be set or cleared in a locked file P.55
5 Press the STOP button to close the sub menu
LCD Contrast Adjustment CONTRAST
4 Press the MENU/SET button to complete the setup screen
3 Press the 3 or 2 button to set the contrast level
“OFF”
Backlight BACKLIGHT
the “BACKLIGHT”
3 choose between “ON” and
4 Press the MENU/SET button to complete the setup screen
System Sounds BEEP
the “BEEP”
3 Press the 3 or 2 button to choose between “ON” and “OFF”
4 Press the MENU/SET button to accept the chosen folder
Assigning Folder Names FOLDER NAME
the “FOLDER NAME”
3 Press the 3 or 2 button to choose the folder you want to name
Recorder buttons that are used to input characters
Assigning Folder Names FOLDER NAME
6Use the two following methods to quickly find characters
Large caps
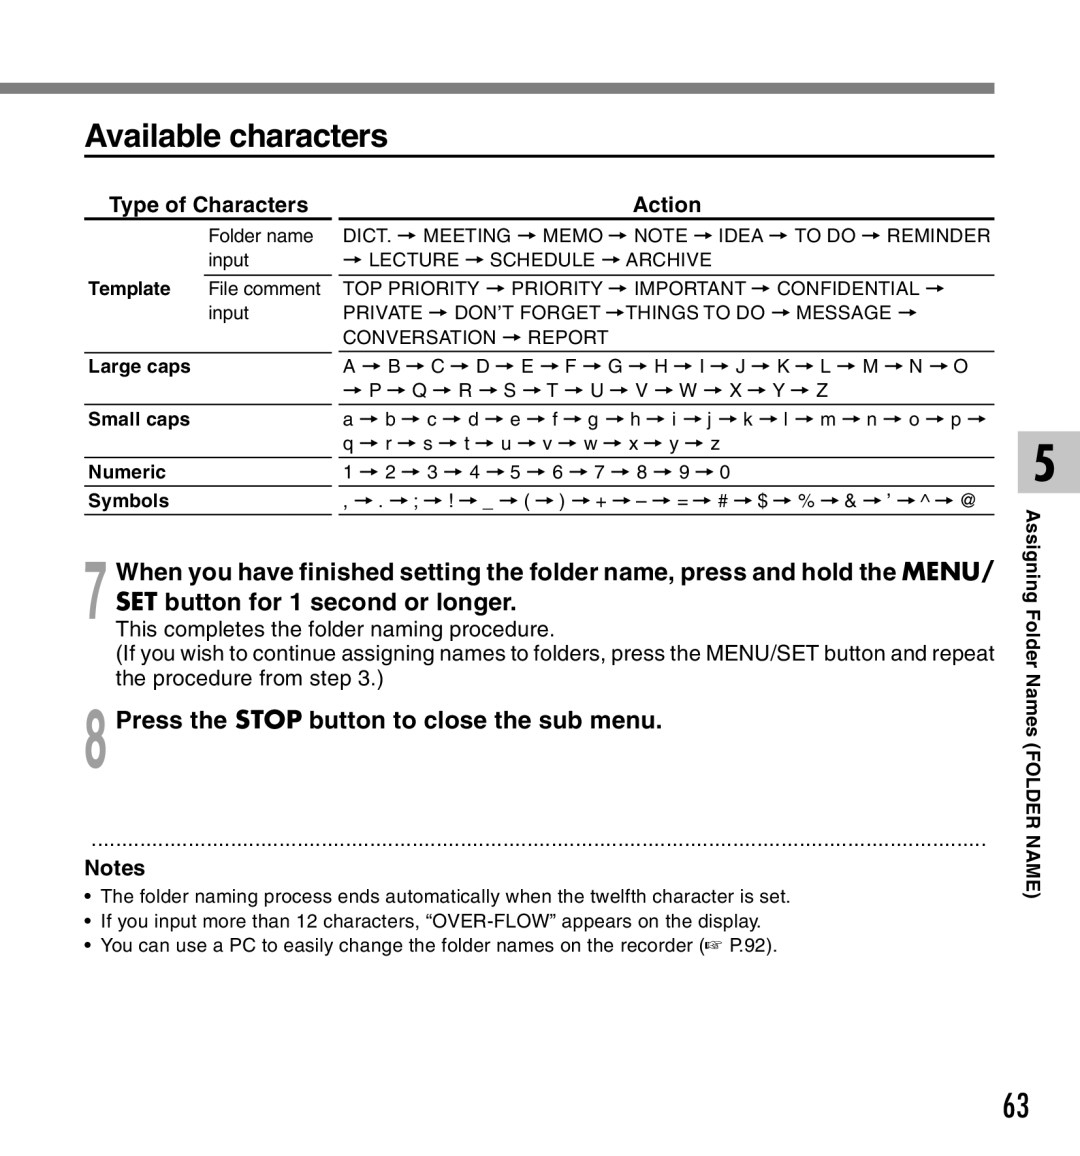
Available characters
Symbols
8 Press the STOP button to close the sub menu
Input the character
Assigning File Comments COMMENT
Press the 3 or 2 button in the
the “COMMENT”
4 Press the MENU/SET button to accept the chosen destination folder
Moving Files Across Folders
1 Choose the file you want to move and play it
3 Press the 3 or 2 button to choose a destination folder
While in stop or playback mode
LCD Display Information
Press the DISPLAY button
While in record mode
While recording in VCVA mode
LCD Display Information
4Press the 3or 2button to choose “FORMAT”
Formatting the Recorder FORMAT
1,3, 2,4
2Press the 3 or 2 button to choose “SUB MENU”
Press the MENU/SET button
Press the 3 button again to
choose “START”
again
Using DSS Player Software
Precautions on using the recorder connected to a PC
6 Preparation Before Using DSS Player
Basic Operating Environment of DSS Player
Operating Environment
1Insert DSS Player into the CD- ROM drive
Installing Software
3Enter “D\setup.exe” in the Open field and click OK
4 The installation Language Selection dialog box opens
6 Confirm your acceptance of the terms of the Licensing Agreement
Installing DSS Player
Installing the Device Driver
7 Select where to install DSS Player
1Insert DSS Player into the CD-ROM drive
Installing Software
4Click Continue when the DSS Player opening screen appears
7 Completing setup
5 Click Change/Remove
Uninstalling Software
1 Exit DSS Player 2 Select Control Panel from start menu
3 Click Add/Remove programs in the control panel window
4Delete the Help File
Uninstalling Software
1Exit DSS Player 2Delete the Preferences File
3Delete the Executable File
Once the Online Help screen appears, click
Using Online Help
Search by Contents
Search by Key word
Connecting to Your PC
Connecting to your PC using the USB cable
1 Release the HOLD switch
the lower-right corner
Disconnecting from Your PC
Click the
on the task bar
Connecting to Your PC
2 Connect the USB connection cable to the cradle
Connecting to your PC using the cradle
Remove the recorder from the cradle
Connecting to Your PC
Click the start button, select All
Running DSS Player
of the DSS Player Version
Start Windows
Running DSS Player
Macintosh
Running DSS Player
3 Device Manager Window
Window Names DSS Player
1 Play Control Bar
2 Dictation Folder Window
2Select the voice file
Download Voice Files from the Recorder
Download Selected Files
1Select the folder
4 Download complete
Play the voice file
Play a Voice File
Select the folder
Select the voice file
Select the folder
Upload Voice Files to the Recorder
Select the folder to upload
Upload the voice file
5Upload complete
Upload Voice Files to the Recorder
window
Send Voice Files with E-mail
Changing User ID
Enter the user ID in the Transfer User ID
Changing a folder name in the Device window
Changing a Folder Name
Editing File Comments
Changing a folder name in the Voice Folder window
Load templates
Editing a Template
Save edited content Read saved content Delete edited content
content
1From the Tools menu, select Change to audio device
Audio set up
USB Microphone/USB Speaker
Uses as a USB Speaker
Uses as a USB microphone
Windows 2000, Me
Windows XP
1Start the DSS Player
Plus Upgrade Function
Purchase and Upgrade
8 DSS Player Expanded Functions
Upgrading to DSS Player Plus
3 Select Upgrade to DSS Player Plus from the Help menu
Plus Using Voice Recognition Software
Voice Recognition in ViaVoice Audio set up
2 Change the recorder to AUDIO CLASS
6 Click the Next button
Using Voice Recognition Software
8Proceed with the AUDIO Setup according to the instruction on screen
7Select a sound card
4 Description of Wizard
Voice Recognition in Dragon NaturallySpeaking Training
1 Startup Dragon NaturallySpeaking
3 Creating a User
5Recording Training Text
7Adding a User
Using Voice Recognition Software
Select the voice file
Executing Voice Recognition
Start of voice recognition
Select the folder
Using Voice Recognition Software
When Dragon NaturallySpeaking is Selected
Noise Canceling Function
Notes on Recording For Voice Recognition
1Select the folder
Plus Joining Files
2Select the voice files
3Select Join from the Edit menu or press the button
4 Set the order of files
selected folder
Joining Files
2Select the voice files
3Select Split from the Edit menu or press the button
Plus Splitting Files
1Select the folder
Set the split position
5 Input File Names
6 Press the Split button
3Press the OK button
Plus Menu Setting of this Recorder
1Select Configure recorder menu from the Download menu
2Execute Menu Setting
3 choose “AUDIO CLASS”
Changing the USB Class USB CLASS
Press the 3 or 2 button in the
“USB CLASS”
10 Other Practical Use Methods
Using as External Memory of the Computer
Example Copying Data from PC to Recorder using Explorer or Finder
1Start Windows 2Connecting the recorder to your PC
Alarm Message List
Alarm Message List
BATTERY LOW
OVER-FLOW COMMENT CAN’T BE ENTERED MEMORY ERROR
ERROR
Alarm Message List
Alarm Message List
TIME SETTING
No playback tone heard Does not reverse skip in the set skip interval
Troubleshooting
Troubleshooting
Nothing appears on the display Won’t start Unable to record
Cannot find the recorded voice The playback speed does not change
Troubleshooting
Can not connect to the computer using the cradle
Troubleshooting
Ni-MH Rechargeable Battery BR401
Accessories optional
Noise-Cancellation monaural microphone ME12
Ni-MH Rechargeable Battery Charger BU-400 Europe only
Specifications
Technical Assistance and Support
Model Number
FOR HOME OR OFFICE USE
Tested To Comply With FCC Standards
Declaration of Conformity