Speaker system setup
POWER (or SYSTEM) |
|
|
|
|
|
|
|
| ||
button |
|
|
|
| SMART SCAN CONTROLLER jog dial | |||||
|
|
|
|
|
|
|
|
|
| MASTER VOLUME |
|
|
|
|
|
|
| SMART SCAN CONTROLLER |
| ||
|
|
|
|
|
|
|
|
| PRESET |
|
SYSTEM |
|
|
|
|
|
|
|
|
|
|
|
|
|
|
|
|
|
|
| TUNING |
|
|
|
|
|
|
|
|
|
| SURROUND |
|
|
|
|
|
|
|
| ENTER |
| PARAMETER |
|
|
|
|
|
|
|
|
|
|
| |
POWER |
|
|
|
|
|
|
|
|
|
|
ON OFF | SPEAKERS |
|
|
|
|
|
|
| ||
| MAIN | REMOTE |
|
|
|
|
|
|
| |
|
|
| REC OUT | MULTI SOURCE | MIDNIGHT |
|
| |||
|
|
| THEATER |
|
| |||||
|
|
|
|
|
|
| MIN | MAX | ||
| DIGITAL AUDIO | MULTI CH INPUT |
|
|
|
|
|
|
|
|
| SELECTOR |
|
| PTY/ TP | DISPLAY CHARACTER AUTO TUN SCAN | GROUP | MEMORY FM MUTE/MODE | TREBLE | ||
|
|
|
|
|
|
|
|
| BASS | |
|
|
|
|
|
|
|
|
| CLEAR |
|
PHONES | VIDEO 3/VIDEO CAM INPUT |
|
|
|
|
|
|
|
|
|
| DVD |
| AM | PHONOCD |
| |||||
|
| CAM | M D | MONITOR |
|
|
|
| ||
S VIDEO | VIDEO L AUDIO R(MONO) |
|
|
|
|
|
|
|
|
|
AUDIO VIDEO CONTROL RECEIVER
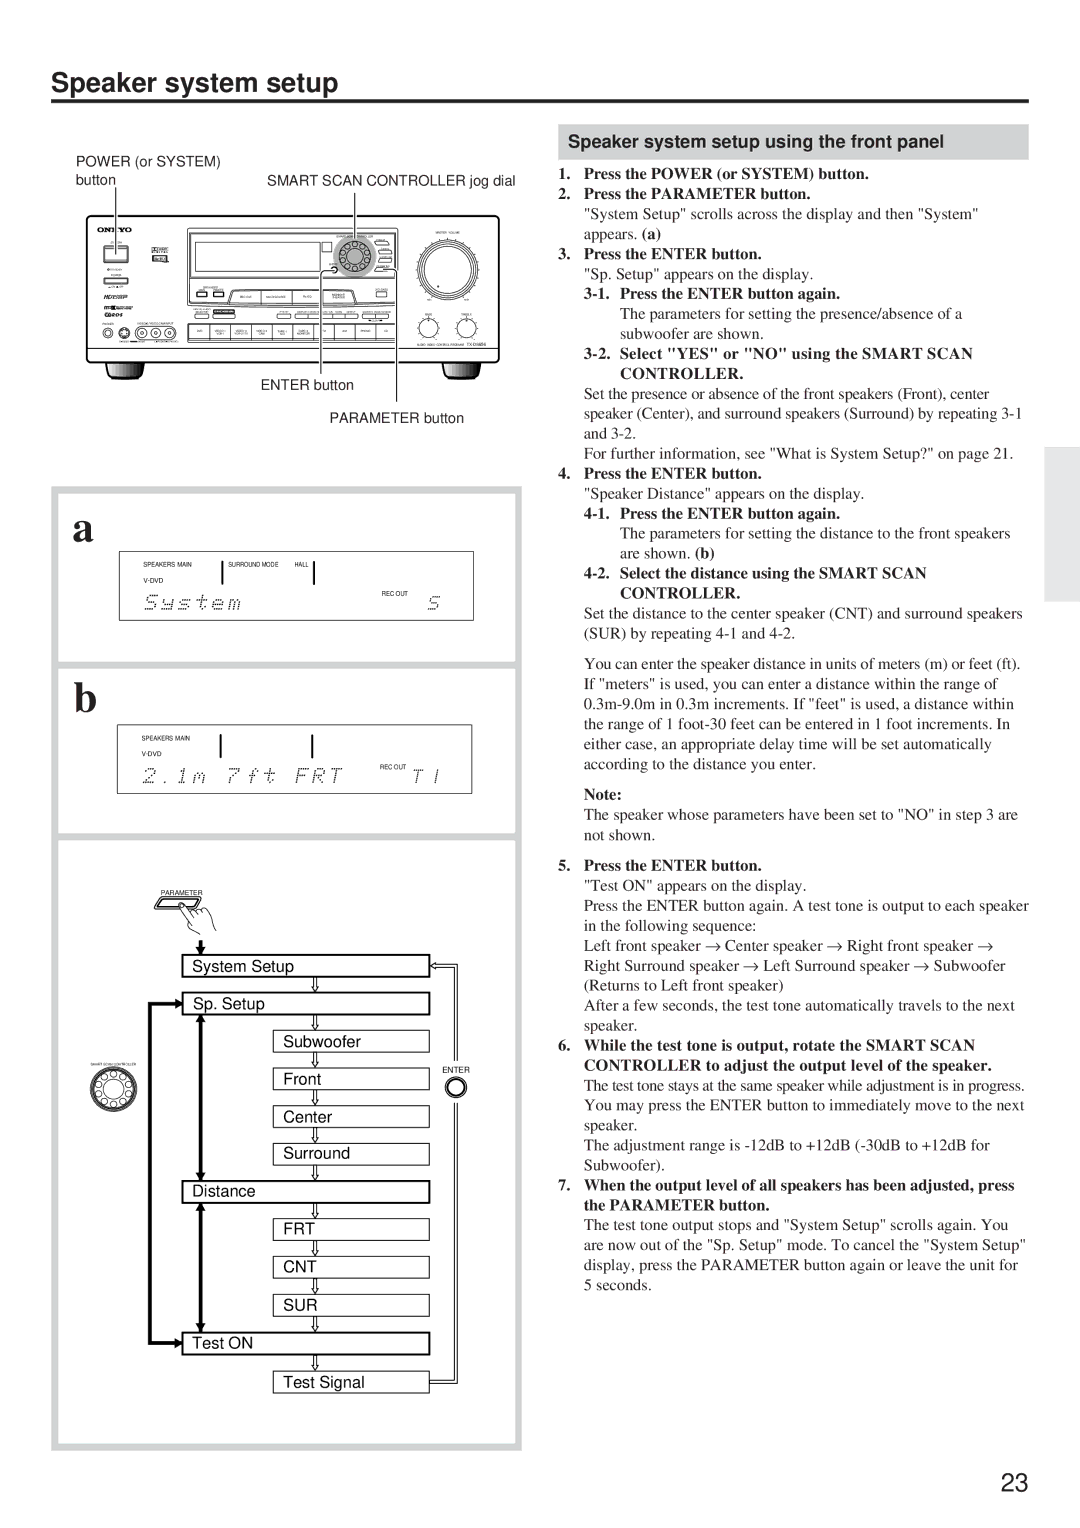
ENTER button
PARAMETER button
a |
|
|
|
SPEAKERS MAIN | SURROUND MODE | HALL | |
|
|
| |
|
|
| REC OUT |
b |
|
|
|
SPEAKERS MAIN | SURROUND MODE |
| |
|
| STUDIO | MIDNIGHT THEATER |
DIGITAL 2 |
| ||
|
|
| REC OUT |
PARAMETER |
| ||
|
| System Setup |
|
|
| Sp. Setup |
|
|
| Subwoofer | |
SMART SCAN CONTROLLER |
|
| ENTER |
|
|
| |
|
| Front | |
|
| Center | |
|
| Surround | |
|
| Distance |
|
|
| FRT | |
|
| CNT | |
|
| SUR | |
|
| Test ON |
|
|
| Test Signal | |
Speaker system setup using the front panel
1.Press the POWER (or SYSTEM) button.
2.Press the PARAMETER button.
"System Setup" scrolls across the display and then "System" appears. (a)
3.Press the ENTER button.
"Sp. Setup" appears on the display.
3-1. Press the ENTER button again.
The parameters for setting the presence/absence of a subwoofer are shown.
3-2. Select "YES" or "NO" using the SMART SCAN CONTROLLER.
Set the presence or absence of the front speakers (Front), center speaker (Center), and surround speakers (Surround) by repeating
For further information, see "What is System Setup?" on page 21.
4.Press the ENTER button.
"Speaker Distance" appears on the display.
The parameters for setting the distance to the front speakers are shown. (b)
4-2. Select the distance using the SMART SCAN CONTROLLER.
Set the distance to the center speaker (CNT) and surround speakers (SUR) by repeating
You can enter the speaker distance in units of meters (m) or feet (ft). If "meters" is used, you can enter a distance within the range of
Note:
The speaker whose parameters have been set to "NO" in step 3 are not shown.
5.Press the ENTER button.
"Test ON" appears on the display.
Press the ENTER button again. A test tone is output to each speaker
in the following sequence:
Left front speaker → Center speaker → Right front speaker → Right Surround speaker → Left Surround speaker → Subwoofer
(Returns to Left front speaker)
After a few seconds, the test tone automatically travels to the next speaker.
6.While the test tone is output, rotate the SMART SCAN CONTROLLER to adjust the output level of the speaker.
The test tone stays at the same speaker while adjustment is in progress. You may press the ENTER button to immediately move to the next speaker.
The adjustment range is
7.When the output level of all speakers has been adjusted, press the PARAMETER button.
The test tone output stops and "System Setup" scrolls again. You are now out of the "Sp. Setup" mode. To cancel the "System Setup" display, press the PARAMETER button again or leave the unit for 5 seconds.
23