Operating Instructions Software
Contents
Test IC Card Error LOG
Menu screen transitions
Multi CUE F8 Multi CUE SET UP Assemble Manual Edit
S T
Turning on the power
Turn on the power Home menu is displayed
Home menu displays
∑ Display lamps
Dual
HD Free
SD Free
∑ Setting mode display area
∑ Remaining tape time
∑ User file display
∑ Time code displays
∑ Setting the initial value for the time code
00 00 00
∑ Setting and checking the cue time
Press the 4 cursor key Cue time now appears in reverse video
Home menu
This menu is displayed by pressing the following key Home
Hold
Reset
Key Key designation Description
Free
ALL
SD SDI SD SDI OUT
Digital
Audio
Mixer Analog
Home SET UP menu
This menu is displayed by pressing the following keys Home
Field
FRAME1
Fine
Coarse
After pressing the F11 key, turn the Adjust control
Sets the stop/still still picture mode holding time
Preroll
Still
Press the ENT key. The setting is now entered
∑ Reference
Center cursor key
Cursor key
∑ Programmed play function
Video in menu
This menu is displayed by pressing the following key
Digital
INT SG
Ramp
Black
Video OUT HD menu
Convert
F3 PR
BLACK.L
Video OUT HD SET UP menu
This menu is displayed by pressing the following keys
Serial SYS Phase
Line Conv
Interp
OFF
Video OUT HD SET UP State menu
Eemode
∑ Selecting the TAPE/EE output signals
Video OUT SD menu
Transfers the VTR to the Video OUT SD SET UP Composite
Transfers the VTR to the Video OUT SD SET UP SDI menu
Cmpst
Menu screen
Video OUT SD SET UP Composite menu
Comb FIL
Clip
SYS SC
SYS H
Video OUT SD SET UP Cmpst State menu
Through The E-E through mode AV minimum delay mode
Or Audio OUT F8 F12
Is established
∑ Selecting the TAPE/EE output signals
Video OUT SD SET UP SDI menu
FINE/COARSE
With the 480/59.94i format
With the 480/59.94p format
With the 576/50i format
ALL OFF
Video OUT SET UP Line BLK video output line blanking menu
ALL on
∑ Setting the line blanking
Move the cursor and select the lines to be blanked
Video OUT SD SET UP SDI State menu
Video OUT SET UP State menu
Video OUT Convert menu
Hdtosd
Sdtohd
Hdtohd
Video OUT Convert Hdtosd menu
Hfilter Enhance
75/1.0/1.25/1.5/2.0/3.0
Hfilter Response
Vfilter Enhance
0/2.0/3.0/4.0/5.0/6.0
Sets the the picture quality horizontal frequency bandwidth
5/1.0/1.5/2.0/3.0/4.0
Sets the the picture quality vertical frequency bandwidth
Video OUT Convert Sdtohd menu
Controls the enhancement adjustment of the converter output
Video OUT Convert Hdtohd menu
Audio in menu
CH-MIX
CUE
PCM
Audio in PCM Input Select menu
AES
Analog
Digital
Selects the signals of the analog CH2 input
CH6 Selection is made in line with the CH5 setting using
F10 CH-6
ANA CH2
Audio in CUE Input Select menu
No mixing
Mixes the playback signals
Source
Audio in SET UP menu
This menu is displayed by pressing the following keys Audio
Fr in increments of 1/10th of a frame
∑ Switching the audio level meter scale
Tone
∑ Operation
∑ Formats supported
Audio in CH-MIX Select menu
Select
CH-MIX on
CH-MIX OFF
∑ Mix-and-record
Sound output based on VTR’s mode and F6, F7 key statuses
ONotesN
Audio OUT menu
Monitor
SDI Asign
Audio OUT Monitor menu
Shtl
Moni
VAR
ADD
Audio OUT SET UP menu
Full
Rate CON2
Auto CPY3
F11 Rate CON key
∑ Fade function
Audio OUT SET UP State menu
Video OUT SET UP State menu
Audio OUT SDI Asign menu
Sdaud
Sdtosd
TC/CHR menu
EXT LTC
LTC
VTC
Slave
TC.ST
TC.UB
TC.TC
ERR
Time code displays CTL1 Control signal
∑ Changing the superimposing position
∑ Time code displays and VTR’s operating modes
TCG
∑ Error information displays
COMP.CPU Error
System Error other error
VTR’s operating modes
SYS=23 TAPE=24 30LTCR 01 04 37 24LTCR 01 04 37
∑ Superimposed displays
∑ Superimposed displays of format information
Table of user bit settings
TC/CHR SET UP menu
This menu is displayed by pressing the following keys TC/CHR
TCG OUT
VITC.L
Vitc
LTC
HD mode
TC/CHR SET UP VITC.L menu
SD mode
∑ Selecting the line where Vitc is to be inserted
Tcsync point setting
TC/CHR Convert menu
∑ 2-level and 3-level time code displays
≥Front panel
24TC
30TC
∑ Concerning the TC Sync value and sync phase settings
∑ Setting the TC Sync value
HD Super
LTC OUT
OEditing accuracyN
OPoints to noteN
VAR Limt F10 OFF
Ltcout
Multi CUE menu
Transfers to the Multi CUE SET UP menu screen
Protect
∑ Switching the pages
∑ Protecting pages
∑ Entering cues
Pagef
∑ Clearing all the cue points
∑ Changing cue points
∑ Clearing cue data
Multi CUE SET UP menu
PAG Mode
Auto Step
PAG CLR
ALL CLR
INSERT/ASSEMBLE Manual Edit menu
INSERT/ASSEMBLE
Auto Edit
CH Select
Insert Manual Edit CH Select menu
Video
CH1 ON/OFF
CH2 ON/OFF
CH3 ON/OFF
INSERT/ASSEMBLE Manual Edit SET UP menu
Keys to display this menu
Timing
ERR.STP
Tracking
FIX
4F Auto 8F Auto 1080/23p, 1080/24p, 1080/25p, 1080/50i
576/50i
4F Force 8F Force 1080/23p, 1080/24p, 1080/25p
1080/50i, 576/50i
∑ Edit REC Inhibit mode display
∑ Sequence of priority for recording inhibit modes
≥SOFTWARE
≥HOME
∑ Selecting the Software inhibit channels
∑ REC ENV display
≥Automatically adjusting the tracking optimizing
∑ Tracking
OPT Auto
Optimizing
Time Over
∑ Manually adjusting the tracking
Not Complete
Press the F13 Mode key to set it to X Fade or V Fade
Turn the Adjust control to select the audio fade time
∑ Selecting the audio fade time
Press the F12 FD Time key
INSERT/ASSEMBLE Auto Edit menu
Player
∑ Entering the edit points
∑ Tape position indicator
∑ Duration
≥Trimming operations
Input the data using the scratchpad
Error Invalid TC Data
SPR Data
≥Calling the edit data which was input last
Set the F4 VAR Memo key to on
∑ Variable memory function
Set the F3 W/PLYR key to OFF
∑ Variable memory editing
Insert Auto Edit CH Select menu
Transfers the VTR to the Insert Auto Edit menu screen
INSERT/ASSEMBLE Auto Edit SET UP menu
Operation
DLY Strt
FD TIME2
MODE2
CUT
∑ Selecting the preroll time
∑ Setting DLY Start
∑ Setting Edit REC Inhibit
SET UP menu
Interface SET UP menu
Start BIT
Stop BIT
Parity
User
Both
2ONoteN
∑ Table of correlations between modes and connectors
MODE-1 connection diagram
Baud Rate
∑ Setting the RS-232C parameters
∑ Setting the V/A control parameters
∑ Setting the CH Assign audio channel
AUDIO-1 AUDIO-2
Panel SET UP menu
This menu is displayed by pressing the following keys SET UP
Reverse
S1 r1
Panel SET UP OP MAP Remote menu
MAP Mode
MON SEL
Function
Local
∑ Correlation between F5 MAP Mode and F6 Function keys
∑ OP MAP setting method
Panel SET UP OP MAP Local menu
Regardless of the OP MAP settings, operation of all
Remote
User SET UP menu
≥User files SET UP menu
∑ Saving user files
Factory
Editor
Press the F key and F2 Save key together to save the file
∑ Locking user files
∑ Updating user files
∑ Deleting user files
∑ Calling user files
∑ Copying user filenames
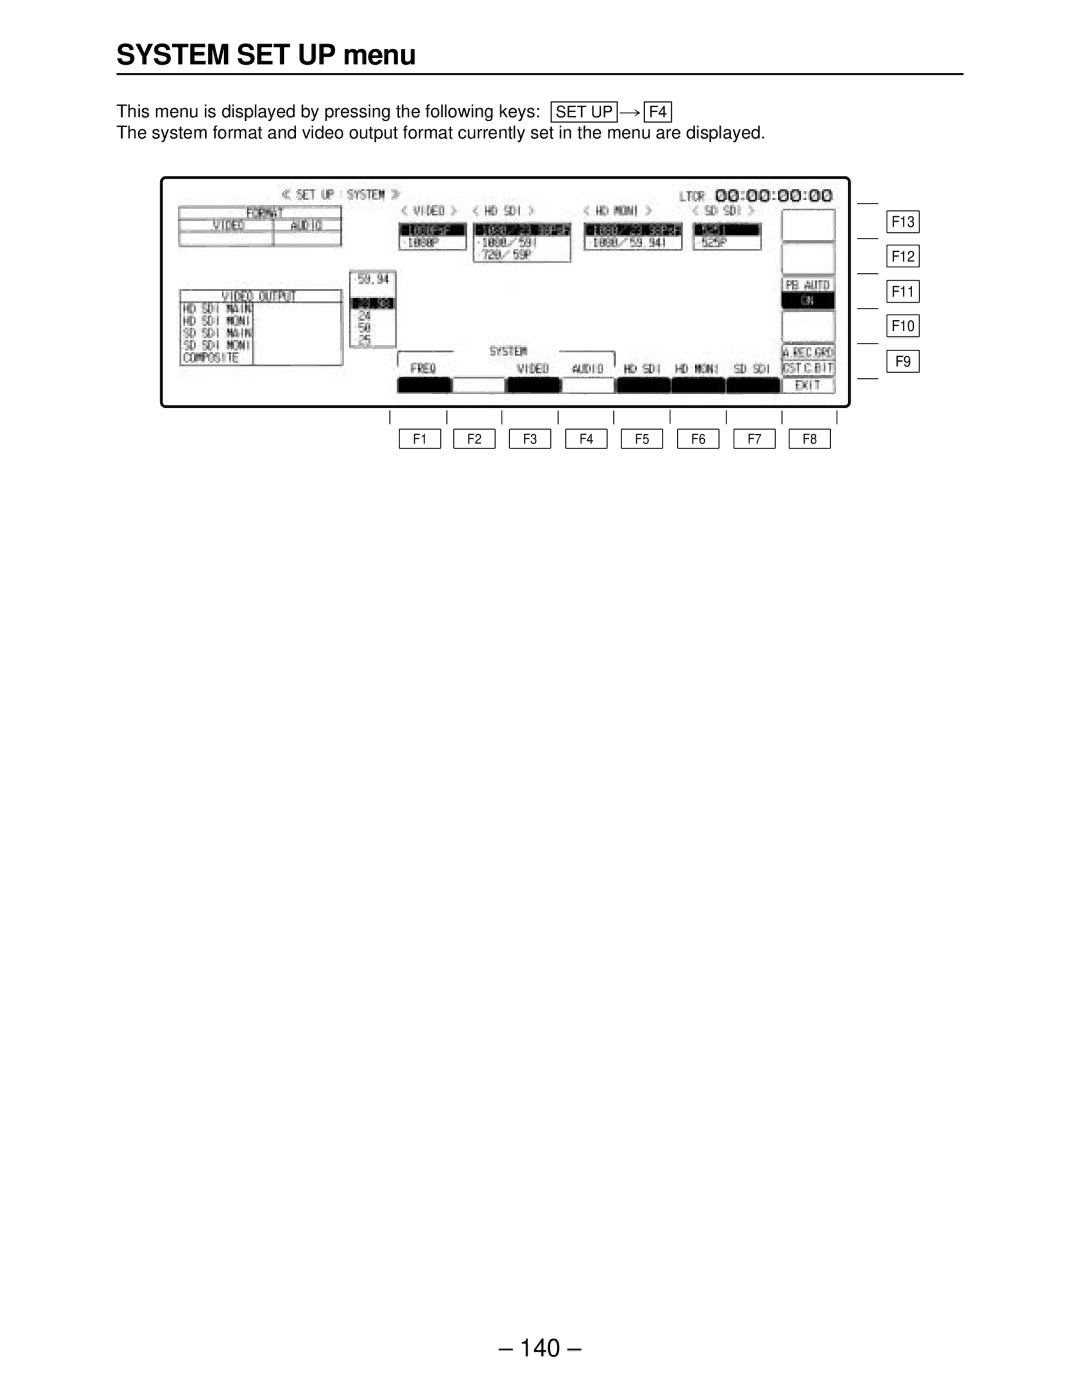
System SET UP menu
140
For selecting the video recording format
Freq
For selecting the system frequency
HD SDI
1080/59.94I 1080/60I
720/59.94P 720/60P
HD Moni
SD SDI
SD SDI Main
REC.GRD
PB Auto
144
Optional System format front setting
System format and video output status table
Engineer SET UP menu
Transfers the VTR to the RF Engineer SET UP menu screen
Transfers the VTR to the Operation Engineer SET UP
Keys are pressed together, and then press
RF Engineer SET UP menu
Keys are pressed together and then
RED Lamp
ERR LOG
F9 key is
Operation Engineer SET UP menu
This menu is displayed when the SET UP F13 and F pressed
MAX
MIN
Test menu
Mecha
Front
Servo
∑ UDC board display
∑ Operation Time display
∑ Serial number display
RF Test menu
Error
ENV
EYE
Confi
∑ Error rate display
Total Error
Inner Error
∑ Correction and revision statuses
RF adjustment value display menu
ADJ Mode
ADJ CH
EQ/REC/PLL CH0, CH1, CH2, CH3
Audio Test menu
Menu below is displayed when the F5 Key is pressed
Mecha Test menu
Selects the size of the pseudo cassette when no Tape has
Mecha Test men
Normal Normal operation
Size
System Test menu
Returns the VTR to the Test menu screen F9-F13
Servo Test menu
ADJ Enable
Torque
Data Send
Measure
∑ Tracking adjustment
Test Front menu
Keycheck
Returns the VTR to the Test Front menu screen
Test Front Panel menu
Entire display panel is lighted up in a fixed pattern
Test Front KEY Check in menu
∑ Keys
∑ Dial and controls
∑ LEDs
Inserting the IC card
Preparations
How to register the date and time
Test IC Card menu
Userfil
Multcue
Errlog
Format
Test IC Card User menu
≥User Files Test menu
Test IC Card Multi CUE menu
≥Multi Cue Files Test menu
Test IC Card Multi CUE Select menu
Keys are pressed together
Test IC Card Multi CUE Monitor menu
F1-F2 F3-F7 Designation of 1-5 cue Number
Returns the VTR to the Test IC Card Multi CUE menu
F9-F13 Designation of 6-10 cue Number
Test IC Card Error LOG menu
≥Error Log Files
Screen F9-F13
Test IC Card Error LOG Monitor menu
Returns the VTR to the Test IC Card Error LOG menu
Error messages
Diag menu Auto OFF mode
System error
Operation error
Diag menu error messages
∑ When there are multiple warnings
Diag Active menu
Menu Masked
Menu Last
∑ When there are 2 or more canceled masked warnings
Diag Masked menu
Menu Active
Transfers the VTR to the Diag Active menu
Last Clear
∑ When 2 or more warnings have occurred
Diag Last menu
Diag error messages
Message Error description On-screen display
HD REF Error
SD REF Error
HD SDI Error
CRC Error in HD SDI
PCM Error
Sync Error Confirm
Crcc Error Confirm
Parity Error Confirm
OVER-RUN Error
RS-232C Error
Command from RS-232C Port SUM-CHECK Error
From RS-232C Port Parity Error
Auto OFF error messages
Auto OFF Cassette Unload Fail Power OFF
Syscon Error
Servo Error
Mecha Error
Sensor Trouble Detection Switch Fail
System error messages
L1 Board not Responding
System Error
AV not Responding
Syscon not
Responding
Operation messages
Operation messages in Auto Edit mode
Message Description of error/problem
Screen saver function
193
Panasonic Broadcast Europe