Digital Video Camcorder
Mini
Operating Instructions
Things You Should Know
Safety Precautions
Date of Purchase Dealer Purchased From Dealer Address Dealer Phone No
Model No Serial No
Trade Name
Declaration of Conformity
Panasonic
Model No
IMPORTANT SAFETY INSTRUCTIONS
U.S.A./CANADA CONSUMERS ATTENTION
Precautions
THE POWER SUPPLY TURNED ON WHEN NOT IN USE
USE & LOCATION
Before opening the CD-ROM package, please read the following
Article 5 Reverse Engineering, Decompiling or Disassembly
Record mode
Contents
Before using
Edit mode
Playback mode
With a PC
Menu
ª Charging the battery
Quick Guide
ª Fitting the battery
ª How to turn on the power
1 While pressing the button 1, set the OFF/ ON switch to OFF
ª How to turn off the power
ª Recording on a tape
ª Recording still pictures onto a card Photoshot
Accessories
Before using
Parts identification and handling
6 White balance sensor 7 Remote control sensor 8 Lock button
17 Power switch OFF/ON 18 Power lamp
15 Battery holder 16 Battery eject button PUSH BATT
27 LCD monitor open release OPEN 28 Reset button RESET
29 Power LCD button POWER LCD -24- Power LCD lamp
43 Lens hood
Fitting the lens cap
41 Tripod receptacle
42 Shoulder strap fixture
The one-touch free-style grip belt
Using the LCD monitor
ª To restore the strap to the grip belt
2 Adjust the belt length
Power supply
Using the viewfinder
ª Adjusting the field of view
ª Charging the battery
ª Connecting to the AC outlet
Charging time and recordable time
ª Fitting the battery
ª Removing the battery
ª When the cassette holder does not come out
Inserting/removing a cassette
ª When the cassette holder cannot be housed
ª Inserting/removing the cassette
ª Card access lamp
Inserting/removing a card
ª Concerning the write protection switch on the SD Memory Card
ª Concerning the card
Turning the Camcorder on
How to use the joystick
Selecting a mode
ª How to turn on the power
2 Tape recording mode AUTO/MANUAL/FOCUS switch is set to MANUAL
Switching the language
4 Card recording mode AUTO/MANUAL/FOCUS switch is set to AUTO
5 Card recording mode AUTO/MANUAL/FOCUS switch is set to MANUAL
ª About the menu setting
Using the menu screen
ª Operating with remote control
7 Press the joystick to determine the setting
Adjusting LCD monitor/viewfinder
Setting date and time
ª Recharging the built-in lithium battery
ª Adjusting the brightness and color level
ª Remote control
Using the remote control
1 Press the POWER LCD button
1 Set SETUP LCD AI DYNAMIC or NORMAL
ª Remote control usable range
ª Install a button-type battery
ª Selecting the remote control mode
ª Concerning the button-type battery
ª Connect the Magic Wire Remote Control with Narration Mic to the
Magic Wire Remote Control with Narration Mic
ª Switching the microphone
4 Photoshot button PHOTO SHOT 5 Microphone switch button TALK
Check before recording
Record mode
ª Basic Camcorder holding
ª Check points
ª POWER SAVE
Recording on a tape
ª On-screen display in the tape recording mode
ª Concerning the remaining tape time indication on the screen
Check the recording
Recording still pictures on a card while recording image onto a tape
Blank search function
ª Stopping a blank search midway through
ª To record still pictures clearly
Recording still pictures onto a card Photoshot
ª On-screen display in the card recording mode
ª Progressive Photoshot
ª Concerning the focusing area
Zoom in/out function
ª Select the size of still pictures to be recorded on a card
ª Select the picture quality for photoshot images
Quick start
Recording yourself
ª To cancel the quick start when the power is OFF
2 Set the OFF/ON switch to OFF
MagicPix functions
Backlight compensation function
Soft skin mode
ª To cancel the MagicPix function
Fade in/fade out function
Tele-macro function
Wind noise reduction function
ª To cancel the tele-macro function
ª When the flash is not used
Using the built-in flash
ª To adjust the brightness of the flash 1 Set ADVANCE FLASH LEVEL
ª Using the flash VW-FLH3 optional
Recording images for wide-screen TVs
Self-timer recording
Optical image stabilizer function
ª To stop the timer midway through
Recording in various situations Scene mode
RapidFire Consecutive Photoshot
1 Set the AUTO/MANUAL/FOCUS switch to MANUAL
ª To stop RapidFire Consecutive Photoshot midway through
ª To cancel the scene mode function
Recording in natural colors White balance
ª To restore to the automatic adjustment
1 Set the AUTO/MANUAL/FOCUS switch to MANUAL
ª About the black balance adjustment
Manual focus adjustment
ª To restore to the automatic adjustment
When the manual adjustment mode is selected
ª To restore to automatic adjustment
Manual shutter speed/aperture adjustment
1 Set the AUTO/MANUAL/FOCUS switch to MANUAL
Manual shutter speed adjustment
Playing back tape
Playback mode
ª To adjust volume
ª Settings on the audio
Variable-speed search function
Slow-motion playback/ frame-by-frame playback
1 Press the E button or the D button on the remote control
1 During playback, press the button on the remote control
Playing back card
Playback on TV
1 Press the OSD button on the remote control
ª If the image or audio from this Camcorder is not output on the TV
1 Move the s /VOLr lever to switch the images
Deleting files recorded on a card
ª To display multiple playback files
ª About the compatibility of still pictures
Formatting a card
Writing the printing data on a card DPOF setting
Protecting files on a card
ª To complete the settings
Recording from a tape onto a card
Edit mode
Copying onto a DVD recorder or a VCR Dubbing
≥Insert a tape which already has recorded contents and a card
ª When neither image nor sound from
Recording the contents of other equipment
3 Turn the power on and start playback. Other equipment
the Camcorder is output to the TV set
ª Analog/digital conversion
Using the DV cable for Recording Digital Dubbing
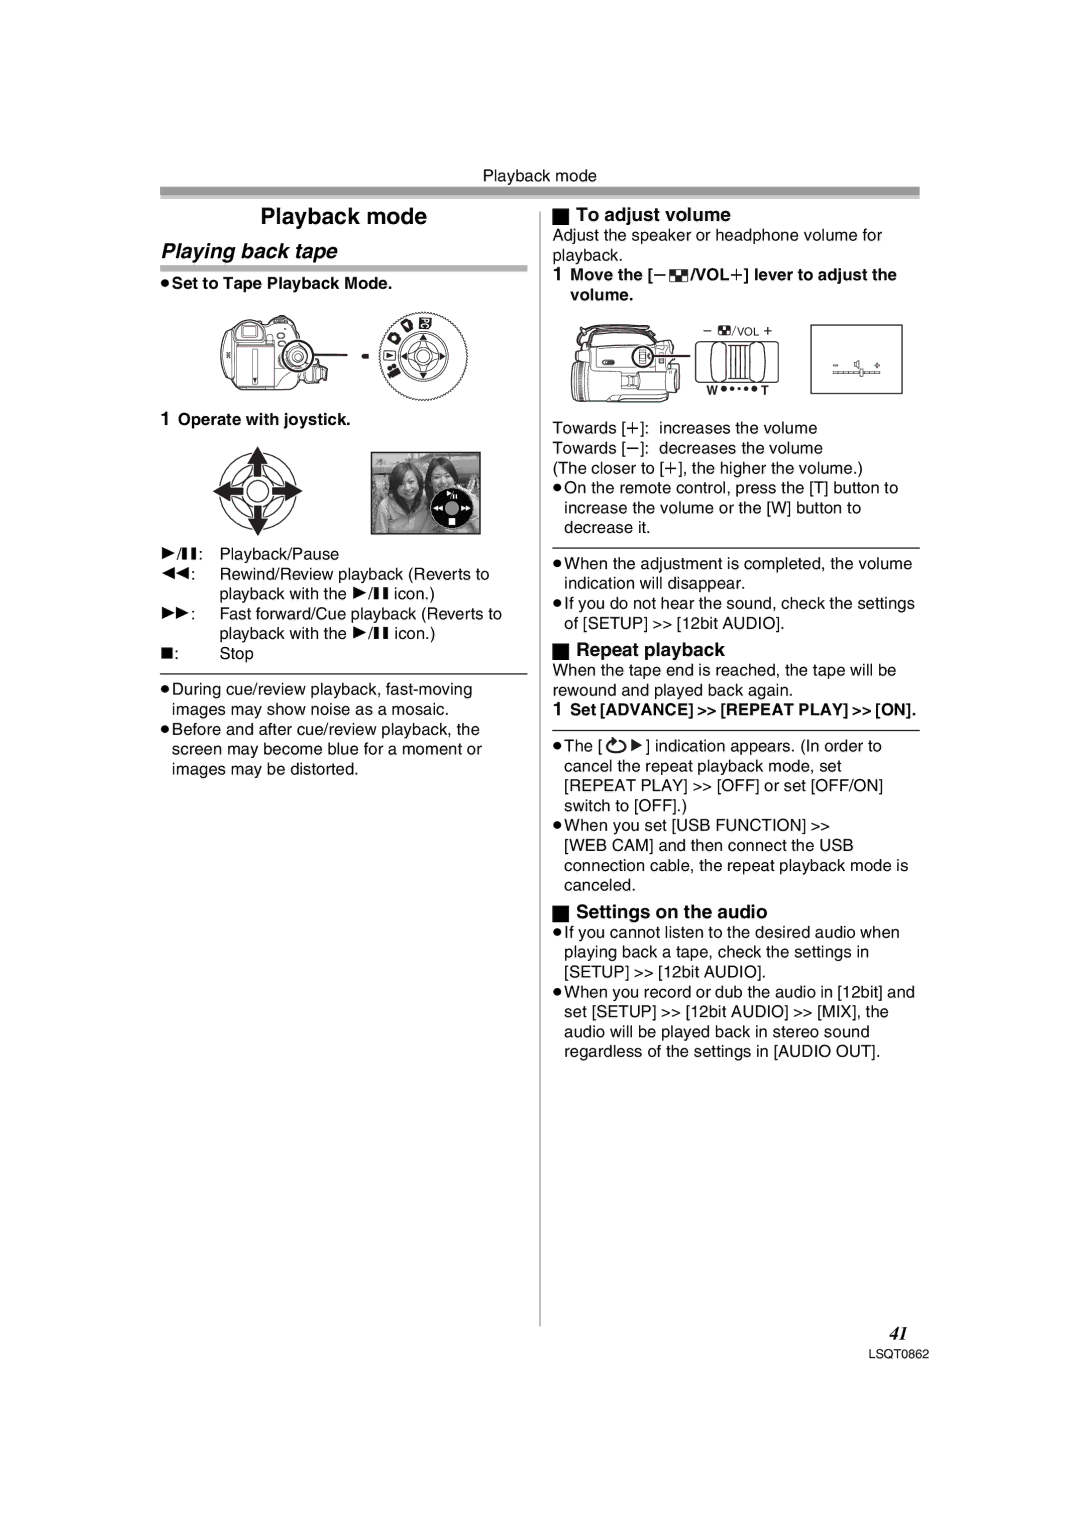
≥Set to Tape Playback Mode. Player/ recorder
1 Connect the Camcorder and digital video equipment with the DV cable
ª To cancel the standby for recording
Audio dubbing
Audio dubbing using the microphone terminal
2 Set ADVANCE A. DUB INPUT MIC
6 Press the button on the remote control to stop audio dubbing
5 Press the button on the remote control to start audio dubbing
ª Before recording with audio dubbing
ª To play back the sound recorded with audio dubbing
ª When you stop printing halfway
Printing pictures by directly connecting to the printer PictBridge
5 Select the setting for date printing
≥Insert a card and set to Picture Playback Mode
Using USB Driver
Using the Camcorder with a PC
With a PC
ª Software Installation
Using as a Web camera
Connecting Computer and Camcorder
ª Using Built-in SD Drive
6 After the USB Driver is installed, please restart your computer
ª Connecting the Camcorder to personal computer For Use as a Web
ª Installing Video Stream Driver
4 Finish installation by following the on-screen instructions
1 Install the supplied Video Stream Driver on the provided CD-ROM
≥If you use Windows 98SE, the OS installation CD may be required
ª Setting up Windows Messenger
2 Select .NET Messaging Service and click OK
5 After the setup is completed, sign in and start Windows Messenger
ª Setting up MSN Messenger
Using MotionDV STUDIO
1 Click Sign In 2 Type in your Sign-in name and password
4 After the setup is completed, sign in and start MSN Messenger
4 Finish installation by following the on-screen instructions
ª Installing Video Stream Driver
5 After the completion of setup, click on Finish
2 Click Video Stream Driver
ª To start MotionDV STUDIO
1 Click Update Driver
3 Right-click Enhanced Host Controller and then select Properties
4 Click Driver tab to check the description on Driver Provider
Connecting the Camcorder to a personal computer
To disconnect USB cable safely
1 Set the Mode Dial to Tape Recording Mode or Tape Playback Mode
2 Set BASIC or ADVANCE USB FUNCTION MOTION DV
uninstall
If you no longer need software or driver Uninstall
1 Select Start Settings
ª About the SD Memory Card
ª About the folder structure when using the Memory Card in a personal
ª About the compatibility of the card files
computer
Menu list
Menu
3 SETUP
3 SETUP
3 SETUP DISPLAY -64- REMOTE
SHTR EFFECT -31- DATE/TIME -64- INITIAL SET 3 SETUP
ª CARD RECORDING MENU
ª PICTURE PLAYBACK MENU
Menus related to playback
Menus related to taking pictures
ª H.SHOE MIC
ª DATE/TIME
ª DEMO MODE
Other menus
ª INITIAL SET
Indications
Others
Basic indications
Recording indications
Textual indications
Warning/alarm indications
Confirmatory indications
Others
Conditions which disable
Functions cannot be used simultaneously
Functions
the functions
Power/Body
Before requesting repair Problems and solutions
2 The Camcorder power is turned off automatically
3 The Camcorder power does not stay on long enough
Indications
4 The original sound was erased when audio dubbing was performed
1 A sentence is displayed in red or yellow in the screen center
2 The time code becomes inaccurate
be seen
2 “PUSH THE RESET SWITCH” is displayed
4 Playback picture is not clear
Card 1 Recorded pictures are not clear
When 3 in yellow
Cautions for Use
When 3 in red
When the lens is fogged
ª About dirty heads
When normal playback cannot be performed even after the head cleaning
ª About the Camcorder
While carrying the Camcorder, do not drop or bump it
Be sure to detach the battery after use
ª About the battery
Prepare spare batteries when going out for recording
Do not throw old battery into fire
ª About the card
ª About the cassette
ª Folder structure of the card
Never place the cassette in a high temperature place
ª LCD monitor/Viewfinder
Explanation of terms
ª Periodical check-ups
ª Automatic white balance
ª Auto focus
ª White balance
Recording a subject behind dirty or dusty glass
Recording a subject in dark surroundings
Audio output level Line 316 mV, 600 ohm
Specifications
Minimum required illumination 1 lx MagicPix Mode
≥These figures vary depending on the subject being photographed
Others
≥The numbers shown in the table are approximations
Accessory#
Camcorder Accessory System
Description
compatible with MultiMediaCard
Camcorder Accessory Order Form For USA Customers
Request for Service Notice USA Only
Request for Service Notice
Panasonic/Quasar Video Products
Limited Warranty
Limited Warranty For USA Customers
Accessory Purchases
Customer Services Directory
npcparts@us.panasonic.com
Centralized Factory Servicenter
Warranty For Canadian Customers
PANASONIC PRODUCT - LIMITED WARRANTY
WARRANTY SERVICE
IF YOU SHIP THE PRODUCT TO A SERVICENTRE
ª Numerics
Index
ª Carga de la batería
Spanish Quick Use Guide Guía española para el uso rápido
ª Montaje de la batería
ª Insertar/quitar un cassette
ª Grabación en una cinta
ª Cómo apagar la alimentación
ª Grabación de imágenes fijas en una tarjeta Photoshot
ª Reproducción de la cinta
Division of Panasonic Corporation of North America
Panasonic Consumer Electronics Company
Panasonic Puerto Rico, Inc
Panasonic Canada Inc