ENGLISH

ESPAÑOL

Preparation

Preparación

Inserting and Ejecting a Cassette

Introducción y expulsión del casete

When inserting a tape or closing a cassette holder, do not apply excessive force.

This may cause a malfunction.

Do not use any tape other than Mini DV cassettes.

Cuando introduzca la cinta o cuando cierre el compartimento, no aplique una fuerza excesiva.Esto podría hacer que la videocámara no funcionara bien.

No utilice otro tipo de cinta que no sea minicasete DV.

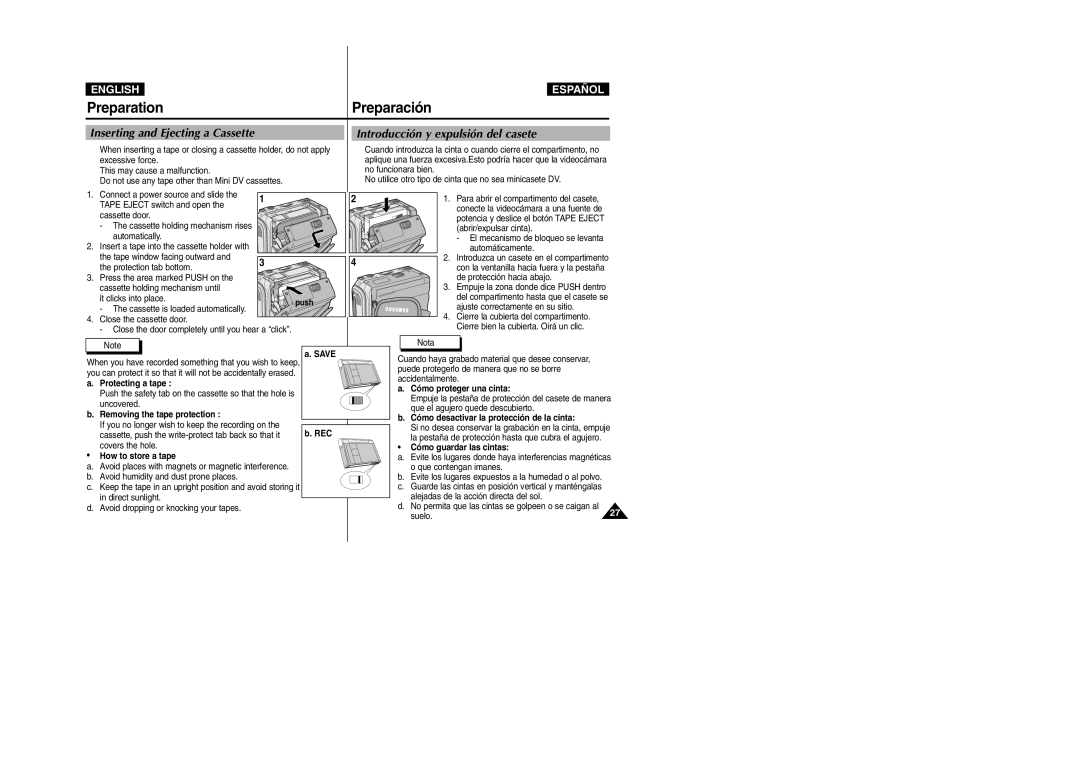
1. Connect a power source and slide the

1

TAPE EJECT switch and open the


cassette door.


- The cassette holding mechanism rises


automatically.


2. Insert a tape into the cassette holder with


the tape window facing outward and

3

the protection tab bottom.


3. Press the area marked PUSH on the


cassette holding mechanism until


it clicks into place.

push

- The cassette is loaded automatically.


4.Close the cassette door.

- Close the door completely until you hear a “click”.

2

4

1.Para abrir el compartimento del casete, conecte la videocámara a una fuente de potencia y deslice el botón TAPE EJECT (abrir/expulsar cinta).

-El mecanismo de bloqueo se levanta automáticamente.

2.Introduzca un casete en el compartimento con la ventanilla hacia fuera y la pestaña de protección hacia abajo.

3.Empuje la zona donde dice PUSH dentro del compartimento hasta que el casete se ajuste correctamente en su sitio.

4.Cierre la cubierta del compartimento. Cierre bien la cubierta. Oirá un clic.

Note

When you have recorded something that you wish to keep, you can protect it so that it will not be accidentally erased.

a.Protecting a tape :

Push the safety tab on the cassette so that the hole is uncovered.

b.Removing the tape protection :

If you no longer wish to keep the recording on the cassette, push the write-protect tab back so that it covers the hole.

How to store a tape

a.Avoid places with magnets or magnetic interference.

b.Avoid humidity and dust prone places.

c.Keep the tape in an upright position and avoid storing it in direct sunlight.

d.Avoid dropping or knocking your tapes.

a. SAVE

b. REC

Nota

Cuando haya grabado material que desee conservar, puede protegerlo de manera que no se borre accidentalmente.

a.Cómo proteger una cinta:

Empuje la pestaña de protección del casete de manera que el agujero quede descubierto.

b.Cómo desactivar la protección de la cinta:

Si no desea conservar la grabación en la cinta, empuje la pestaña de protección hasta que cubra el agujero.

Cómo guardar las cintas:

a.Evite los lugares donde haya interferencias magnéticas o que contengan imanes.

b.Evite los lugares expuestos a la humedad o al polvo.

c.Guarde las cintas en posición vertical y manténgalas alejadas de la acción directa del sol.

d.No permita que las cintas se golpeen o se caigan al

suelo.

27


Page 27
Image 27
Samsung VP-D300, VP-D307, VP-D305, VP-D303D manual Inserting and Ejecting a Cassette, Introducción y expulsión del casete

VP-D303D, VP-D307, VP-D300, VP-D305, VP-D303 specifications

The Samsung VP-D303, VP-D305, VP-D300, VP-D307, and VP-D303D are part of a series of compact, user-friendly camcorders that emerged in the early 2000s, designed to cater to both amateur and semi-professional videographers. These models feature a sleek design and a variety of functionalities that make them appealing for capturing unforgettable moments and events.

One of the standout features across this series is their compact size, which makes them highly portable. Weighing in at just a few pounds, these camcorders can be easily carried in a bag or even a pocket, allowing users to document everyday life without making it cumbersome.

The VP-D303, VP-D305, VP-D300, and VP-D307 all boast a 1/6-inch CCD sensor, which contributes to the camcorders' ability to capture clear and vibrant video footage. With recording capabilities of up to 520 lines of horizontal resolution, these camcorders deliver sharp and detailed visuals, suitable for personal enjoyment or small-scale presentations.

One of the most notable features of these models is their Digital 10x Optical Zoom. This allows users to get up close and personal with their subjects while maintaining clear image quality. The zoom functionality is complemented by an image stabilization feature, which counteracts camera shake, making handheld shooting smoother and reducing the chances of blurred footage.

The VP-D305 and VP-D307 models come equipped with advanced audio technology, including built-in stereo microphones that ensure sound clarity and a better listening experience. This feature is particularly useful for capturing live events, making them ideal for recording family gatherings, weddings, or school performances.

For connectivity and convenience, the Samsung VP-D303 series includes both USB and FireWire (IEEE 1394) ports. This allows for easy transfer of footage to computers for editing or sharing. Moreover, the models support various tape formats including MiniDV and Digital8, making them versatile for different media preferences.

The user interface is designed for accessibility, featuring a simple menu system and intuitive controls. The camcorders also come with a swiveling LCD screen, allowing users to easily frame their shots from varied angles while providing a clear view during playback.

In conclusion, the Samsung VP-D303, VP-D305, VP-D300, VP-D307, and VP-D303D camcorder models are designed with versatility and user-friendliness in mind. They combine advanced imaging technology, convenient audio features, and easy connectivity options, making them excellent choices for anyone interested in making quality videos.