ENGLISH

ESPAÑOL

Preparation

Preparación

How to use the Remote Control (VP-D301(i)/D303(i)/D303D(i)/D305(i)/D307(i) only)

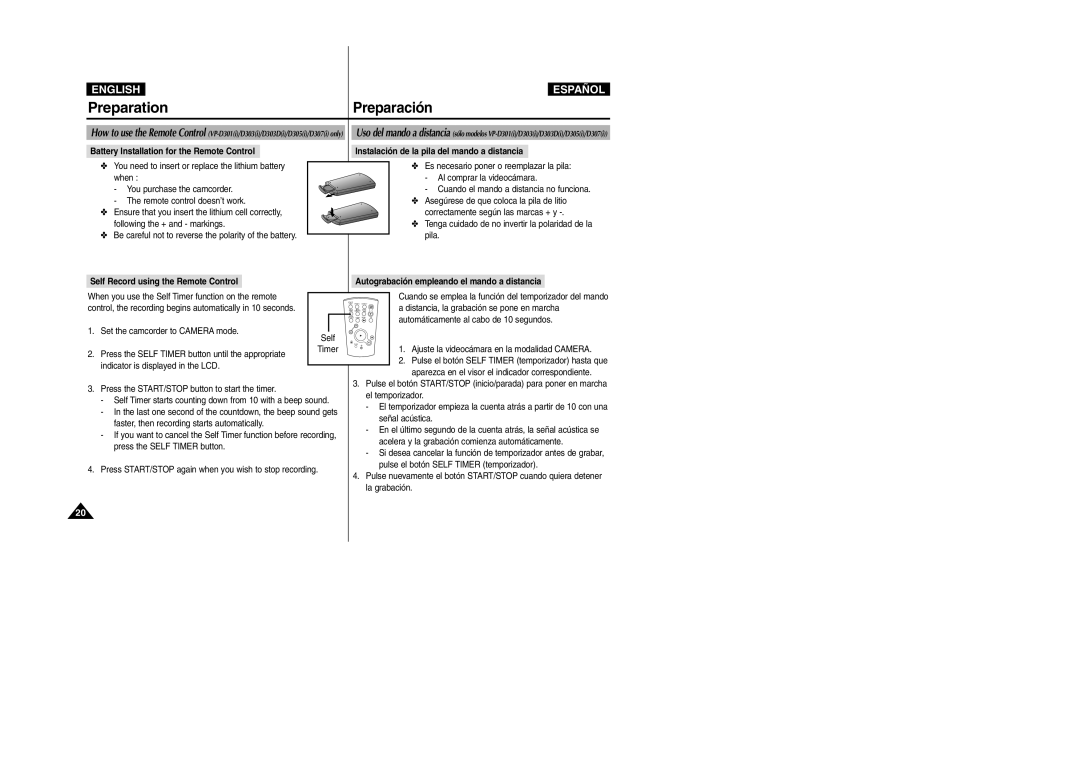
Battery Installation for the Remote Control

You need to insert or replace the lithium battery when :

- You purchase the camcorder.

-The remote control doesn’t work.

Ensure that you insert the lithium cell correctly, following the + and - markings.

Be careful not to reverse the polarity of the battery.

Uso del mando a distancia (sólo modelos VP-D301(i)/D303(i)/D303D(i)/D305(i)/D307(i))

Instalación de la pila del mando a distancia

Es necesario poner o reemplazar la pila:

- Al comprar la videocámara.

- Cuando el mando a distancia no funciona.

Asegúrese de que coloca la pila de litio correctamente según las marcas + y -.

Tenga cuidado de no invertir la polaridad de la pila.

Self Record using the Remote Control


Autograbación empleando el mando a distancia


When you use the Self Timer function on the remote


Cuando se emplea la función del temporizador del mando


START/


control, the recording begins automatically in 10 seconds.


PHOTO

DISPLAY


a distancia, la grabación se pone en marcha


STOP


TIMER

MEMORY TIME


SELF

ZERO

DATE/


automáticamente al cabo de 10 segundos.


PHOTO


SLOW

X2


SEARCH A.DUB


1. Set the camcorder to CAMERA mode.


Self


Timer


F.ADV


1. Ajuste la videocámara en la modalidad CAMERA.

2. Press the SELF TIMER button until the appropriate


2. Pulse el botón SELF TIMER (temporizador) hasta que

indicator is displayed in the LCD.


aparezca en el visor el indicador correspondiente.


3. Press the START/STOP button to start the timer.


3. Pulse el botón START/STOP (inicio/parada) para poner en marcha


el temporizador.

- Self Timer starts counting down from 10 with a beep sound.


- El temporizador empieza la cuenta atrás a partir de 10 con una

- In the last one second of the countdown, the beep sound gets


señal acústica.

faster, then recording starts automatically.


- En el último segundo de la cuenta atrás, la señal acústica se

- If you want to cancel the Self Timer function before recording,


acelera y la grabación comienza automáticamente.

press the SELF TIMER button.


- Si desea cancelar la función de temporizador antes de grabar,


4. Press START/STOP again when you wish to stop recording.


pulse el botón SELF TIMER (temporizador).


4. Pulse nuevamente el botón START/STOP cuando quiera detener


la grabación.

20

Page 20
Image 20
Samsung VP-D307 Preparación, Battery Installation for the Remote Control, Instalación de la pila del mando a distancia

VP-D303D, VP-D307, VP-D300, VP-D305, VP-D303 specifications

The Samsung VP-D303, VP-D305, VP-D300, VP-D307, and VP-D303D are part of a series of compact, user-friendly camcorders that emerged in the early 2000s, designed to cater to both amateur and semi-professional videographers. These models feature a sleek design and a variety of functionalities that make them appealing for capturing unforgettable moments and events.

One of the standout features across this series is their compact size, which makes them highly portable. Weighing in at just a few pounds, these camcorders can be easily carried in a bag or even a pocket, allowing users to document everyday life without making it cumbersome.

The VP-D303, VP-D305, VP-D300, and VP-D307 all boast a 1/6-inch CCD sensor, which contributes to the camcorders' ability to capture clear and vibrant video footage. With recording capabilities of up to 520 lines of horizontal resolution, these camcorders deliver sharp and detailed visuals, suitable for personal enjoyment or small-scale presentations.

One of the most notable features of these models is their Digital 10x Optical Zoom. This allows users to get up close and personal with their subjects while maintaining clear image quality. The zoom functionality is complemented by an image stabilization feature, which counteracts camera shake, making handheld shooting smoother and reducing the chances of blurred footage.

The VP-D305 and VP-D307 models come equipped with advanced audio technology, including built-in stereo microphones that ensure sound clarity and a better listening experience. This feature is particularly useful for capturing live events, making them ideal for recording family gatherings, weddings, or school performances.

For connectivity and convenience, the Samsung VP-D303 series includes both USB and FireWire (IEEE 1394) ports. This allows for easy transfer of footage to computers for editing or sharing. Moreover, the models support various tape formats including MiniDV and Digital8, making them versatile for different media preferences.

The user interface is designed for accessibility, featuring a simple menu system and intuitive controls. The camcorders also come with a swiveling LCD screen, allowing users to easily frame their shots from varied angles while providing a clear view during playback.

In conclusion, the Samsung VP-D303, VP-D305, VP-D300, VP-D307, and VP-D303D camcorder models are designed with versatility and user-friendliness in mind. They combine advanced imaging technology, convenient audio features, and easy connectivity options, making them excellent choices for anyone interested in making quality videos.