AR-650
For Your Records
FCC Notice
Off Mode Default Time
AR-650 Copier model Base model Off Mode
Automatic Energy Save Default Time
Sleep Mode Default Time
Preface
User Safety
Features of the AR-650 copier
Table of Contents
Table of Contents
Installation
Precautions
Be sure to disconnect the power-cord plug
Precautions
Handle and use the copier gently and carefully
Description of the Digital Copier
Certification Label
Names of Main Components
Finisher AR-FN8, AR-FN9
Description of Optional Equipment
Hole Punching Unit
Clip tray
Description of the Control Panel
Interrupt key
Stop key
ALL Clear key
Start key
Clear key
Description of the Control Panel
Description of the Graphic Display
Clear Paper symbol
Saddle Stitcher JAM Symbol
Unit Misfeed symbol
Call Service symbol
HOW to Make Copies
Turn on the power switch Message Wait Warming Up appears
Turning on the Power Switch
About 7 minutes later, the message Ready appears
When Placing the Original on the Glass
Auto Job Start Mode
Set the desired copy modes
Press the Start key
Turning on the Power Switch / Auto JOB Start
Copies Make
Copying in the Continuous Feed Mode
Press the Program key on the display panel
Copying in the Single-Feed Mode
Press the ADF key
Single feeding
Insert the original
Press the SET key
Copying in the Mixed Originals Mode
When Using the Automatic Document Feeder
Mode is selected
Check that the Automatic Paper Selection
Key in the desired copy quantity
Select the exposure
Copying in the Automatic Paper Selection Mode
Press the Zoom ORG.→ Copy key Select the copy size
ACTUAL-SIZE Copying by Specifying the Copy Size
ACTUAL-SIZE Copying by Specifying the Copy Size
Press the Zoom ORG.→ Copy key Press the AMS key
Using Automatic Magnification Selection
Press the desired COPY-SIZE key
Reduction and Enlargement Copying
Selecting the Original Size and the Copy Size
Using the Zoom Keys
Place the original, key in the copy quantity
Press the 1→ 1 key
Example of Duplexed Copies from Single-Sided Originals
Single-sided originals to duplexed copies
Press the 1→ 2 key to select the function
Duplexed Copies from SINGLE-SIDED Originals
Press the Start key Place the next original second side
Duplexed Copies from SINGLE-SIDED Originals
Example of Duplexed Copies from Two-Sided Originals
Procedure
Duplexed Copies from TWO-SIDED Originals
Example of Single-Sided Copies from Two-Sided Originals
SINGLE-SIDED Copies from TWO-SIDED Originals
Select the desired copy size, exposure
Copy quantity
Example of Duplexed Copies from a Book Original
Duplexed Copies from Book Originals
Duplexed Copies from Book Originals
Margin
Select
If necessary
Select the desired exposure, reproduction
Copying in the Manual Exposure Mode
Copying in the Automatic Exposure Mode
Make sure that Auto is displayed
Place the original and press the Start key
If necessary, press Key To adjust the exposure
Copying in the Text or Photo Mode
Press either
Ratio and copy quantity Press the Start key
Select the desired exposure and reproduction ratio
Bypass Copying
Key in the desired copy quantity Press the Start key
Place sheets of copy paper on the sheet bypass
Select the desired copy size
Bypass Copying by Specifying the Copy Size
Slides
Replace the original with a new original
Interrupt Copying
Reproduction ratio
After interrupt copying is finished, press
Presetting of Copy Modes
ALL Clear KEY
Using the ALL Clear key
Press the ALL Clear key
Using the Editing Functions
Example of Image Shift Copying
Image Shift Copying
Press the Edit key to enter the Editing menu
Or on the glass
SET
Example of Edge Erase Copying
Edge Erase Copying
Usingthe Editing Functions
DUAL-PAGE Copying
Example of Dual-Page Copying Procedure
Example of X-Y zoom
Y Zoom
Select the X-Y zoom function in the Editing menu
Specify the X and Y reproduction ratios
Example of trimming/masking
TRIMMING/MASKING
Place the original
How to read areas
Original scale
Read the values defining the desired area
TRIMMING/MASKING
As follows
Select the editing function in the Editing menu
Specify the area of the original
Mirror Image
Example of mirror image Procedure
Example of negative/positive reversal
NEGATIVE/POSITIVE Reversal
Press the NEG/POS key
NEGATIVE/POSITIVE Reversal
Examples of 2 in 1 / 4
1 / 4
Select the 2 in 1 / 4 in 1 function in the Editing menu
1 / 4 in 1
Select 2 in 1 or 4
Select the 2 in 1 / 4 in 1 function
Select the type of original
Editing menu
Press
Side
Annotation
Select where the date and time are to be printed
Example of annotation
Select the annotation function in the Editing menu
Annotation
Number
Example of page number Procedure
Select the page number function in the Editing menu
Select the page number position
Number
Key in the start page number
Place the original on the original glass
Using the Editing Functions
Example of magazine sort
Magazine Sort
Select the magazine sort function in the Editing menu
Set the center margin
Repeat the above
When the last original has finished being
Scanned, press Key
Examples of Cover Sheet Copying
Cover Sheet Copying
Setting the sheets on the sheet bypass
Copying Procedure
Setting a cassette for cover sheet
Set the special sheets of paper for
Cover Sheet Copying
Select the desired Cover Sheet mode
Select the cover sheet copying function in the Editing menu
Key in the desired number of copies or sets
Examples of Sheet Insertion Copying
Sheet Insertion Copying
Designated sheet-insertion cassette
Place special sheets of paper
Select the sheet-insertion copying function
Press the Edit key to enter the Editing
Press the Blank or Copied key
Using the digital keys, specify the desired
Press Next
To specify the next page, repeat step
Setting a Cassette for Cover SHEET/SHEET-INSERTION Copying
Setting Procedure
Resetting to the Previous Size
Document Storage
Procedure 1 Memorize Mode
Select the document storage function
Select the desired exposure
Document Storage
Select the document storage function in the Editing menu
Document you want printed
Select the number location containing
Select the desired copy quantity Press the Start key
Memo
Using the Special Functions
Following message appears
Account Number
Key in a 4-digit account number
Make copies as you would normally do
Storing a New Combination of Copy Modes
JOB Memory
Select the job memory function
Program menu
Press the MEMORY1 or, MEMORY2 MEMORY3 , MEMORY4 key
JOB Memory
Select the job memory function Program menu
Recalling a Stored Combination of Copy Modes
Press the Recall key to select the recall function
JOB Memory
How to Set the Weekly Timer
Weekly Timer
Select the timer function in the Program
Menu
How to Cancel the Operation of the Weekly Timer
Weekly Timer
How to Use the Copier when Turned OFF
Select the timer function in the Program menu
101
Copying Using Paper of Other Sizes
102
Setting the Date and Time
Key in the last two numbers of the year
103
To change the Automatic Shutoff time
To change theAutomatic Energy Save time
To exit from the Automatic Energy Save time
To exit from the Automatic Shutoff time
105
Change of Language on the Display Panel
106
107
Using the Optional Finisher
108
Names of the Main Components
109
NON-SORT Copying
Check that
Ratio and exposure
Sort Copying
If Sort is not displayed, select the sort Mode
110
111
Key in the copy quantity sets using the digital keys
Copies exit onto the trays
Sort Copying
When Placing the Original on the Glass Select the sort mode
112
113
Group Copying
Select the group mode
114
115
Key in the copy quantity using the digital
Keys
116
Group Copying
117
Press the desired mode keys
Select the staple mode
Stapling
118
Stapled copies exit onto the trays
119
120
Stapling
121
Select the puncher mode
Hole Punching Mode
122
Tip Number of punch holes and available paper sizes
123
124
Magazine Sort & Saddle Stitching Mode
125
126
Perform steps 2 through 5 of the procedure
Place the original and press the Start
127
When the Graphic Symbols Flash
Adding Paper to the Front Cassette
ADD Paper Symbol
128
Slowly push the cassette straight in until
129
Adding Paper to the Large-Capacity Feeder
Open the door of the large-capacity feeder
Replacing Procedure
Replace Toner BAG Symbol
130
131
132
ADD Toner Symbol
133
134
ADD Toner Symbol
Additional Explanation
135
Misfeeding inside of the Copier
Clear Paper Symbol
136
Open the exit cover
137
138
Clear Paper Symbol
139
140
141
Misfeeding in the Automatic Duplexer
142
143
144
145
Misfeeding in Pedestal Cassette Feeding
Misfeeding in the Bypass Guide
Misfeeding from the Large-Capacity Feeder
146
Removing Procedure
Check Original Symbol
147
148
Check Original Symbol
Resume copying
Originals remaining in the original feed tray
Raise the paper guide and remove Misfed paper
149
Open the cover of the hole punching unit
150
Open the upper cover of the finisher
Lifting up the lever , or levers
151
Remove the misfed paper
152
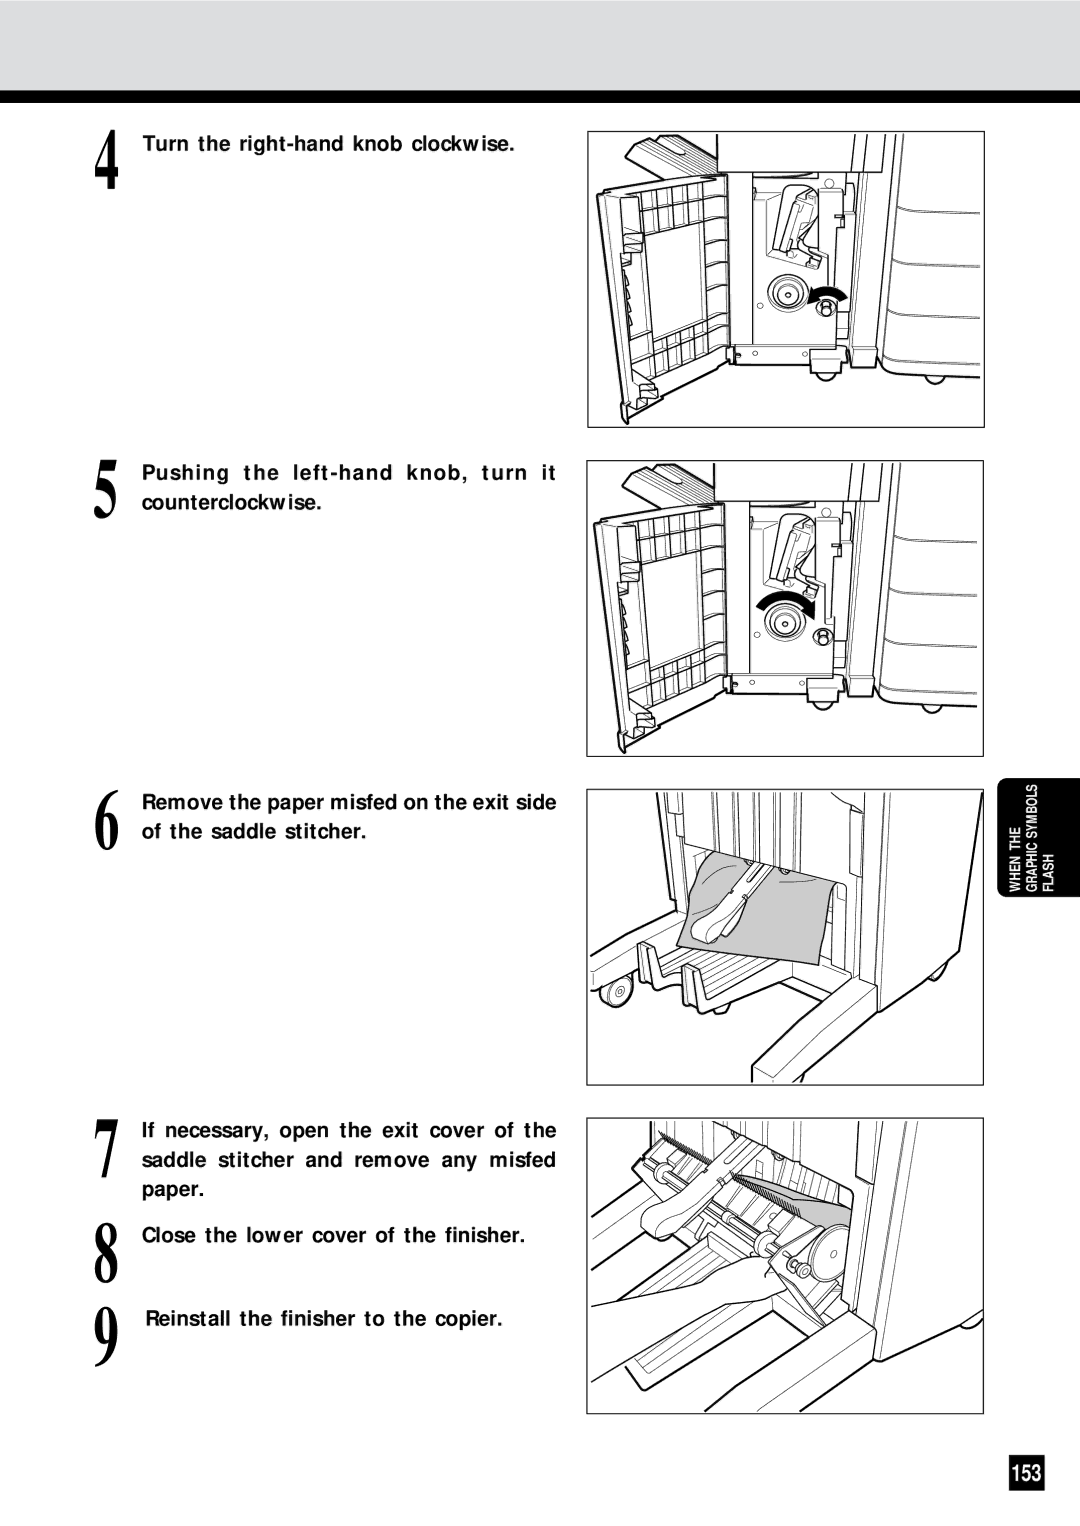
Saddle Stitcher JAM Symbol
Lift the release lever and move the finisher
153
Finisher
Replacing Staples Optional
154
Pull out the staple cartridge
155
Pulling straight up, remove the seal holding the staples
Replacing Staples Optional
Reinstall the stapler unit in its previous position
156
Set the staple cartridge
157
Saddle Stitcher AR-FN9
Remove the staple case and set the new
Case
Test stapling is automatically carried out
158
Blank copy is made automatically
159
160
Removing Jammed Staples OPTIONALCont
161
Remove the empty staple case
162
163
164
Clearing Accumulated Punched Paper Bits
165
Call Service Symbol
166
Periodic Maintenance
167
Maintenance
Daily Inspection
Cleaning covers
Items to inspect every morning
Items to inspect once a week
Copier does not start
Simple Troubleshooting
169
Copies are not clear
When copies are dirty
170
171
SPECIFICATIONS, Accessories & Options
172
Specifications
173
174
Finisher Specifications Optional
Tray Loading Capacity
Hole Puncher Options for AR-FN8/AR-FN9
Page
Sharp Corporation
Oration