Power/light switch “OFF” Interrupteur moteur/lumière
“Fermé”
Interruptor corriente/luz “OFF”
Power/light switch “ON” Interrupteur moteur/lumière “Ouvert”
Interruptor corriente/luz “ON”

SETTING UP YOUR MACHINE

PRÉPARATION DE LA MACHINE PRÉPARACION DE LAMÁQUINA

Always disconnect the machine from power supply by removing the plug from the wall-outlet.

D é b r a n c h e z t o u j o u r s . L a machine de l’alimentation électrique en retirant la fiche de la prise murale.

Siempre desconecte la máquina de la fuente de alimentación r e t i r a n d o e l e n c h u f e d e l tomacorriente de la pared.

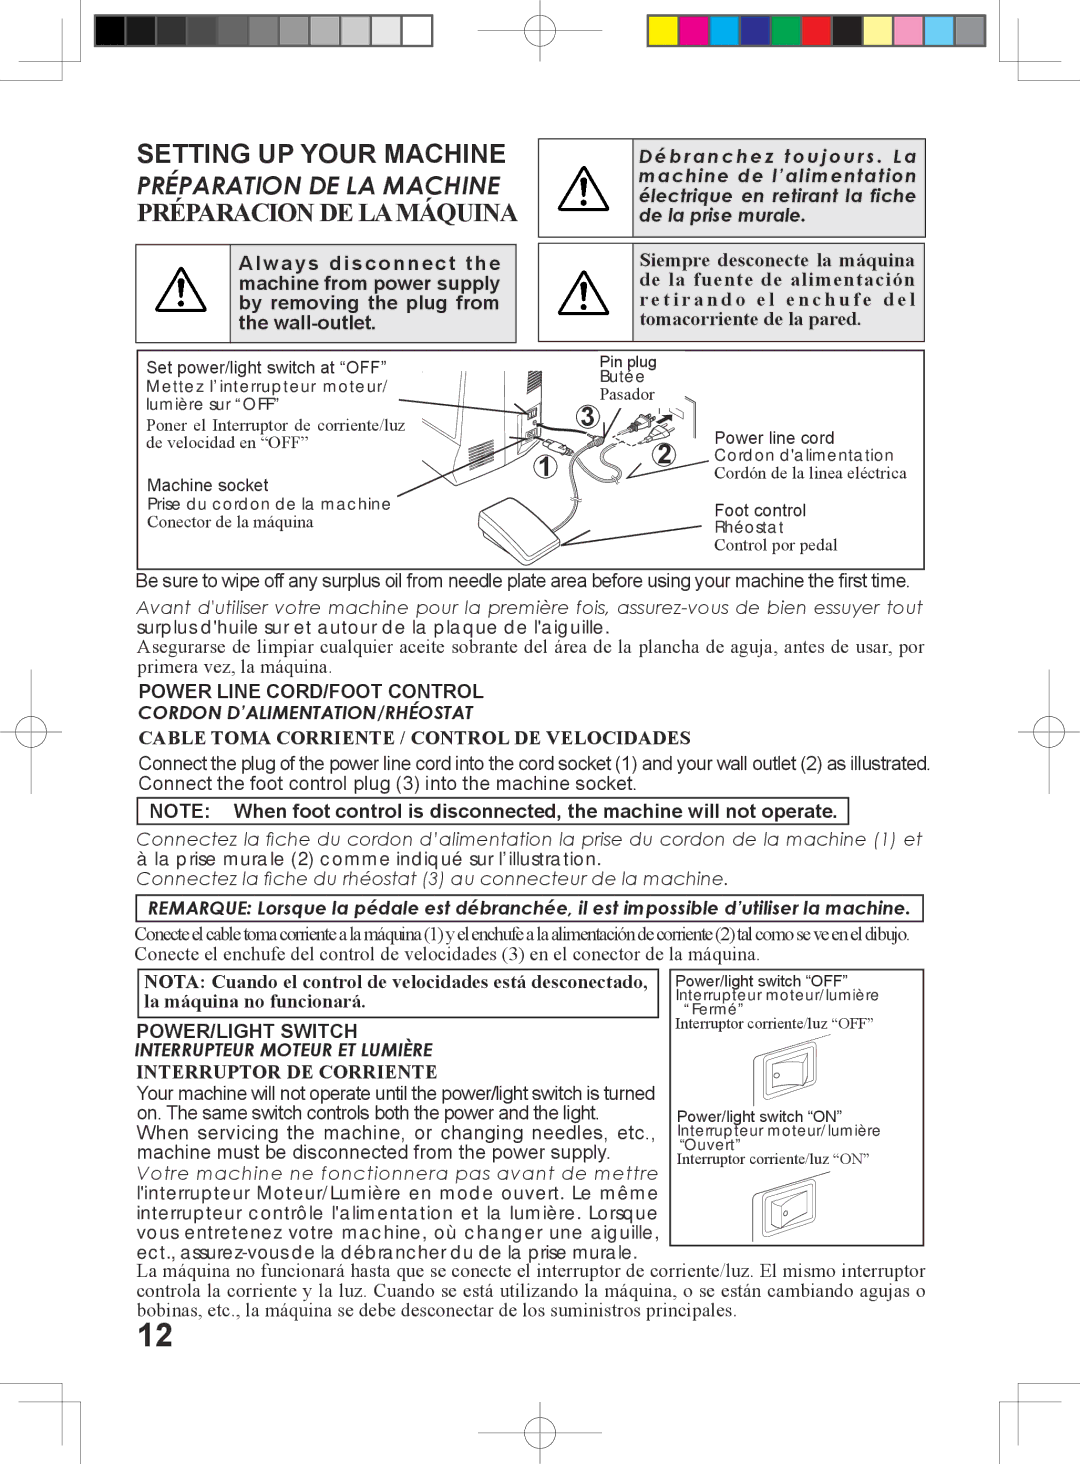
Set power/light switch at “OFF”

Mettez l’interrupteur moteur/ lumière sur “OFF”

Poner el Interruptor de corriente/luz de velocidad en “OFF”

machine socket

Prise du cordon de la machine

Conector de la máquina

Pin plug

Butée


3 Pasador

Power line cord


2

1

Cordon d'alimentation


Cordón de la linea eléctrica

Foot control

Rhéostat

Control por pedal

Be sure to wipe off any surplus oil from needle plate area before using your machine the first time.

Avant d'utiliser votre machine pour la première fois, assurez-vous de bien essuyer tout surplus d'huile sur et autour de la plaque de l'aiguille.

Asegurarse de limpiar cualquier aceite sobrante del área de la plancha de aguja, antes de usar, por primera vez, la máquina.

Power line cord/FOOT CONTROL

CORDON D’ALIMENTATION/RHÉOSTAT

CABLE TOMA CORRIENTE / CONTROL DE VELOCIDADES

Connect the plug of the power line cord into the cord socket (1) and your wall outlet (2) as illustrated. Connect the foot control plug (3) into the machine socket.

NOTE: When foot control is disconnected, the machine will not operate.

Connectez la fiche du cordon d’alimentation la prise du cordon de la machine (1) et à la prise murale (2) comme indiqué sur l’illustration.

Connectez la fiche du rhéostat (3) au connecteur de la machine.

REMARQUE: Lorsque la pédale est débranchée, il est impossible d’utiliser la machine.

Conecteelcabletomacorrientealamáquina(1)yelenchufealaalimentacióndecorriente(2)talcomoseveeneldibujo. Conecte el enchufe del control de velocidades (3) en el conector de la máquina.

NOTA: Cuando el control de velocidades está desconectado, la máquina no funcionará.

POWER/LIGHT SWITCH

INTERRUPTEUR MOTEUR ET LUMIÈRE

INTERRUPTOR DE CORRIENTE

Your machine will not operate until the power/light switch is turned

on. The same switch controls both the power and the light. When servicing the machine, or changing needles, etc., machine must be disconnected from the power supply.

Votre machine ne fonctionnera pas avant de mettre l'interrupteur Moteur/Lumière en mode ouvert. Le même

interrupteur contrôle l'alimentation et la lumière. Lorsque vous entretenez votre machine, où changer une aiguille,

ect., assurez-vous de la débrancher du de la prise murale.

La máquina no funcionará hasta que se conecte el interruptor de corriente/luz. El mismo interruptor controla la corriente y la luz. Cuando se está utilizando la máquina, o se están cambiando agujas o bobinas, etc., la máquina se debe desconectar de los suministros principales.

12

Page 14
Image 14
Singer 6199, 6180, 6160, 5500 instruction manual Setting UP Your Machine, Préparation DE LA Machine Préparacion DE Lamáquina

5500, 6199, 6160, 6180 specifications

Singer is a renowned name in the world of sewing machines, consistently pushing the envelope to deliver innovative products that cater to both novice and experienced sewists. Among their extensive range of machines, the Singer 6199, 5500, 6180, and 6160 models stand out due to their robust features, advanced technologies, and user-friendly characteristics.

The Singer 6199 is known for its versatility. This machine offers a wide variety of stitch options, including utility, decorative, and stretch stitches, making it suitable for various projects, from garment construction to home décor. Its automatic needle threader simplifies setup, allowing users to focus more on their creativity. The adjustable stitch length and width give the user complete control, enhancing the sewing experience.

Moving on to the Singer 5500, this model is designed with practicality in mind. Its heavy-duty construction ensures stability while sewing through thick fabrics, making it ideal for quilters and those working with denim. The one-step buttonhole feature simplifies the process of creating professional-looking buttonholes, while the built-in stitch guide allows beginners to easily choose the right stitch for their fabric. This machine also boasts a powerful motor, ensuring consistent performance even when working with challenging materials.

The Singer 6180 incorporates a wealth of advanced features that further enhance its usability. With a digital LCD screen, sewists can easily select and view stitch patterns, facilitating a seamless sewing experience. The included walk foot and quilting accessory pack make this machine a favorite among quilting enthusiasts. This model also supports sewing fonts, enabling users to personalize their creations with custom text—a valuable addition for creating unique gifts or home items.

Lastly, the Singer 6160 combines elegance with functionality. Its sleek design is complemented by a host of features, including an automatic tension adjustment system that guarantees consistent results regardless of fabric thickness. The high-speed sewing capability allows for efficient project completion, while the multiple needle positions cater to various stitching techniques. Additionally, the drop-in bobbin system simplifies threading and maintenance, making it user-friendly for those new to sewing.

In conclusion, the Singer 6199, 5500, 6180, and 6160 models exemplify the perfect blend of technology, versatility, and user-centric design. These machines are equipped to handle an array of sewing tasks, ensuring that both beginners and experienced sewists can achieve their creative visions with ease. As technology continues to evolve, Singer remains committed to providing solutions that inspire and empower crafters around the world.